
Introduction
Welcome to your new favorite weeknight dinner solution. If you have been searching for an easy chicken recipe that delivers a satisfying crunch without the hassle of a complicated breading station, you have found the perfect guide.
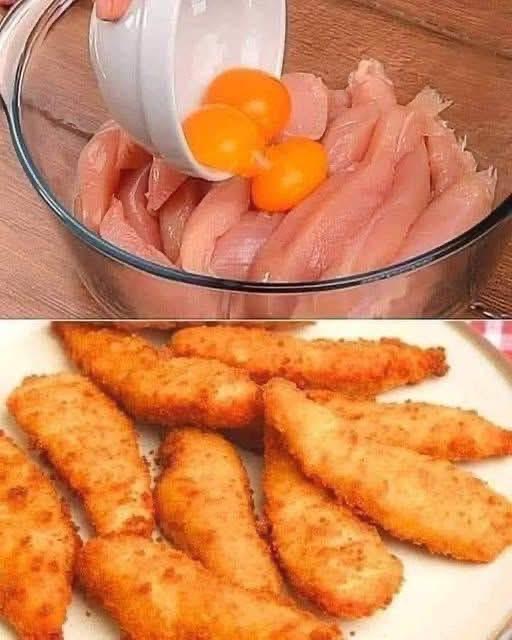
These crispy fried chicken tenders are tender and juicy on the inside with a golden, crunchy coating on the outside. The chicken is seasoned before being coated in a simple mixture of flour and cornstarch, creating that irresistible crispy texture everyone loves.
Whether you are looking for quick dinner ideas for the family, a high-protein meal prep option, or homemade chicken strips for game day, these crispy tenders are an easy and delicious choice.
Recipe Overview
| Feature | Details |
| Prep Time | 15 minutes |
| Cook Time | 20 minutes |
| Total Time | 35 minutes |
| Servings | 4 servings |
| Difficulty | Beginner |
| Course | Main Course |
| Cuisine | American-inspired |
| Dietary | High-Protein |
| Cooking Method | Pan-Fried |
Why You’ll Love This Recipe
You will love these crispy chicken tenders because they are incredibly easy to prepare while delivering the crunchy texture you normally associate with restaurant-style fried chicken.
The chicken is coated with a seasoned mixture that creates a golden crust while helping the meat remain juicy and flavorful inside. Cornstarch is especially useful for creating a lighter, crispier coating.
This recipe is also versatile enough for busy weeknights, family dinners, lunchboxes, or casual gatherings. Serve the chicken with your favorite dipping sauce, crispy fries, a fresh salad, or roasted vegetables for a complete meal.
Ingredients
Chicken and Wet Base
| Ingredient | Quantity | Notes |
| Boneless Skinless Chicken Breasts | 600 g (1.3 lbs) | Cut into strips |
| Large Egg Yolks | 3 | Helps the coating adhere |
| Dijon Mustard | 1 tablespoon | Adds tangy flavor |
| Garlic Powder | 1 teaspoon | Adds savory flavor |
| Salt | 1 teaspoon | Adjust to taste |
| Black Pepper | ½ teaspoon | Freshly ground preferred |
Crispy Coating
| Ingredient | Quantity | Notes |
| All-Purpose Flour | 1 cup (125 g) | Main coating |
| Cornstarch | ½ cup (60 g) | Creates extra crispiness |
| Paprika | 1 teaspoon | Adds color and flavor |
| Garlic Powder | 1 teaspoon | Savory seasoning |
| Onion Powder | 1 teaspoon | Adds depth |
| Salt | 1 teaspoon | Adjust to taste |
| Black Pepper | ½ teaspoon | Freshly ground |
| Cayenne Pepper | ¼ teaspoon | Optional for heat |
For Frying
| Ingredient | Quantity | Notes |
| Neutral Frying Oil | About 500–750 ml | Use enough for shallow frying |
Canola, sunflower, vegetable, or peanut oil can be used, depending on your preference and dietary needs.
Step-by-Step Instructions
1. Prepare the Chicken
Pat the chicken breasts dry with paper towels.
Slice the chicken into strips of approximately equal thickness. Keeping the pieces similar in size helps them cook more evenly.
If some pieces are particularly thick, gently flatten them so they are approximately the same thickness as the other strips.
2. Make the Wet Seasoning
Place the chicken strips in a large bowl.
Add the egg yolks, Dijon mustard, garlic powder, salt, and black pepper.
Using clean hands or tongs, toss everything together until every piece of chicken is evenly coated.
Allow the chicken to rest for approximately 5–10 minutes while you prepare the dry coating.
3. Prepare the Crispy Coating
In a separate shallow bowl, combine the flour, cornstarch, paprika, garlic powder, onion powder, salt, black pepper, and cayenne pepper if using.
Whisk until the seasonings are evenly distributed.
4. Coat the Chicken
Take one chicken strip at a time and place it into the seasoned flour mixture.
Press the flour mixture firmly onto the chicken so that it adheres well.
Turn the strip over and coat the other side.
For an extra-crispy crust, dip the coated chicken back into the wet mixture and then into the flour mixture a second time.
Shake off any loose excess coating and place the prepared chicken on a clean plate or wire rack.
5. Heat the Oil
Pour the oil into a large, heavy-bottomed skillet.
Heat over medium to medium-high heat until the oil reaches approximately 175°C (350°F).
If you do not have a thermometer, drop a tiny amount of flour into the oil. It should immediately sizzle without burning.
Avoid overheating the oil. Excessively hot oil can brown the coating before the chicken has cooked through.
6. Fry the Chicken Tenders
Carefully place several chicken strips into the hot oil, leaving enough space between them.
Do not overcrowd the pan because this can lower the oil temperature and result in a less crispy coating.
Fry for approximately 3–5 minutes per side, depending on the thickness of the chicken.
The coating should become deep golden brown and crispy.
7. Check the Chicken
Chicken should be cooked to a safe internal temperature of 74°C (165°F) in the thickest part.
Use an instant-read thermometer to check the temperature whenever possible.
Because chicken strips vary in size, cooking time can vary slightly.
8. Drain the Chicken
Transfer the cooked chicken tenders to a wire rack set over a baking sheet or a paper towel-lined plate.
A wire rack is preferable because it allows excess oil to drain away while keeping the underside of the chicken crisp.
Let the tenders rest for a few minutes before serving.
9. Serve
Serve the chicken tenders hot with your favorite dipping sauces.
Ranch dressing, honey mustard, barbecue sauce, buffalo sauce, garlic aioli, or spicy mayonnaise all pair beautifully with crispy chicken strips.
Best Tips
Pat the chicken dry before seasoning. Excess moisture can make it harder for the coating to adhere.
Keep the chicken pieces similar in size so they cook at approximately the same rate.
Press the flour mixture firmly onto the chicken rather than simply rolling it through the flour. This helps create a thicker, crunchier crust.
Do not overcrowd the skillet. Frying in batches gives the chicken enough space to brown properly.
Maintain the oil temperature around 175°C (350°F). If the oil becomes too cool, the chicken may absorb excess oil. If it becomes too hot, the coating can burn before the chicken is fully cooked.
For maximum crispiness, place the cooked tenders on a wire rack rather than stacking them directly on top of each other.
Always check the internal temperature of the chicken to ensure it reaches 74°C (165°F).
Best Ingredient Options
Chicken Breast
Boneless, skinless chicken breasts are ideal for classic chicken tenders because they are lean and easy to slice.
Chicken tenderloins can also be used and require less preparation.
Cornstarch
Cornstarch helps create a light and crispy exterior. If you do not have it, you can replace it with additional flour, although the crust may be slightly less crisp.
Paprika
Regular paprika provides mild flavor and a beautiful golden color. Smoked paprika can be used when you want a subtle smoky taste.
Oil
Use a neutral oil with a high enough smoke point for frying, such as sunflower, canola, or vegetable oil.
Recipe Variations
Spicy Chicken Tenders
Increase the cayenne pepper or add chili powder and a pinch of crushed red pepper flakes to the coating.
Garlic Parmesan Chicken Tenders
Add finely grated Parmesan cheese and extra garlic powder to the finished tenders immediately after frying.
Buttermilk Chicken Tenders
Replace the egg-yolk mixture with seasoned buttermilk and marinate the chicken for several hours before coating and frying.
Southern-Style Chicken Strips
Add paprika, onion powder, garlic powder, black pepper, and a small amount of cayenne pepper to the flour mixture for a classic Southern-inspired flavor.
Extra-Crispy Double-Coated Tenders
For an especially thick crust, coat each chicken strip twice. Dip it into the seasoned wet mixture, then flour, back into the wet mixture, and finally into the flour again.
What to Serve With
These crispy chicken tenders pair perfectly with classic sides such as French fries, sweet potato fries, coleslaw, potato wedges, or a simple green salad.
For a lighter meal, serve them with steamed vegetables, roasted broccoli, cucumber salad, or a fresh tomato salad.
For dipping, try honey mustard, barbecue sauce, ranch dressing, buffalo sauce, ketchup, garlic aioli, or a spicy mayonnaise.
Make-Ahead Instructions
You can prepare the seasoned chicken and coating shortly before cooking.
For best results, avoid coating the chicken too far in advance because moisture from the wet mixture can gradually soften the flour coating.
If you need to prepare the chicken ahead of time, keep the cooked tenders refrigerated and reheat them in the oven or air fryer before serving.
Storage
Allow leftover chicken tenders to cool before placing them in an airtight container.
Refrigerate for up to 3–4 days.
For best texture, do not seal the chicken while it is still very hot because trapped steam can soften the crispy coating.
Reheating
For the crispiest results, reheat the chicken tenders in an air fryer at 190°C (375°F) for approximately 4–7 minutes, depending on thickness.
You can also reheat them in a preheated oven at 200°C (400°F) for approximately 8–12 minutes.
Avoid microwaving when possible because the coating can become soft rather than crispy.
Make sure leftovers are heated thoroughly before serving.
Freezing
Cooked chicken tenders can be frozen for convenient future meals.
Allow them to cool completely, then arrange them in a single layer on a baking sheet and freeze until firm.
Transfer them to a freezer-safe container or bag, separating layers with parchment paper if necessary.
For best quality, use within approximately 2–3 months.
Reheat directly from frozen in an air fryer or oven until hot and crisp throughout.
Common Mistakes to Avoid
Overcrowding the pan: Too many chicken strips at once can dramatically lower the oil temperature and produce greasy chicken.
Using excessively hot oil: Very hot oil can burn the coating before the chicken is cooked.
Skipping the cornstarch: While optional, cornstarch contributes significantly to the light, crispy texture.
Not pressing on the coating: Gently pressing the flour mixture onto the chicken helps it adhere and creates a more substantial crust.
Cutting the chicken too thick: Very thick strips can brown on the outside before the center reaches a safe temperature.
Stacking hot tenders: Steam trapped between stacked pieces can soften the crispy coating.
Guessing when the chicken is done: Color alone is not a reliable indicator. The thickest portion should reach 74°C (165°F).
Nutrition Estimate
The following nutrition information is an approximate estimate per serving and can vary depending on how much coating and frying oil the chicken absorbs.
| Nutrient | Approximate Amount per Serving |
| Calories | 450–550 kcal |
| Protein | 45–50 g |
| Carbohydrates | 30–40 g |
| Fat | 18–25 g |
| Saturated Fat | 3–5 g |
| Fiber | 1–2 g |
| Sugar | 1–3 g |
| Sodium | 700–1,000 mg |
Frequently Asked Questions
How do I make chicken tenders extra crispy?
Using a combination of flour and cornstarch helps create a crispier coating. Keeping the frying oil at approximately 175°C (350°F) and avoiding overcrowding the pan are also important.
Can I use chicken tenderloins instead of chicken breast?
Yes. Chicken tenderloins are an excellent option and can be used without slicing if they are already the appropriate size.
Can I make these chicken tenders without deep frying?
Yes. You can cook them in an air fryer or oven, although the exact texture will differ from traditional fried chicken.
For an air fryer, lightly spray the coated chicken with oil and cook at approximately 200°C (400°F) until golden and the internal temperature reaches 74°C (165°F).
Why isn’t my chicken crispy?
The most common reasons are oil that is not hot enough, overcrowding the pan, insufficient coating, or placing the cooked chicken directly on a flat surface where steam becomes trapped.
Can I prepare these chicken tenders in advance?
Yes. Cooked tenders can be refrigerated for several days and reheated in an oven or air fryer. For the best texture, freshly fried chicken is recommended.
What temperature should chicken tenders reach?
The thickest portion of the chicken should reach 74°C (165°F) for food safety.
Can I make the coating spicy?
Absolutely. Add cayenne pepper, chili powder, smoked paprika, or crushed red pepper flakes according to your preferred heat level.
What dipping sauces go best with chicken tenders?
Honey mustard, barbecue sauce, ranch, buffalo sauce, garlic aioli, ketchup, and spicy mayonnaise are all excellent choices.
Conclusion
These crispy fried chicken tenders are an easy homemade alternative to fast-food chicken strips, combining juicy chicken with a beautifully golden and crunchy coating.
With simple pantry ingredients, straightforward preparation, and about 35 minutes from start to finish, they are perfect for busy weeknight dinners, family meals, game-day snacks, or casual entertaining.
Serve them hot with your favorite dipping sauce and a side of fries, salad, or vegetables for a satisfying homemade meal that the whole family will love.