
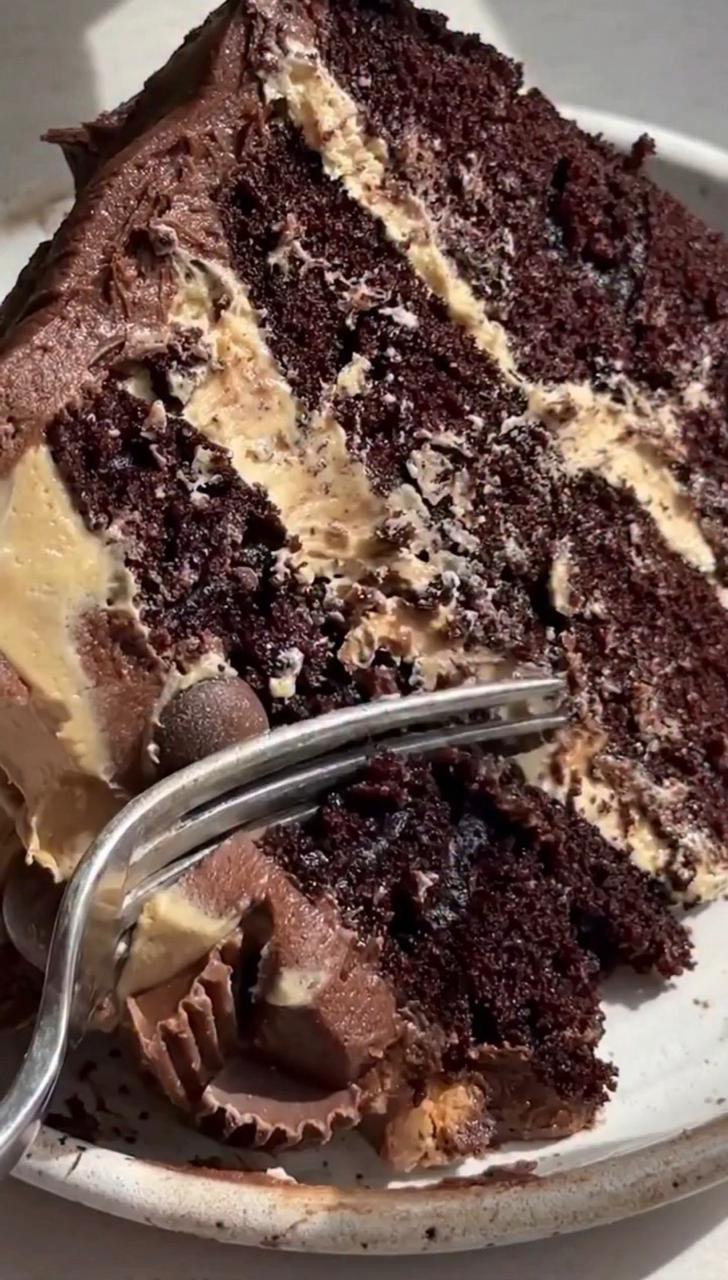
This Chocolate Peanut Butter Cake is an indulgent, bakery-style dessert made with three layers of deeply chocolatey, moist cake, fluffy peanut butter filling, and rich chocolate frosting.
The combination of dark chocolate cake and creamy peanut butter creates an irresistible contrast of flavors and textures. Finished with chopped mini peanut butter cups, this impressive layer cake is perfect for birthdays, holidays, celebrations, or an unforgettable weekend baking project.
Recipe Overview
| Detail | Specification |
| Prep Time | 30 minutes |
| Cook Time | 30–35 minutes |
| Cooling & Assembly | 1–2 hours |
| Total Time | Approximately 2½–3 hours |
| Yield | One 3-layer, 8-inch cake |
| Course | Dessert |
| Cuisine | American |
| Difficulty | Intermediate |
| Dietary Focus | Vegetarian |
Why You’ll Love This Recipe
Every forkful delivers moist chocolate cake, creamy peanut butter buttercream, and rich chocolate frosting in one decadent bite.
The boiling water added to the chocolate batter creates an exceptionally soft and moist crumb without requiring complicated baking techniques.
The peanut butter filling is thick enough to create beautiful, defined layers while remaining smooth and fluffy.
A generous coating of chocolate frosting gives the cake a luxurious finish, while mini peanut butter cups provide the perfect final garnish.
Ingredients
Chocolate Cake
| Ingredient | Amount |
| Granulated sugar | 2 cups (400 g) |
| All-purpose flour | 1¾ cups (220 g) |
| Unsweetened cocoa powder | ¾ cup (65–75 g) |
| Baking powder | 1½ teaspoons |
| Baking soda | 1½ teaspoons |
| Salt | 1 teaspoon |
| Large eggs | 2 |
| Whole milk | 1 cup (240 ml) |
| Vegetable oil | ½ cup (120 ml) |
| Vanilla extract | 2 teaspoons |
| Boiling water | 1 cup (240 ml) |
Peanut Butter Filling
| Ingredient | Amount |
| Unsalted butter, softened | 1 cup (227 g) |
| Creamy peanut butter | 1 cup (250 g) |
| Powdered sugar | 3 cups (360 g) |
| Heavy whipping cream | ¼ cup (60 ml) |
| Vanilla extract | 1 teaspoon |
Chocolate Frosting
| Ingredient | Amount |
| Unsalted butter, softened | 1 cup (227 g) |
| Unsweetened cocoa powder | ½ cup (43–45 g) |
| Powdered sugar | 3½ cups (420 g) |
| Heavy whipping cream | ¼ cup (60 ml) |
| Vanilla extract | 1 teaspoon |
| Mini peanut butter cups | As needed for garnish |
Step-by-Step Instructions
1. Prepare the Cake Pans
Preheat your oven to 350°F (175°C).
Grease three 8-inch round cake pans. Line the bottoms with parchment paper and lightly grease the parchment.
This makes the finished cake layers much easier to remove.
2. Combine the Dry Ingredients
In a large mixing bowl, whisk together the sugar, flour, cocoa powder, baking powder, baking soda, and salt.
Make sure the cocoa powder is evenly distributed throughout the flour mixture.
3. Add the Wet Ingredients
Add the eggs, whole milk, vegetable oil, and vanilla extract.
Beat on medium speed for approximately 2 minutes, scraping down the sides of the bowl if necessary.
4. Add the Boiling Water
Slowly pour in the boiling water while mixing carefully on low speed.
The batter will become very thin. This is completely normal.
The hot water helps hydrate the cocoa powder and contributes to the cake’s exceptionally moist texture.
5. Bake
Divide the batter evenly among the three prepared pans.
Bake for approximately 30–35 minutes, or until a toothpick inserted into the center comes out clean or with a few moist crumbs.
Allow the cakes to cool in their pans for about 10 minutes before transferring them to wire racks.
Cool completely before assembling.
6. Make the Peanut Butter Filling
Place the softened butter and creamy peanut butter in a large bowl.
Beat until smooth and creamy.
Gradually add the powdered sugar, followed by the heavy cream and vanilla extract.
Beat on medium-high speed for several minutes until the filling becomes light, fluffy, and spreadable.
7. Prepare the Chocolate Frosting
In a separate bowl, beat the softened butter and cocoa powder until smooth.
Gradually add the powdered sugar.
Add the heavy cream and vanilla extract, then continue beating until the frosting is smooth and creamy.
If the frosting is too thick, add another teaspoon of cream at a time.
If it is too soft, add a little more powdered sugar.
8. Assemble the Cake
Place the first completely cooled cake layer on a cake stand or serving plate.
Spread approximately half of the peanut butter filling evenly across the top.
Place the second cake layer on top and gently press it into position.
Spread the remaining peanut butter filling over the second layer.
Finish with the third cake layer.
9. Frost the Cake
Spread a thin layer of chocolate frosting over the entire cake to create a crumb coat.
Refrigerate for approximately 15–20 minutes to firm it up.
Apply the remaining chocolate frosting generously over the top and sides of the cake.
Use an offset spatula or cake scraper to create a smooth bakery-style finish.
10. Garnish
Decorate the top and sides with chopped mini peanut butter cups.
For an especially indulgent presentation, arrange several whole mini peanut butter cups around the top edge of the cake.
Allow the finished cake to rest in the refrigerator for approximately 20–30 minutes before slicing.
Best Tips
Use room-temperature ingredients. Softened butter and room-temperature eggs and milk help create a smoother batter and frosting.
Don’t worry about the thin batter. The chocolate cake batter is intentionally loose after adding the boiling water.
Cool the cake completely. Frosting a warm cake can cause the peanut butter filling and chocolate frosting to melt.
Level the layers if necessary. If the cakes develop domed tops, carefully trim them with a serrated knife for a perfectly stacked cake.
Don’t overmix after adding the flour. Mix just until the ingredients are incorporated, except where the recipe specifically calls for longer beating.
Use creamy peanut butter. A conventional creamy peanut butter generally produces the smoothest filling.
Best Ingredient Options
Cocoa Powder
Use high-quality unsweetened cocoa powder for a deeper chocolate flavor.
Dutch-process cocoa can work in some chocolate cake recipes, but because this recipe relies on baking soda and baking powder for leavening, standard unsweetened cocoa is the safest choice unless you adjust the formula.
Peanut Butter
Creamy conventional peanut butter works best for the filling. Natural peanut butter can separate and may produce a less stable frosting unless thoroughly mixed.
Chocolate Frosting
For an even richer flavor, replace a portion of the cocoa powder with melted and cooled semisweet chocolate.
Garnish
Mini peanut butter cups are the classic choice, but chopped roasted peanuts, chocolate curls, or mini chocolate chips also make attractive toppings.
Recipe Variations
Extra Chocolate Version
Add ½ cup of mini chocolate chips to the cake batter for little pockets of melted chocolate throughout the layers.
Peanut Butter Chocolate Drip Cake
Prepare a simple chocolate ganache and drizzle it around the top edge after frosting the cake.
Crunchy Peanut Butter Cake
Add ½ cup of finely chopped roasted peanuts to the peanut butter filling.
Smaller Cake
For a smaller celebration cake, reduce the recipe proportionally and use two 8-inch layers rather than three.
Chocolate Peanut Butter Cupcake Version
The same flavor combination can be transformed into cupcakes, topped with peanut butter frosting and a mini peanut butter cup.
What to Serve With
Serve slices of this rich chocolate cake with a cold glass of milk for a classic combination.
For an elegant dessert presentation, add a scoop of vanilla ice cream and a drizzle of warm chocolate sauce.
Fresh strawberries or raspberries also provide a pleasant tart contrast to the rich chocolate and peanut butter flavors.
For special occasions, serve small slices with freshly brewed coffee or espresso.
Make-Ahead Instructions
The chocolate cake layers can be baked 1 day ahead.
Once completely cooled, wrap each layer tightly in plastic wrap and store at room temperature for up to 24 hours, or refrigerate if preparing further in advance.
The peanut butter filling and chocolate frosting can also be prepared ahead and refrigerated in airtight containers.
Before assembling, allow the frosting and filling to soften at room temperature and beat briefly until spreadable again.
Storage
Because the cake contains butter-based fillings and frosting, store it in an airtight cake container.
At room temperature, it can generally be kept for about 1 day in a cool environment.
For longer storage, refrigerate the cake for approximately 4–5 days.
For the best texture, allow refrigerated slices to sit at room temperature for about 20–30 minutes before serving.
Reheating
This cake does not require reheating.
If you prefer a softer texture, simply allow an individual slice to come to room temperature before eating.
Avoid microwaving the fully frosted cake because the peanut butter filling and chocolate frosting can melt unevenly.
Freezing
This cake freezes well when properly wrapped.
For best results, freeze individual slices or unfrosted cake layers.
Wrap tightly in plastic wrap followed by aluminum foil and freeze for up to 2–3 months for best quality.
Thaw overnight in the refrigerator, then allow the cake to sit at room temperature before serving.
Common Mistakes to Avoid
Frosting warm cake layers: This can cause the frosting to melt and the layers to slide.
Using cold butter: Cold butter won’t whip into a light and fluffy filling.
Adding powdered sugar too quickly: Add it gradually to avoid a lumpy frosting and a cloud of powdered sugar.
Skipping the crumb coat: A thin first layer of frosting helps prevent chocolate crumbs from appearing in the final finish.
Overfilling the layers: Too much peanut butter filling can cause the cake layers to slide apart.
Cutting immediately: Allowing the assembled cake to chill briefly helps the layers and frosting firm up.
Nutrition Estimate
| Nutrient | Approx. Per Serving* |
| Calories | 780 kcal |
| Total Fat | 43 g |
| Saturated Fat | 18 g |
| Cholesterol | 85 mg |
| Sodium | 450 mg |
| Total Carbohydrates | 96 g |
| Dietary Fiber | 6 g |
| Sugars | 72 g |
| Protein | 12 g |
*Approximate values based on 12 servings and will vary depending on the specific brands and amount of garnish used.
Frequently Asked Questions
Can I make this cake the day before?
Yes. In fact, making the cake one day ahead can make assembly easier. Keep the finished cake refrigerated in an airtight container and bring it toward room temperature before serving.
Why is my chocolate cake batter so thin?
The boiling water makes the batter considerably thinner than traditional cake batter. This is intentional and helps create a moist, tender chocolate crumb.
Can I use natural peanut butter?
It’s possible, but conventional creamy peanut butter is recommended because its more stable consistency produces a smoother filling.
How do I keep the cake layers from sliding?
Don’t spread the peanut butter filling too close to the edges. Leave a small border around each layer, then chill the stacked cake briefly before applying the final frosting.
Can I use store-bought frosting?
Yes, if you’re short on time. However, homemade chocolate frosting provides a fresher flavor and allows you to control the sweetness and consistency.
How should I slice this cake?
Use a long, sharp serrated knife. Wipe the blade clean between cuts for neat, bakery-style slices that clearly show the chocolate and peanut butter layers.
Can I make the cake without the peanut butter cups?
Absolutely. The cake is still delicious without the garnish. You can replace them with chopped peanuts, chocolate shavings, or a simple chocolate drizzle.
Final Thoughts
This Chocolate Peanut Butter Cake is the ultimate dessert for anyone who loves the classic combination of chocolate and peanut butter.
Three layers of moist chocolate cake are sandwiched with fluffy peanut butter filling, covered in rich chocolate frosting, and finished with mini peanut butter cups for an irresistible bakery-style presentation.
Whether you’re celebrating a birthday, holiday, anniversary, or simply craving an indulgent homemade dessert, this cake is guaranteed to make an impressive centerpiece.
⚠️ This recipe may not be suitable for everyone, especially those with peanut, dairy, egg, or gluten allergies. Please check all ingredients carefully and consult a doctor or qualified healthcare professional if you have specific dietary concerns.