
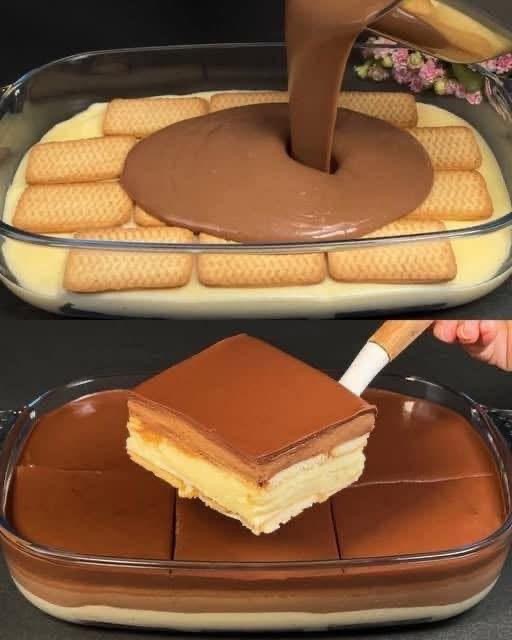
This No-Bake Vanilla and Chocolate Biscuit Cake is a simple, creamy dessert made with layers of crisp tea biscuits, silky vanilla custard, and rich chocolate pudding.
The biscuits soften as they chill, creating a tender, cake-like texture without turning on the oven. It is an easy no-bake dessert recipe that is perfect for family gatherings, holidays, birthdays, or whenever you want an impressive homemade dessert with minimal effort.
With inexpensive pantry ingredients and no complicated baking techniques, this creamy biscuit cake is an excellent make-ahead dessert.
Recipe Overview
| Category | Details |
| Recipe | No-Bake Vanilla and Chocolate Biscuit Cake |
| Prep Time | 20 minutes |
| Cook Time | 15 minutes |
| Chilling Time | 4–6 hours |
| Total Time | About 5 hours |
| Servings | 8–10 |
| Difficulty | Easy |
| Method | No-Bake |
| Cuisine | European-inspired |
Why You’ll Love This Recipe
This dessert requires no oven, making it especially convenient during warm weather or when you want a quick homemade treat.
The combination of creamy vanilla custard, chocolate pudding, and softened biscuits creates a delicious contrast of flavors and textures in every bite.
It is also an affordable dessert because it uses simple ingredients such as milk, sugar, cornstarch, cocoa powder, flour, butter, and tea biscuits.
Most importantly, you can prepare it several hours ahead of time. The longer it chills, the softer and more cake-like the biscuits become.
Ingredients
For the Vanilla Custard
| Ingredient | Amount |
| Whole milk | 2 cups |
| Granulated sugar | 1/3 cup |
| Cornstarch | 2 tablespoons |
| All-purpose flour | 2 tablespoons |
| Unsalted butter | 1 tablespoon |
| Vanilla extract | 1 teaspoon |
For the Chocolate Pudding
| Ingredient | Amount |
| Whole milk | 2 cups |
| Granulated sugar | 1/3 cup |
| Cornstarch | 2 tablespoons |
| Unsweetened cocoa powder | 2 tablespoons |
| Unsalted butter | 1 tablespoon |
For the Biscuit Layers
| Ingredient | Amount |
| Plain rectangular tea biscuits | 2 packs |
Petit Beurre, Maria biscuits, or similar plain tea biscuits work particularly well.
Step-by-Step Instructions
1. Prepare the Vanilla Custard
Pour 2 cups of whole milk into a medium saucepan.
Add the sugar, cornstarch, and all-purpose flour. Whisk thoroughly while the ingredients are still cold to remove any lumps.
Place the saucepan over medium heat.
Cook while whisking constantly. Continue cooking until the mixture becomes noticeably thick and begins to gently bubble.
This usually takes about 5–7 minutes.
Remove the saucepan from the heat and immediately stir in 1 tablespoon of butter and the vanilla extract.
Whisk until the butter has completely melted and the custard is smooth and glossy.
2. Build the First Biscuit Layer
Choose a rectangular glass baking dish, approximately 8 × 8 inches or a similar size.
Arrange the tea biscuits tightly across the bottom of the dish.
Break a few biscuits if necessary to fill small gaps. The goal is to create an even, almost completely covered base.
3. Add the Vanilla Layer
While the vanilla custard is still warm, carefully pour it over the biscuit layer.
Use a spatula to spread the custard evenly from edge to edge.
Make sure the custard reaches the sides of the dish so every bite has a creamy filling.
4. Add the Second Biscuit Layer
Immediately arrange another layer of biscuits over the warm vanilla custard.
Place them gently so they do not sink too deeply into the custard.
Press very lightly if necessary to create an even surface.
5. Prepare the Chocolate Pudding
In a clean saucepan, combine the remaining 2 cups of milk, sugar, cornstarch, and unsweetened cocoa powder.
Whisk everything together while the milk is still cold.
Place the saucepan over medium heat.
Cook, whisking continuously, until the chocolate mixture thickens and begins to bubble gently.
This should take approximately 5–7 minutes.
Remove from the heat and stir in the remaining tablespoon of butter.
Whisk until smooth, shiny, and completely combined.
6. Add the Chocolate Topping
Pour the warm chocolate pudding over the second biscuit layer.
Spread it carefully with a spatula to create a smooth, even chocolate surface.
For a cleaner appearance, gently tap the baking dish against the countertop a few times to help remove large air bubbles.
7. Chill the Cake
Allow the dessert to cool at room temperature for about 20–30 minutes.
Cover the dish with plastic wrap or a suitable lid.
Refrigerate for at least 4–6 hours.
For the best texture, refrigerate it overnight.
The biscuits will absorb moisture from the custard and chocolate pudding, becoming soft and cake-like.
8. Slice and Serve
Once thoroughly chilled, cut the biscuit cake into squares or rectangles using a sharp knife.
For cleaner slices, wipe the knife between cuts.
Serve cold and enjoy.
Best Tips for Success
Whisk the cornstarch and flour into cold milk before heating. This helps prevent lumps from forming in the custard.
Keep whisking while the puddings cook. Custard can thicken quickly and may stick to the bottom of the saucepan if left unattended.
Do not allow the biscuits to soak in liquid before assembling the cake. They will soften naturally while the dessert chills.
For the best presentation, make sure each biscuit layer is arranged as evenly as possible.
Allow enough chilling time. Four hours is the minimum recommended time, but overnight refrigeration produces an even softer and more cohesive dessert.
Best Biscuit Options
Petit Beurre: A classic choice with a delicate buttery flavor and rectangular shape.
Maria biscuits: Slightly sweeter and excellent for layered no-bake desserts.
Graham crackers: They can be used for a slightly more caramel-like flavor and softer texture.
Tea biscuits: Plain tea biscuits are ideal because they allow the vanilla and chocolate layers to stand out.
Recipe Variations
Chocolate Biscuit Cake
For an even more chocolate-forward dessert, use chocolate biscuits instead of plain tea biscuits.
Coffee Biscuit Cake
Add 1 teaspoon of instant espresso powder to the chocolate pudding for a subtle coffee flavor.
Coconut Version
Sprinkle shredded coconut between the biscuit and custard layers or over the chocolate topping.
Chocolate Shavings
Once the chocolate layer has cooled slightly, decorate the top with grated chocolate or chocolate curls.
Nutty Version
Add a thin layer of finely chopped toasted hazelnuts or walnuts between the biscuit layers.
Extra Creamy Version
Serve each slice with a spoonful of lightly whipped cream for an extra-rich dessert.
What to Serve With It
This no-bake biscuit cake is delicious served on its own, but you can also pair it with:
- Fresh strawberries or raspberries
- Whipped cream
- Vanilla ice cream
- Fresh berries
- Chocolate shavings
- Chopped toasted nuts
- A cup of coffee
- Hot tea
The slightly bitter flavor of coffee or tea works particularly well with the sweet vanilla and chocolate layers.
Make-Ahead Instructions
This is an excellent make-ahead dessert.
Prepare the cake up to 24 hours before serving and keep it covered in the refrigerator.
In fact, making it the day before can improve the texture because the biscuits have more time to soften and absorb the creamy layers.
Storage
Store leftover biscuit cake covered in the refrigerator.
It is best consumed within 3–4 days for the best texture and flavor.
Always use a clean utensil when serving to help maintain freshness.
Reheating
This dessert should not be reheated.
It is designed to be served cold directly from the refrigerator.
If the dessert has been refrigerated for a long time and feels very firm, allow it to sit at room temperature for approximately 5–10 minutes before serving.
Freezing
Freezing is possible, although it may slightly change the texture of the custard after thawing.
If you want to freeze it, cover the dessert tightly with plastic wrap and then place it in an airtight freezer-safe container.
Freeze for up to 1 month.
Thaw overnight in the refrigerator before serving.
Common Mistakes to Avoid
Not Whisking the Custard
Failing to whisk continuously can cause lumps or allow the mixture to stick to the bottom of the pan.
Using Too Much Heat
High heat can cause the milk mixture to scorch. Medium heat provides better control and gives the cornstarch time to thicken the pudding properly.
Cutting It Too Soon
The dessert needs several hours in the refrigerator. Cutting it immediately after assembly will result in loose layers and crunchy biscuits.
Over-Soaking the Biscuits
The biscuits do not need to be dipped in milk. The custard and chocolate pudding will soften them naturally.
Skipping the Chill Time
Do not rush the refrigeration step. The chilling period is what transforms the separate ingredients into a cohesive, cake-like dessert.
Nutrition Estimate
The following values are approximate and will vary depending on the biscuits and exact ingredients used.
| Nutrient | Approximate Amount per Serving |
| Calories | 300–350 kcal |
| Carbohydrates | 45–50 g |
| Protein | 5–7 g |
| Fat | 10–13 g |
| Saturated Fat | 5–7 g |
| Sugar | 22–28 g |
| Fiber | 1–2 g |
| Sodium | 150–250 mg |
Frequently Asked Questions
Can I make this dessert the day before?
Yes. Making it the day before is actually recommended. Overnight refrigeration gives the biscuits plenty of time to soften and allows the layers to set properly.
Can I use Maria biscuits instead of Petit Beurre?
Absolutely. Maria biscuits are an excellent substitute and work beautifully in this recipe.
Can I use graham crackers?
Yes. Graham crackers can be used, although they will give the dessert a slightly different flavor and texture.
Why is my custard lumpy?
Lumps usually develop when cornstarch or flour is added to hot milk without being properly dissolved first. Always whisk the dry ingredients into cold milk before heating.
How long does the biscuit cake need to chill?
Refrigerate it for at least 4–6 hours. Overnight is even better for the softest, most cake-like biscuit texture.
Can I add whipped cream?
Yes. A layer of lightly sweetened whipped cream can be added between the biscuit and chocolate layers or served alongside each slice.
Can I make it without flour?
Yes. You can replace the 2 tablespoons of flour with additional cornstarch. The texture may be slightly different, so add the cornstarch gradually and cook until the desired thickness is reached.
Can I make this dessert less sweet?
Yes. You can slightly reduce the sugar, especially if you are using sweetened biscuits. Keep in mind that reducing the sugar too much may change the overall flavor balance.
Final Thoughts
This No-Bake Vanilla and Chocolate Biscuit Cake proves that an impressive homemade dessert does not need to be complicated.
With simple tea biscuits, creamy vanilla custard, and glossy chocolate pudding, every layer comes together to create a soft, rich, and satisfying treat.
Prepare it ahead of time, let it chill until perfectly set, and slice it just before serving for an easy dessert that is sure to disappear quickly.