
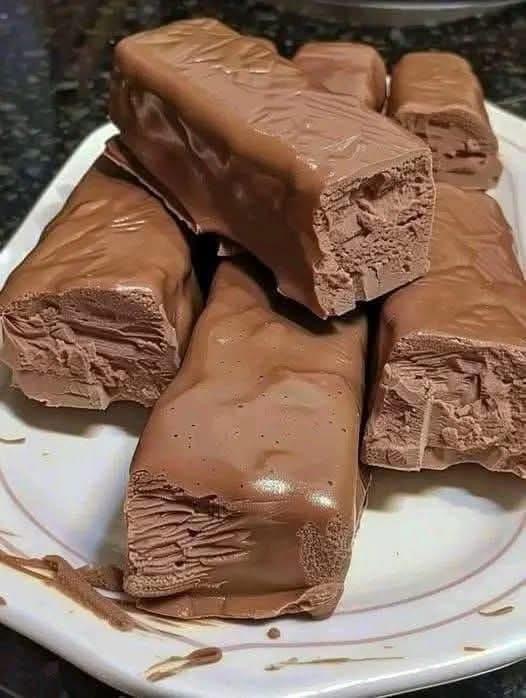
If you love the soft, airy center of classic chocolate nougat bars, these Homemade Whipped Chocolate Candy Bars are an incredibly easy treat to make at home.
They feature a fluffy chocolate center made with just two ingredients, surrounded by a smooth milk chocolate shell. The contrast between the light, creamy center and crisp chocolate coating makes these bars completely irresistible.
Best of all, this easy chocolate candy recipe requires no gelatin, no candy thermometer, and no complicated candy-making techniques.
Recipe Overview
| Prep Time | Cook Time | Freezing Time | Total Time | Yield |
| 20 minutes | 5 minutes | 2–3 hours | About 3½ hours | 8–10 bars |
Category: Dessert / Candy
Method: No-Bake
Difficulty: Easy
Why You’ll Love This Recipe
These homemade chocolate bars are incredibly simple to prepare and require only a few ingredients.
The whipped topping gives the chocolate center a light, airy texture that contrasts beautifully with the firm chocolate coating.
There is also no need for a candy thermometer or traditional nougat-making process, making this a beginner-friendly homemade candy recipe.
These bars are perfect for parties, holidays, lunchbox treats, dessert tables, or whenever you’re craving something chocolatey.
Ingredients
For the Fluffy Chocolate Center
| Ingredient | Quantity |
| Milk chocolate chips | 1 cup (about 170 g) |
| Whipped topping, fully thawed | 8 oz (about 225 g) |
For the Chocolate Coating
| Ingredient | Quantity |
| Milk chocolate chips | 2 cups (about 340 g) |
| Coconut oil | 1 tablespoon |
Step-by-Step Instructions
1. Prepare the Pan
Line an 8×8-inch square baking pan with parchment paper.
Leave some parchment hanging over the sides. This overhang will act as handles and make it much easier to remove the frozen chocolate center later.
2. Melt the Chocolate for the Center
Place 1 cup of milk chocolate chips in a microwave-safe bowl.
Microwave in 30-second intervals, stirring thoroughly after each interval.
Continue until the chocolate is completely melted and smooth.
Allow the melted chocolate to cool for approximately 5–10 minutes.
It should still be fluid but should no longer be hot.
3. Fold in the Whipped Topping
Add the completely thawed whipped topping to the cooled melted chocolate.
Using a rubber spatula, gently fold the mixture together.
Do not aggressively stir or beat it. Gentle folding helps maintain some of the light, airy texture.
Continue folding until the mixture is evenly combined and no large white streaks remain.
4. Freeze the Chocolate Center
Transfer the mixture to the prepared baking pan.
Spread it evenly and smooth the surface with a spatula.
Place the pan in the freezer for approximately 2–3 hours, or until the chocolate center is completely firm.
5. Cut Into Bars
Once firm, use the parchment paper to lift the frozen chocolate block from the pan.
Place it on a cutting board.
Using a sharp knife warmed briefly under hot water and then dried completely, cut the block into 8–10 rectangular bars.
Work fairly quickly so the frozen center remains firm.
6. Prepare the Chocolate Coating
Place the remaining 2 cups of milk chocolate chips in a microwave-safe bowl.
Add the coconut oil.
Microwave in 30-second intervals, stirring thoroughly between each interval.
Continue until the chocolate is smooth and completely melted.
If the chocolate becomes too thick, allow it to cool slightly and stir well rather than overheating it.
7. Coat the Bars
Working with one frozen bar at a time, carefully place it into the melted chocolate.
Use two forks to turn the bar and coat all sides.
Lift the bar out and gently tap the forks against the side of the bowl to allow excess chocolate to drip away.
Place the coated bar on a parchment- or wax-paper-lined baking sheet.
Repeat with the remaining bars.
8. Set the Chocolate Shell
The frozen bars should cause the chocolate coating to firm up quickly.
For a completely set shell, place the coated bars in the refrigerator for approximately 10–15 minutes.
Once the chocolate is firm, they are ready to serve.
Best Tips
Make sure the whipped topping is completely thawed before mixing it with the chocolate.
Allow the melted chocolate to cool slightly before adding the whipped topping. Chocolate that is too hot can cause the whipped topping to lose its fluffy texture.
Fold gently rather than vigorously stirring the mixture.
Freeze the center until it is genuinely firm before cutting and dipping.
Keep the bars cold while working. If they become soft, return them to the freezer for 10–15 minutes before continuing.
Use a sharp knife for clean cuts.
Best Chocolate Options
Milk chocolate creates the sweetest and most classic candy-bar flavor.
Semi-sweet chocolate can be used if you prefer a deeper, less sweet chocolate flavor.
Dark chocolate makes an excellent variation for adults who enjoy a more intense cocoa flavor.
For the smoothest coating, use chocolate specifically designed for melting or coating.
Recipe Variations
Dark Chocolate Bars
Replace the milk chocolate chips with dark chocolate for a richer chocolate flavor.
Peanut Butter Chocolate Bars
Spread a very thin layer of creamy peanut butter over the frozen chocolate center before cutting, then coat the bars in chocolate.
Mint Chocolate Bars
Add a small amount of peppermint extract to the melted chocolate used for the center.
Chocolate Hazelnut Bars
Add a thin layer of chocolate-hazelnut spread between the fluffy center and chocolate shell.
White Chocolate Version
Use white chocolate for the outer coating for a beautiful contrast with the dark chocolate center.
What to Serve With
These homemade candy bars are delicious on their own, but they also pair wonderfully with:
- Hot coffee
- Espresso
- Hot chocolate
- Cold milk
- Vanilla ice cream
- Fresh berries
For a dessert platter, cut the bars into smaller pieces and arrange them alongside cookies, brownies, and other homemade candies.
Make-Ahead Instructions
These bars are ideal for making ahead.
Prepare the chocolate centers up to 2 days in advance and keep them tightly covered in the freezer.
You can also prepare and coat the bars a day before serving.
Keep them refrigerated in an airtight container until ready to serve.
Storage
Store the finished chocolate bars in an airtight container in the refrigerator.
They are best enjoyed within approximately 5–7 days for the freshest texture.
Place parchment paper between layers if stacking the bars to prevent them from sticking together.
Reheating
These candy bars should not be reheated.
They are best served chilled or allowed to sit at room temperature for a few minutes before eating.
Freezing
The finished bars can be frozen for longer storage.
Place them in an airtight freezer-safe container with parchment paper between layers.
Freeze for up to 1 month for the best quality.
Allow frozen bars to sit in the refrigerator for several hours before serving.
Common Mistakes to Avoid
Adding whipped topping to hot chocolate: This can cause the fluffy mixture to lose its texture.
Overmixing: Vigorous mixing can deflate the whipped topping.
Cutting before the center is fully frozen: Soft centers are much more difficult to dip.
Overheating the chocolate: Chocolate can become thick, grainy, or scorched if overheated.
Using wet utensils: Even a small amount of water can cause melted chocolate to seize.
Working too slowly: The frozen centers will soften as they sit at room temperature.
Nutrition Estimate
Approximate values per bar, assuming 10 bars:
| Nutritional Content | Amount per Serving |
| Calories | 300 kcal |
| Total Fat | 18 g |
| Saturated Fat | 12 g |
| Carbohydrates | 34 g |
| Protein | 3 g |
| Sugars | 29 g |
| Sodium | 45 mg |
Nutrition information is an estimate and will vary depending on the specific chocolate chips and whipped topping used.
Frequently Asked Questions
Do these taste exactly like a 3 Musketeers bar?
They have a similar concept—a fluffy chocolate center covered in chocolate—but the texture and flavor are not identical to commercially produced candy bars.
Do I need a candy thermometer?
No. This recipe does not require cooking sugar syrup or using a candy thermometer.
Can I use homemade whipped cream?
The recipe is designed around stabilized whipped topping. Regular homemade whipped cream may contain more water and can produce a softer center, so the texture may not be the same.
Why is my chocolate coating too thick?
The chocolate may have cooled too much. Gently warm it in short intervals and stir thoroughly.
You can also add a very small amount of additional coconut oil to loosen the coating.
Can I use dark chocolate?
Yes. Dark chocolate works very well if you prefer a less-sweet, more intense chocolate flavor.
How should I keep the bars from sticking together?
Place a small sheet of parchment paper between each layer when storing them in an airtight container.
Can I make smaller candy bites?
Absolutely. Cut the frozen center into small squares instead of large bars for bite-sized party treats.
Final Thoughts
These Homemade Whipped Chocolate Candy Bars are proof that you don’t need complicated candy-making equipment to create an impressive chocolate dessert at home.
The fluffy chocolate center and smooth milk chocolate coating create a delicious combination of textures that makes these homemade treats especially hard to resist.
They’re perfect for holidays, parties, homemade gifts, dessert tables, or simply satisfying a serious chocolate craving.
Make a batch, keep them chilled, and enjoy a luxurious homemade candy bar whenever the craving strikes!