
Introduction
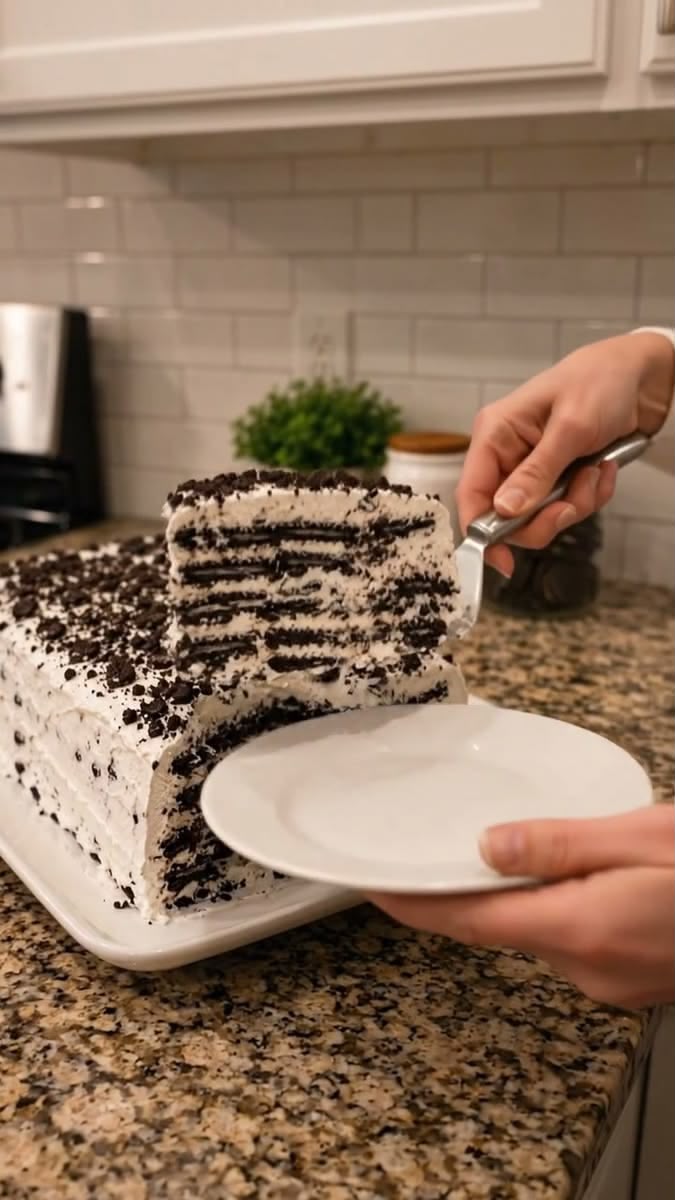
This No-Bake Oreo Icebox Cake is an irresistibly creamy dessert made with layers of chocolate Oreo cookies and sweet vanilla whipped cream. The best part is that there is no oven required.
As the cake chills, the cookies absorb some of the moisture from the whipped cream and become wonderfully soft, creating a delicious cake-like texture while keeping their rich chocolate flavor.
It is an easy make-ahead dessert for birthdays, family gatherings, holidays, potlucks, or whenever you need a quick sweet treat with minimal preparation.
Recipe Overview
| Detail | Information |
| Prep Time | 20 minutes |
| Chill Time | 4–8 hours |
| Best Chill Time | Overnight |
| Total Time | About 4 hours 20 minutes to 8 hours 20 minutes |
| Servings | 9–12 slices |
| Difficulty | Easy |
| Method | No-Bake |
Why You’ll Love This Recipe
🍪 No oven required: Perfect when you want a simple dessert without baking.
🥛 Ultra-creamy texture: Homemade vanilla whipped cream creates a light and fluffy filling.
🍫 Rich Oreo flavor: Every bite combines chocolate cookies with sweet cream.
⏰ Make-ahead friendly: It can be prepared several hours before serving.
👨👩👧👦 Great for gatherings: The recipe is simple to prepare and easy to slice and serve.
Ingredients
For the Cake
| Ingredient | Amount |
| Cold heavy whipping cream | 3 cups |
| Powdered sugar | ⅓ cup |
| Pure vanilla extract | 1 teaspoon |
| Regular Oreo cookies | Approximately 40–46 |
| Oreo cookies, crushed | 3–4 extra |
Use ⅓ cup powdered sugar for a moderately sweet dessert. If you prefer a sweeter icebox cake, you can increase it to ½ cup.
Make sure the heavy cream is very cold before whipping. Cold cream will whip more easily and produce a more stable texture.
Step-by-Step Instructions
Make the Whipped Cream
Place the cold heavy whipping cream, powdered sugar, and vanilla extract into a chilled mixing bowl.
Using a stand mixer fitted with the whisk attachment or a hand mixer, beat the mixture over medium-high speed until stiff peaks form.
The whipped cream should be thick enough to hold its shape. Avoid whipping for too long, because overwhipping can cause the cream to become grainy and eventually turn into butter.
Prepare the Baking Dish
Use an 8 × 8-inch square baking dish for a thick layered cake.
Spread a very thin layer of whipped cream over the bottom of the dish.
This first layer helps keep the Oreo cookies in place while you assemble the cake.
Add the First Oreo Layer
Arrange whole Oreo cookies in a single, even layer over the whipped cream.
Break a few cookies in half when necessary to fill the edges and empty spaces.
Try to cover as much of the surface as possible without worrying about making every piece perfectly uniform.
Add the Whipped Cream
Spread a generous layer of whipped cream evenly over the Oreo cookies.
Use a spatula to gently smooth the surface.
Continue Layering
Add another layer of Oreo cookies over the whipped cream.
Follow with another layer of whipped cream.
Continue alternating between Oreo cookies and whipped cream until you have used most of the ingredients.
For the best presentation, finish the cake with a generous final layer of whipped cream.
Add the Oreo Topping
Crush the remaining 3–4 Oreo cookies.
You can crush them finely for a delicate topping or leave some larger pieces for extra texture.
Sprinkle the crushed cookies evenly over the top of the whipped cream.
Chill the Cake
Cover the baking dish tightly with plastic wrap.
Refrigerate for at least 4 hours, although 6–8 hours or overnight is highly recommended.
The longer chilling time allows the Oreo cookies to absorb moisture from the whipped cream and soften into a tender, cake-like consistency.
Slice and Serve
Once fully chilled, remove the cake from the refrigerator.
Use a sharp knife to cut it into 9–12 squares.
Serve cold and enjoy immediately.
Best Tips
Keep the cream cold: Cold heavy cream whips faster and holds its structure better.
Do not overwhip: Stop once stiff peaks form. Overwhipping can ruin the smooth, fluffy texture.
Do not rush the chilling time: The cookies need several hours to soften properly.
Use whole cookies: Whole Oreos provide the best layered texture, while broken pieces are useful for filling gaps.
Chill overnight when possible: An overnight rest produces an especially soft and cake-like Oreo texture.
For cleaner slices: Refrigerate the cake thoroughly and use a sharp knife. Wipe the knife between cuts if you want neat squares.
Best Ingredient Options
Oreo Cookies
Regular chocolate Oreos work beautifully in this recipe.
You can also experiment with different Oreo flavors for a slightly different dessert.
Heavy Whipping Cream
Use full-fat heavy whipping cream for the richest and most stable whipped cream.
Powdered Sugar
Powdered sugar dissolves easily into the cream and gives the filling a smooth texture.
Adjust the amount according to your preferred sweetness.
Vanilla Extract
Pure vanilla extract adds a subtle flavor that balances the rich chocolate cookies.
Recipe Variations
Chocolate Oreo Icebox Cake
Add 2–3 tablespoons of unsweetened cocoa powder to the whipped cream for an extra chocolate-rich filling.
Chocolate Chip Oreo Cake
Add mini chocolate chips between some of the layers for extra chocolate texture.
Peanut Butter Oreo Cake
Drizzle a thin layer of creamy peanut butter between the Oreo and whipped cream layers.
Strawberry Oreo Icebox Cake
Add thinly sliced strawberries between the layers for a fresh fruit flavor.
Mint Oreo Cake
Use mint-flavored Oreo cookies and add a tiny amount of peppermint extract to the whipped cream.
Extra Chocolate Version
Finish the cake with crushed Oreos and a light drizzle of melted chocolate before chilling.
What to Serve With It
This icebox cake is delicious on its own, but you can serve individual slices with:
🍓 Fresh strawberries
🍫 Chocolate shavings
🥛 A glass of cold milk
🍦 A small scoop of vanilla ice cream
🍫 Chocolate sauce
☁️ Extra whipped cream
Make-Ahead Instructions
This is an excellent make-ahead dessert.
Prepare the entire cake, cover it tightly, and refrigerate it several hours before serving.
Preparing it the night before is ideal because the cookies have plenty of time to soften and absorb the creamy filling.
Storage
Keep the Oreo icebox cake covered and refrigerated.
For the best texture and flavor, enjoy it within 3–4 days.
Because the dessert contains whipped cream, it should remain refrigerated until serving.
Freezing
You can freeze the assembled cake for a firmer, semifrozen dessert.
Cover it tightly with plastic wrap and an additional layer of foil, then freeze.
Allow it to thaw in the refrigerator before serving for a softer, more traditional icebox-cake texture.
Reheating
No reheating is necessary.
This dessert is designed to be served cold directly from the refrigerator.
Common Mistakes to Avoid
Using warm cream: Warm cream will be more difficult to whip properly.
Overwhipping the cream: Stop immediately once stiff peaks form.
Skipping the chill time: The cookies will remain too crunchy if the cake is served too soon.
Adding too much sugar: Oreos are already sweet, so start with ⅓ cup powdered sugar and adjust if desired.
Leaving the cake uncovered: Covering the dessert helps prevent it from absorbing refrigerator odors and keeps the top fresh.
Nutrition Estimate
Nutrition will vary depending on the exact Oreo cookies, cream, sugar, and portion size used.
| Nutrient | Approximate Amount per Serving |
| Calories | 400–500 kcal |
| Carbohydrates | 40–50 g |
| Protein | 4–6 g |
| Fat | 25–32 g |
| Saturated Fat | 14–19 g |
| Sugar | 25–32 g |
| Sodium | 250–400 mg |
Frequently Asked Questions
Can I make this Oreo cake the same day?
Yes. It needs at least 4 hours of refrigeration, but 6–8 hours is better for the softest cookie texture.
Can I prepare it the night before?
Absolutely. Overnight refrigeration is one of the best ways to prepare this dessert.
Why does my icebox cake seem too firm?
If the cookies are still crunchy, the cake probably needs more refrigeration time. Give it several additional hours so the cookies can absorb moisture from the whipped cream.
Can I use homemade whipped cream?
Yes. Homemade whipped cream is ideal for this recipe and gives the cake a light, creamy texture.
Can I use store-bought whipped topping?
Yes, if you want an even quicker preparation. However, homemade whipped cream provides a fresher flavor.
How many people does this recipe serve?
An 8 × 8-inch cake generally makes 9 large or 12 smaller servings, depending on how you cut it.
Can I add fruit?
Yes. Strawberries, raspberries, or sliced bananas can be added between the layers for a fruity variation.
Final Thoughts
This No-Bake Oreo Icebox Cake proves that an impressive dessert doesn’t have to require complicated baking techniques. With just a handful of ingredients and a little patience, you can create layers of creamy vanilla whipped cream and softened chocolate Oreo cookies that taste like a homemade chocolate cream cake.
For the best results, prepare it ahead of time and let it chill overnight. When you’re ready to serve, simply slice, garnish, and enjoy this wonderfully creamy, chocolatey dessert.