
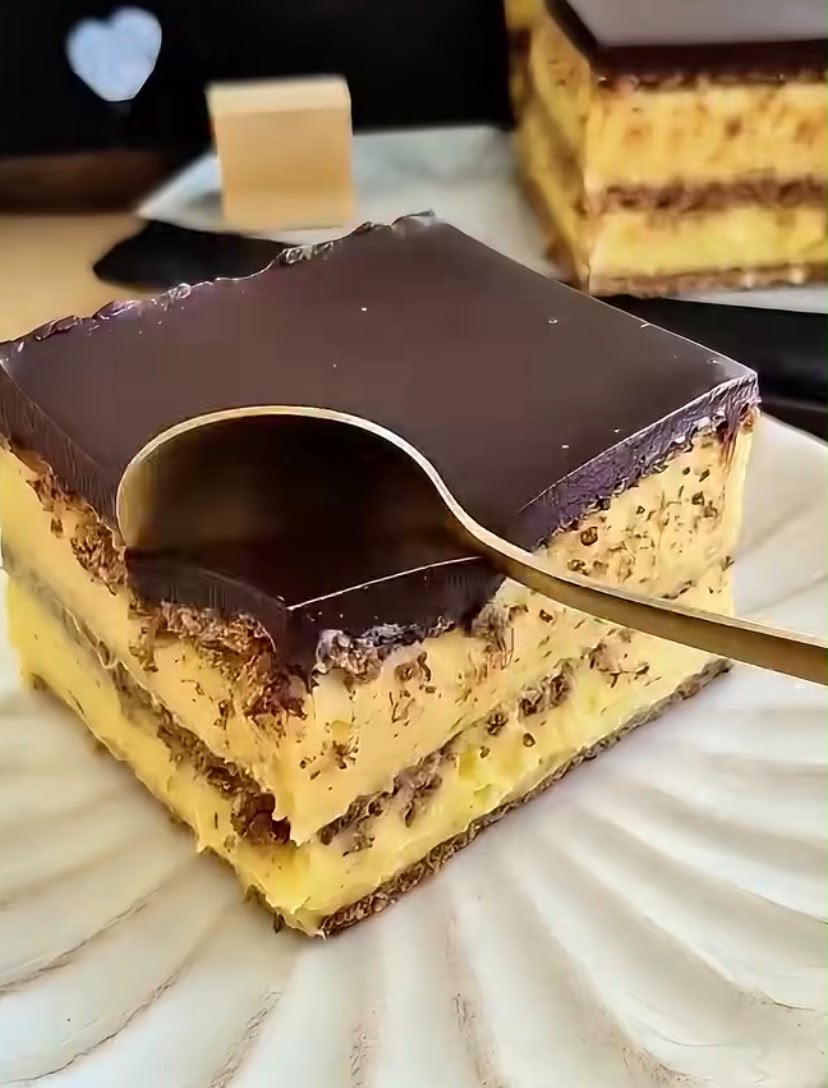
No-Bake Vanilla Cream Biscuit Cake with Crunchy Chocolate Shell
This No-Bake Vanilla Cream Biscuit Cake is an easy and elegant dessert made with layers of tender biscuits, silky vanilla diplomat cream, and a thin chocolate shell that cracks beautifully when you cut into it.
There is no oven required, making this chilled dessert especially convenient for warm days or when you want an impressive homemade dessert without complicated baking.
The combination of creamy vanilla custard, lightly softened biscuits, and crisp chocolate creates a wonderful contrast of textures in every bite.
Recipe Overview
| Details | Information |
| Recipe | No-Bake Vanilla Cream Biscuit Cake |
| Prep Time | 35 minutes |
| Chilling Time | 4 hours minimum |
| Best Chilling Time | Overnight |
| Total Time | About 4 hours 35 minutes |
| Servings | 8–10 |
| Difficulty | Easy to Moderate |
| Category | No-Bake Dessert |
| Method | Chilled / Refrigerator |
Why You’ll Love This Recipe
This no-bake cake is incredibly creamy, easy to assemble, and requires no oven. The vanilla diplomat cream gives the dessert a light and luxurious texture, while the biscuits become soft enough to slice easily after chilling.
The chocolate topping is the finishing touch. Mixed with a little neutral oil, the melted chocolate forms a thin, glossy shell that becomes crisp when refrigerated but is easier to cut than plain melted chocolate.
It is also a wonderful make-ahead dessert because the flavor and texture improve as the biscuits absorb some of the vanilla cream.
Ingredients
For the Vanilla Diplomat Cream
| Ingredient | Amount |
| Whole milk | 500 ml |
| Egg yolks | 4 |
| Granulated sugar | 100 g |
| Cornstarch | 45 g |
| Vanilla extract or vanilla paste | 1 teaspoon |
| Butter | 40 g |
| Heavy cream, 30% fat or higher | 200 ml |
For the Biscuit Layers
| Ingredient | Amount |
| Rectangular biscuits, such as Petit Beurre or tea biscuits | 1–2 packages |
| Warm milk or light coffee | 150 ml |
For the Crunchy Chocolate Shell
| Ingredient | Amount |
| Dark or milk chocolate | 150 g |
| Neutral oil, such as sunflower or grapeseed oil | 2 tablespoons |
Step-by-Step Instructions
1. Prepare the Vanilla Custard
Pour the whole milk into a saucepan and add the vanilla.
Heat over medium heat until the milk becomes hot and just begins to simmer. Do not bring it to a vigorous boil.
Meanwhile, place the egg yolks and sugar in a large heatproof bowl.
Whisk until the mixture becomes lighter in color and slightly creamy.
Add the cornstarch and whisk until completely smooth.
2. Temper the Eggs
Gradually pour the hot milk into the egg mixture while whisking constantly.
Adding the milk slowly while whisking helps prevent the egg yolks from scrambling.
Pour the mixture back into the saucepan.
Cook over medium heat, stirring constantly with a whisk or silicone spatula.
Continue cooking until the custard thickens noticeably and reaches a smooth, creamy consistency.
Once thickened, remove the saucepan from the heat.
3. Add the Butter and Chill
Add the 40 g of butter to the hot custard.
Stir until the butter has completely melted and the cream is smooth and glossy.
Transfer the custard to a shallow dish.
Cover the surface directly with plastic wrap so that the plastic touches the custard. This prevents a skin from forming.
Refrigerate until completely cold.
4. Turn the Custard Into Diplomat Cream
Once the pastry cream is thoroughly chilled, place the cold heavy cream in a clean mixing bowl.
Whip it until it reaches firm peaks.
Take the chilled vanilla pastry cream and whisk it briefly to loosen its texture.
Gently fold the whipped cream into the pastry cream in several additions.
Use a spatula and fold carefully rather than aggressively mixing. This keeps the diplomat cream light and airy.
5. Prepare the Biscuit Layers
Prepare your square or rectangular cake pan. A removable-bottom pan or adjustable cake frame makes removing the finished dessert easier.
Pour the warm milk or light coffee into a shallow bowl.
Quickly dip each biscuit into the liquid.
Do not soak the biscuits for too long because they will continue softening as the cake chills.
Arrange the dipped biscuits in a single layer across the bottom of the pan.
Break a few biscuits if necessary to fill small gaps.
6. Add the First Cream Layer
Spread half of the vanilla diplomat cream evenly over the first layer of biscuits.
Use a spatula to smooth the cream from edge to edge.
Try to create an even layer so the finished cake has a clean appearance when sliced.
7. Add the Second Biscuit Layer
Dip another batch of biscuits briefly into the milk or coffee.
Arrange them over the cream layer.
Gently press them into place without crushing them.
Cover the second biscuit layer with the remaining vanilla diplomat cream.
Smooth the surface carefully with a spatula.
8. Prepare the Chocolate Shell
Break the chocolate into small pieces and place it in a heatproof bowl.
Melt the chocolate gently using a double boiler or microwave.
If using a microwave, heat it in approximately 30-second intervals, stirring well after each interval until completely smooth.
Add the neutral oil and stir until fully incorporated.
The oil gives the chocolate a beautiful shine and helps create a shell that is easier to cut.
9. Add the Chocolate Topping
Pour the melted chocolate immediately over the chilled cake.
Quickly spread it into a thin, even layer with an offset spatula or the back of a spoon.
Work relatively quickly because the cold surface will begin setting the chocolate.
10. Chill the Cake
Place the assembled cake in the refrigerator for at least 4 hours.
For the best texture, chill it overnight.
During this time, the biscuits soften and absorb some of the vanilla cream while the chocolate topping becomes firm and crisp.
When ready to serve, remove the cake from the refrigerator.
If using a removable cake frame, carefully release it from the sides.
Slice with a sharp knife and serve well chilled.
Best Tips for Success
Make sure the pastry cream is completely cold before folding in the whipped cream. If the custard is still warm, it can deflate the whipped cream and produce a loose filling.
Do not over-soak the biscuits. A quick dip is enough because they will continue absorbing moisture from the cream while the cake rests.
For clean layers, spread each portion of cream evenly before adding the next layer of biscuits.
Use good-quality chocolate for the topping because it is one of the most noticeable flavors in the finished dessert.
Adding neutral oil to the melted chocolate helps create a thinner, more flexible chocolate shell that is less likely to shatter when sliced.
For the cleanest slices, use a sharp knife. You can briefly warm the knife under hot water, dry it thoroughly, and then use it to cut through the chocolate layer.
Best Ingredient Options
Biscuits
Petit Beurre, tea biscuits, butter biscuits, or other firm rectangular cookies work well.
You can also use chocolate biscuits if you want an even more intense chocolate flavor.
Chocolate
Dark chocolate gives the dessert a deeper and less sweet flavor, while milk chocolate creates a sweeter and creamier topping.
A combination of dark and milk chocolate can also work beautifully.
Milk or Coffee
Milk creates a delicate, creamy flavor that works particularly well with vanilla.
For adults, lightly brewed coffee adds a delicious contrast to the sweet vanilla cream and chocolate shell.
Recipe Variations
For a chocolate-vanilla version, use chocolate biscuits between the layers while keeping the vanilla diplomat cream.
For a coffee dessert, briefly dip the biscuits in cooled coffee before assembling the cake.
For a fruity version, add a thin layer of sliced strawberries or bananas between the biscuit and cream layers.
For extra chocolate flavor, add a small amount of finely chopped chocolate or mini chocolate chips to the vanilla cream before assembling the cake.
You can also decorate the finished chocolate shell with chopped nuts, coconut, chocolate curls, or crushed biscuits before it completely sets.
What to Serve With This Dessert
This chilled biscuit cake is delicious on its own because it already combines creamy vanilla and chocolate flavors.
Fresh strawberries, raspberries, or blueberries make a refreshing accompaniment and add a bright contrast to the rich cream.
For an extra-indulgent presentation, serve individual slices with a small spoonful of whipped cream or a few fresh berries.
A cup of coffee or tea also pairs beautifully with the vanilla and chocolate flavors.
Make-Ahead Instructions
This is an excellent make-ahead dessert.
The entire cake can be assembled the day before serving and stored in the refrigerator overnight.
In fact, allowing the cake to rest overnight generally produces an even softer biscuit texture and better-developed flavor.
For the best presentation, keep the cake covered while it chills to prevent it from absorbing odors from the refrigerator.
Storage
Store the finished cake covered in the refrigerator.
It is best enjoyed within 3 to 4 days.
Because the dessert contains dairy and egg-based pastry cream, keep it refrigerated and avoid leaving it at room temperature for extended periods.
Reheating
This dessert should not be reheated.
It is designed to be served cold directly from the refrigerator.
Freezing
Freezing is not recommended for the finished cake because the diplomat cream can change texture after thawing, and the biscuits may become overly soft.
For the best creamy consistency and crunchy chocolate topping, prepare the cake fresh and keep it refrigerated.
Common Mistakes to Avoid
Do not stop cooking the custard too early. The pastry cream needs to thicken properly so the final diplomat cream has enough structure to hold the layers.
Avoid adding hot pastry cream to whipped cream. Always cool the custard completely first.
Do not soak the biscuits for several seconds. A quick dip is sufficient and prevents the finished cake from becoming soggy.
Avoid spreading the chocolate too slowly. The chilled cream will cause the chocolate to set quickly, so smooth it immediately after pouring.
Do not cut the cake immediately after adding the chocolate. Give it enough refrigerator time for the layers to firm up properly.
Nutrition Estimate
Approximate values per serving, depending on the biscuits and chocolate used.
| Nutrient | Estimated Amount |
| Calories | 430 kcal |
| Protein | 7 g |
| Carbohydrates | 48 g |
| Fat | 24 g |
| Saturated Fat | 13 g |
| Fiber | 3 g |
| Sugar | 28 g |
| Sodium | 220 mg |
Nutrition information is an estimate and can vary depending on the specific ingredients, biscuits, chocolate, and serving size.
Frequently Asked Questions
Can I make this cake the day before?
Yes. This dessert is particularly well suited to overnight preparation. The biscuits become tender as they absorb moisture from the vanilla cream.
Can I use chocolate biscuits?
Absolutely. Chocolate biscuits work very well and create a more intense chocolate dessert.
Why is my diplomat cream too runny?
The pastry cream may not have been cooked long enough, or the whipped cream may have been under-whipped. Make sure the pastry cream is fully thickened and completely chilled before combining it with firm whipped cream.
Can I use milk chocolate for the topping?
Yes. Milk chocolate creates a sweeter, creamier chocolate shell. Dark chocolate provides a richer, more intense contrast with the vanilla cream.
How long should the cake chill?
Chill it for at least 4 hours, but overnight is recommended for the best texture.
Can I use coffee instead of milk?
Yes. Lightly brewed and cooled coffee adds a delicious coffee-chocolate flavor. You can also use a mixture of milk and coffee.
How can I cut through the chocolate shell without breaking it?
Use a sharp knife and warm the blade briefly, then dry it completely before slicing. Gentle pressure will help create cleaner cuts.
Can I add fruit?
Yes. Thinly sliced strawberries or bananas can be added between the layers. Make sure the fruit is well drained and not excessively wet.
Final Thoughts
This No-Bake Vanilla Cream Biscuit Cake with Crunchy Chocolate Shell is a beautiful dessert that combines simple ingredients with an impressive presentation.
The soft biscuit layers, airy vanilla diplomat cream, and crisp chocolate topping create a delicious contrast in every bite. Since the cake can be prepared several hours or even a day ahead, it is perfect for family gatherings, celebrations, weekend desserts, and special occasions.