
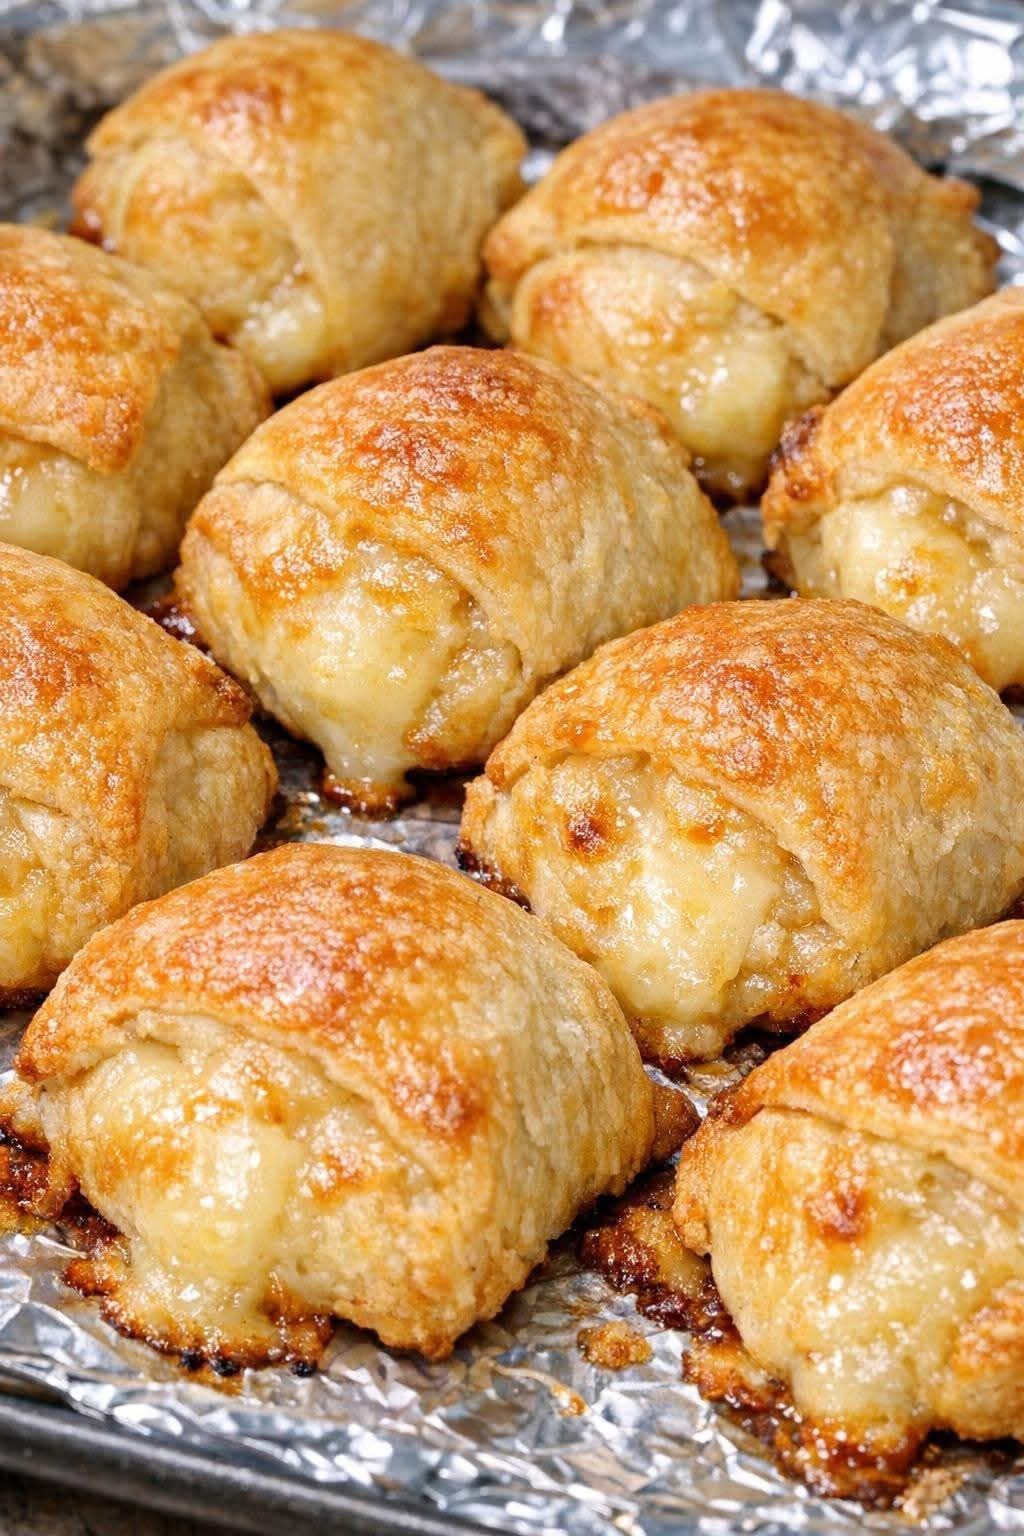
These Chicken and Cheese Crescent Pastries are a deliciously easy appetizer or snack made with tender shredded chicken, creamy cheese, and flaky golden pastry. They are quick to prepare, wonderfully cheesy, and perfect for busy weeknights, parties, family gatherings, or a comforting savory treat.
Recipe Overview
| Category | Details |
| Prep Time | 15 minutes |
| Cook Time | 12–15 minutes |
| Total Time | 30 minutes |
| Servings | 8–10 pastries |
| Cuisine | American-inspired |
| Difficulty | Easy |
| Baking Temperature | 375°F (190°C) |
Ingredients
For the Chicken and Cheese Filling
| Ingredient | Amount |
| Cooked chicken, shredded or finely diced | 2 cups (about 300 g) |
| Cream cheese, softened | 7 oz (200 g) |
| Shredded cheese | 1/2 cup |
| Garlic powder | 1/2 teaspoon |
| Salt | To taste |
| Black pepper | To taste |
Cheddar, mozzarella, or Emmental cheese all work beautifully in this recipe.
For the Pastry
| Ingredient | Amount |
| Refrigerated crescent roll dough | 1 can/package |
| Melted butter | 2 tablespoons |
| OR beaten egg | 1 |
Step-by-Step Instructions
1. Preheat the Oven
Preheat your oven to 375°F (190°C). Line a baking sheet with parchment paper or aluminum foil to make cleanup easier.
2. Prepare the Filling
In a large mixing bowl, combine the cooked shredded chicken, softened cream cheese, shredded cheese, garlic powder, salt, and black pepper.
Mix until everything is evenly combined and the filling becomes creamy and well blended.
3. Prepare the Dough
Unroll the crescent dough and separate it into individual triangles.
Place a generous spoonful of the chicken and cheese filling onto the widest part of each triangle. Avoid adding too much filling, as it can make the pastries difficult to seal.
4. Shape the Pastries
Gently fold the sides of the dough around the filling to help seal it.
Roll each triangle toward the narrow tip, forming a small crescent-shaped pastry. Pinch any obvious openings closed so the cheese filling stays inside while baking.
5. Add the Topping
Arrange the filled pastries on the prepared baking sheet, leaving a little space between each one.
Brush the tops with melted butter for a rich, golden finish. Alternatively, brush them with beaten egg for a more glossy and deeply golden crust.
6. Bake
Bake for 12–15 minutes, or until the pastries are puffed, golden brown, and crisp on the outside.
Keep an eye on them during the final few minutes because baking times can vary slightly depending on your oven and the type of dough used.
7. Serve
Remove the pastries from the oven and let them cool for about 5 minutes before serving.
Serve warm while the pastry is flaky and the cheese filling is creamy and delicious.
Why You’ll Love This Recipe
These chicken and cheese pastries are incredibly easy to prepare and require only a handful of everyday ingredients.
The combination of tender chicken, creamy cheese, and melted shredded cheese creates a rich and satisfying filling inside the flaky pastry.
They are also versatile enough to serve as an appetizer, snack, light lunch, or party food.
Best Tips
Make sure the cream cheese is softened before mixing. This makes it much easier to combine with the chicken and shredded cheese.
Use fully cooked chicken that has been cooled slightly before preparing the filling. Rotisserie-style chicken or leftover roasted chicken works particularly well.
Do not overfill the dough. A moderate amount of filling makes the pastries easier to roll and helps prevent the cheese from leaking during baking.
For an extra golden and glossy crust, use beaten egg instead of melted butter.
Allow the pastries to rest for a few minutes after baking. The filling will be extremely hot straight from the oven.
Best Ingredient Options
For the chicken, you can use shredded roasted chicken, baked chicken breast, or leftover cooked chicken.
For the cheese, cheddar gives the filling a stronger flavor, while mozzarella creates a softer and stretchier texture. Emmental adds a mild nutty flavor.
You can also add finely chopped parsley, green onions, or a small amount of paprika for extra flavor.
Recipe Variations
For a spicy version, add a pinch of chili flakes or a little cayenne pepper to the filling.
For a garlic-herb version, add Italian seasoning, dried parsley, or a small amount of fresh minced garlic.
For a vegetable-filled version, mix in finely chopped cooked spinach, mushrooms, or bell peppers.
You can also make smaller pastries by cutting the dough into smaller portions, making them perfect for parties and appetizers.
What to Serve With
These chicken and cheese pastries are delicious served with a fresh green salad for a simple meal.
They also pair well with tomato soup, vegetable soup, or a creamy soup for a comforting lunch or dinner.
For dipping, try marinara sauce, ranch-style dressing, honey mustard, or a creamy garlic sauce.
Make-Ahead Instructions
You can prepare the chicken and cheese filling several hours in advance and keep it refrigerated in an airtight container.
For the best texture, assemble the pastries shortly before baking.
If you need to prepare them in advance, arrange the unbaked pastries on a lined baking sheet, cover them well, and refrigerate them until ready to bake.
Storage
Store leftover pastries in an airtight container in the refrigerator for up to 3 days.
Because they contain chicken and dairy, refrigerate leftovers promptly and avoid leaving them at room temperature for extended periods.
Reheating
For the best texture, reheat the pastries in a 350°F (175°C) oven for about 8–10 minutes.
An air fryer also works very well. Reheat at approximately 350°F (175°C) for 3–5 minutes, checking frequently.
Avoid microwaving for too long because the pastry can become soft rather than crispy.
Freezing
These pastries can be frozen after baking.
Allow them to cool completely, then place them in a freezer-safe container or bag with parchment paper between layers.
Freeze for up to 2 months for the best quality.
Reheat directly from frozen in a 350°F (175°C) oven until heated through and crisp.
Common Mistakes to Avoid
Using cream cheese straight from the refrigerator can make the filling difficult to mix. Let it soften first.
Adding too much filling can cause the pastries to open during baking and allow the melted cheese to escape.
Failing to seal the dough properly can also cause the filling to leak onto the baking sheet.
Overbaking can make the pastry dry and overly crisp, so remove the pastries once they are nicely golden brown.
Cutting into the pastries immediately after baking can result in a very hot, runny filling. Let them rest for about 5 minutes before serving.
Nutrition Estimate
Nutrition will vary depending on the type of pastry dough, cheese, chicken, and toppings used.
| Nutrient | Estimated Amount Per Serving |
| Calories | 250–300 kcal |
| Protein | 13–16 g |
| Carbohydrates | 15–20 g |
| Fat | 15–20 g |
| Saturated Fat | 7–10 g |
| Sodium | 400–600 mg |
| Calcium | 100–150 mg |
Frequently Asked Questions
Can I use leftover chicken?
Yes. Leftover roasted or baked chicken is perfect for this recipe. Simply shred or finely chop it before mixing it with the cheeses.
Can I use puff pastry instead of crescent dough?
Yes. Puff pastry works very well and produces a more flaky, buttery texture. Cut the pastry into suitable pieces before adding the filling.
Can I use mozzarella cheese?
Absolutely. Mozzarella melts beautifully and gives the pastries a deliciously cheesy texture.
Can I prepare these pastries ahead of time?
Yes. You can prepare the filling ahead of time and refrigerate it. The pastries can then be assembled shortly before baking.
Why did my filling leak out?
The pastries may have been overfilled or the dough may not have been sealed properly. Use a moderate amount of filling and gently press the edges closed before baking.
Can I freeze chicken and cheese pastries?
Yes. Once completely cooled, they can be frozen in an airtight freezer-safe container for up to about 2 months.
Final Thoughts
These Chicken and Cheese Crescent Pastries are a simple, comforting recipe that turns basic ingredients into a delicious golden-brown snack. With creamy chicken and melted cheese wrapped in flaky pastry, they are perfect for family dinners, parties, game nights, lunchboxes, or whenever you want an easy homemade savory treat.
⚠️ This recipe may not be suitable for everyone, so it is advisable to consult a doctor if you have specific dietary restrictions, allergies, or health concerns.