
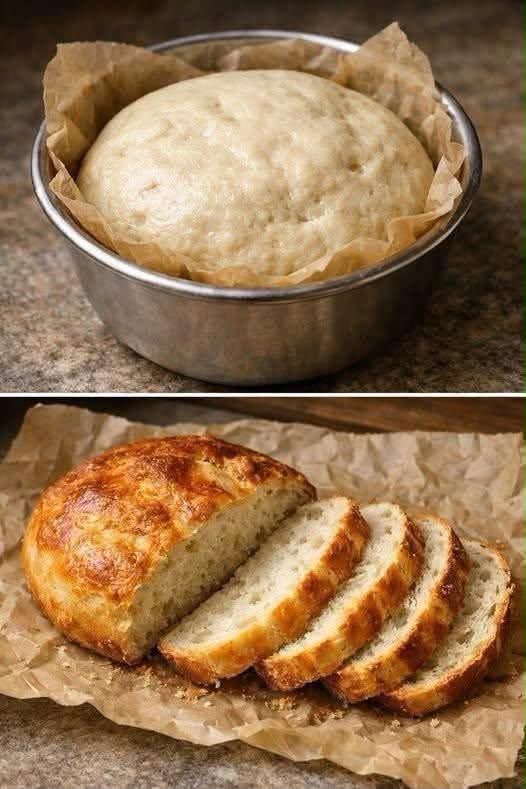
Welcome to the ultimate rustic baking experience with this artisanal no-knead crusty bread recipe. With just four basic ingredients and almost no hands-on work, you can create a bakery-style loaf with a beautifully crisp crust and a soft, airy interior.
The secret is the long fermentation, which develops flavor and structure without traditional kneading.
Recipe Overview
| Recipe Overview | Details |
| Prep Time | 15 minutes |
| Rise Time | 12–18 hours |
| Second Proof | 30–45 minutes |
| Cook Time | 42–45 minutes |
| Total Time | About 13–14 hours |
| Servings | 8 servings |
| Course | Bread / Side Dish |
| Cuisine | Artisan European-Inspired |
| Calories | Approximately 160 kcal per serving |
Why You’ll Love This Recipe
This homemade no-knead crusty bread transforms simple pantry staples into a rustic loaf with a crisp, golden-brown crust.
The long fermentation helps develop a deeper flavor and an airy, open crumb.
Because there is no lengthy kneading or stand mixer required, this recipe is especially convenient for beginner bakers.
Ingredients
| Bread Ingredients | Amount |
| 🌾 All-purpose flour or bread flour | 3 cups (360 g) |
| 🍞 Instant yeast | ¼ tsp (about 1 g) |
| 🧂 Fine salt | 1½ tsp (8–9 g) |
| 💧 Lukewarm water | 1½ cups (360 ml) |
Optional Add-Ins
| Ingredient | Amount |
| Roasted garlic | 3–4 cloves |
| Fresh rosemary, chopped | 1 tbsp |
| Pitted black olives | ⅓ cup |
| Sharp cheddar, cubed | 1 cup |
| Diced jalapeño | ¼ cup |
| Cornmeal or rolled oats | For dusting |
Step-by-Step Instructions
🥣 Mix the Dry Ingredients
Add the flour, instant yeast, and salt to a large mixing bowl.
Whisk everything together until evenly distributed.
💧 Form the Dough
Pour the lukewarm water into the flour mixture.
Stir gently with a wooden spoon or spatula until no dry flour remains.
The dough should look wet, sticky, and shaggy.
Do not knead the dough.
⏰ Long Fermentation
Cover the bowl tightly with plastic wrap or a reusable lid.
Leave the dough at room temperature for 12–18 hours.
The dough is ready when it has expanded noticeably and the surface is covered with bubbles.
The exact fermentation time depends on your room temperature. A warmer kitchen may require less time, while a cooler kitchen may require longer.
🌾 Shape the Loaf
Generously flour your work surface.
Carefully transfer the sticky dough onto the floured surface.
Lightly flour your hands and fold the dough over itself several times.
Shape it gently into a round loaf.
Avoid adding excessive flour because a wetter dough helps create a lighter, more open crumb.
⏰ Second Proof
Place the shaped loaf seam-side down on parchment paper.
Cover loosely with a clean kitchen towel.
Allow it to rest for 30–45 minutes.
🔥 Preheat the Dutch Oven
Place a heavy cast-iron Dutch oven with its lid inside the oven.
Preheat the oven to 450°F (230°C) for approximately 30 minutes.
The Dutch oven should be thoroughly heated before the bread goes inside.
✂️ Score the Bread
Lightly dust the surface with flour if desired.
Using a sharp knife or bread lame, make one or two shallow cuts across the top of the dough.
Scoring helps control how the loaf expands in the oven.
🍞 Bake Covered
Carefully remove the extremely hot Dutch oven.
Using the parchment paper as a sling, lower the dough into the Dutch oven.
Cover immediately with the lid.
Bake for 30 minutes.
🔥 Bake Uncovered
Carefully remove the lid.
Continue baking for another 12–15 minutes, until the crust is deep golden brown and crisp.
For a darker crust, add a few extra minutes while watching carefully.
❄️ Cool Completely
Transfer the bread to a wire rack.
Allow it to cool for at least 1 hour before slicing.
This gives the interior time to finish setting and helps prevent a gummy crumb.
Best Tips
The long fermentation is the key to developing excellent flavor without a sourdough starter.
Keep the dough covered during fermentation so the surface does not dry out.
Do not add too much flour while shaping.
A heavy, thoroughly preheated Dutch oven creates a humid baking environment that helps the crust develop properly.
Handle the hot Dutch oven with extreme care.
For the best texture, allow the finished loaf to cool completely before cutting.
Best Ingredient Options
🌾 Bread Flour
Bread flour generally produces a stronger dough and can give the finished loaf a chewier texture.
🌾 Whole Wheat Flour
Replace 1–2 tablespoons of the white flour with whole wheat flour for a subtle nutty flavor.
🌾 Rye Flour
A small amount of rye flour adds an earthy, rustic character.
💧 Water
Filtered or spring water can be used if you prefer its taste, although ordinary potable tap water is generally suitable.
Recipe Variations
🧄 Roasted Garlic and Rosemary
Gently fold roasted garlic cloves and chopped fresh rosemary into the dough before the long fermentation.
🧀 Cheddar and Jalapeño
Add approximately 1 cup of cubed sharp cheddar and ¼ cup of finely diced jalapeño before shaping.
🫒 Olive Bread
Fold ⅓ cup of well-drained, pitted black olives into the dough.
🌾 Rustic Seeded Loaf
Sprinkle sesame seeds, sunflower seeds, or rolled oats over the surface before baking.
🌿 Herb Bread
Add dried Italian herbs or fresh rosemary and thyme for a fragrant savory loaf.
What to Serve With
Serve thick slices with softened butter, fruit preserves, or extra virgin olive oil.
This bread is excellent with homemade soups, hearty stews, pasta dishes, and roasted vegetables.
Use it to make grilled cheese sandwiches, avocado toast, breakfast sandwiches, or rustic bruschetta.
Make-Ahead Instructions
You can prepare the dough in advance and refrigerate it for up to 3 days.
Keep the bowl tightly covered during refrigeration.
When ready to bake, remove the dough from the refrigerator and allow it to become active and easier to shape before proceeding.
For the most predictable results, follow the original room-temperature fermentation method when making this bread for the first time.
Storage
Allow the loaf to cool completely before storing.
Keep it in a paper bag, bread bag, or clean linen bag at room temperature for approximately 2–3 days.
Avoid airtight plastic storage if you want to preserve the crisp crust, because trapped moisture can soften it.
Reheating
Place individual slices in a toaster or toaster oven until warm and crisp.
For a larger portion, heat the bread in a 350°F (175°C) oven for approximately 8–10 minutes.
To refresh the crust, lightly mist the outside with water before reheating.
Avoid soaking the bread; only a very light mist is needed.
Freezing
This bread freezes very well.
Allow the loaf to cool completely.
You can freeze it whole or slice it before freezing for convenient individual portions.
Wrap tightly in freezer-safe plastic wrap or foil and place inside a freezer-safe bag.
Freeze for up to 3 months for the best quality.
To serve, thaw at room temperature and reheat in a 350°F (175°C) oven for approximately 10 minutes.
Frozen slices can be placed directly into a toaster.
Common Mistakes to Avoid
Adding too much flour: This can make the loaf dense instead of light and airy.
Using too much yeast: A long fermentation requires only a very small amount of yeast.
Skipping the long fermentation: The extended rise is responsible for much of the bread’s flavor and texture.
Not preheating the Dutch oven: A hot baking vessel is essential for strong oven spring and a crisp crust.
Overhandling the dough: Gentle shaping preserves the air bubbles created during fermentation.
Cutting the loaf immediately: Fresh bread needs time to cool and set.
Storing it in plastic: This traps moisture and quickly softens a crusty loaf.
Nutrition Estimate
Approximate values per serving, based on 8 servings:
| Nutritional Component | Amount per Serving |
| Calories | ~160 kcal |
| Total Fat | ~1 g |
| Saturated Fat | ~0 g |
| Cholesterol | 0 mg |
| Sodium | ~350 mg |
| Total Carbohydrates | ~32 g |
| Dietary Fiber | ~1–2 g |
| Sugars | <1 g |
| Protein | ~5 g |
Nutrition values are estimates and may vary depending on the flour and exact ingredients used.
Frequently Asked Questions
Can I make this bread without a Dutch oven?
Yes. You can bake the loaf on a preheated baking sheet or baking stone and place a separate heat-safe pan of hot water in the oven to create steam.
However, a Dutch oven is one of the easiest ways to achieve a crisp artisan-style crust.
Can I use active dry yeast?
Yes. Active dry yeast can be substituted for instant yeast. Dissolving it in part of the lukewarm water first can help distribute it evenly.
Why is my dough so sticky?
This is normal for no-knead bread. The relatively wet dough helps create a lighter crumb.
Use lightly floured hands when shaping instead of adding large amounts of flour.
Can I let the dough ferment for longer than 18 hours?
You can, but fermentation depends on room temperature. If the dough becomes excessively collapsed, very loose, or strongly fermented-smelling, it may have fermented too long.
How can I make the crust extra crispy?
Bake uncovered for the final 12–15 minutes and allow the finished loaf to cool on a wire rack.
Why is the inside of my bread gummy?
The loaf may have been sliced while still hot, underbaked, or made with too much water relative to the flour.
Allow the bread to cool completely before slicing.
Final Thoughts
This artisanal no-knead crusty bread proves that homemade bakery-style bread does not have to be complicated.
With flour, yeast, salt, water, and a little patience, you can create a beautiful rustic loaf with a crisp golden crust and tender, airy interior.
Serve it alongside soup or stew, turn it into sandwiches and toast, or simply enjoy a warm slice with butter and olive oil.
Once you master the basic recipe, experiment with roasted garlic, rosemary, olives, cheese, jalapeños, or seeds to create your own signature artisan loaf.