
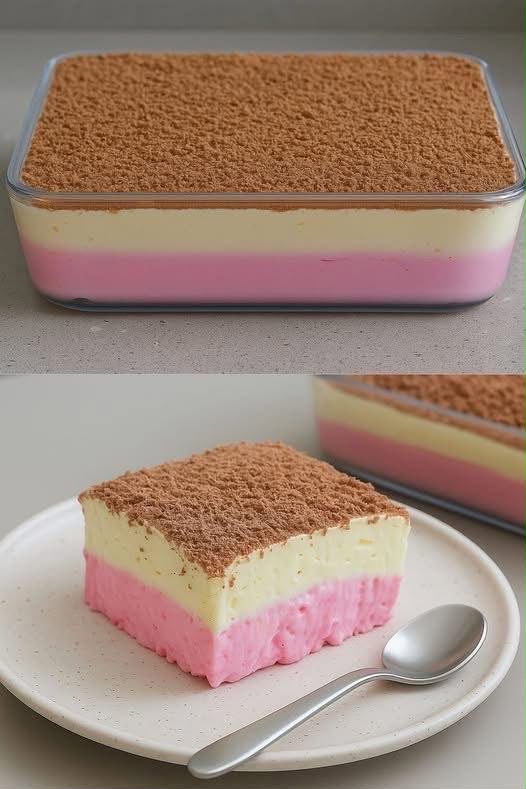
🍓 Layered Strawberry & Vanilla Pudding
A beautiful no-bake layered dessert made with silky strawberry pudding, creamy vanilla pudding, and a delicate dusting of cocoa powder. The contrasting pink and white layers make it especially attractive for family gatherings, dinner parties, holidays, or when you want an elegant dessert without turning on the oven.
Recipe Overview
| Category | Details |
| Prep Time | 15 minutes |
| Cook Time | 15 minutes |
| Chilling Time | 4 hours |
| Total Time | 4 hours 30 minutes |
| Servings | 8 |
| Difficulty | Easy |
| Method | Stovetop / No-Bake |
| Cuisine | Homemade Dessert |
Why You’ll Love This Recipe
This layered pudding is incredibly simple to prepare, yet it looks impressive when served. The strawberry layer provides a fruity sweetness, while the vanilla layer adds a smooth and creamy contrast.
The dessert uses basic pantry and refrigerator ingredients, making it an affordable option for entertaining or preparing a make-ahead dessert.
Because it is chilled rather than baked, it is also a convenient choice when you want a simple dessert with minimal equipment.
🍓 Ingredients
Strawberry Layer
| Ingredient | Quantity |
| Whole milk | 2 cups (480 ml) |
| Granulated sugar | ⅓ cup (67 g) |
| Cornstarch | 3 tablespoons (24 g) |
| Strawberry extract | 1 teaspoon |
| Pink food coloring | 1–2 drops, optional |
Vanilla Layer
| Ingredient | Quantity |
| Whole milk | 2 cups (480 ml) |
| Granulated sugar | ⅓ cup (67 g) |
| Cornstarch | 3 tablespoons (24 g) |
| Vanilla extract | 1 teaspoon |
| Unsalted butter | 1 tablespoon (14 g) |
Cocoa Topping
| Ingredient | Quantity |
| Unsweetened cocoa powder | 2–3 tablespoons |
Step-by-Step Instructions
Prepare the Strawberry Layer
Add the 2 cups of cold milk, ⅓ cup sugar, and 3 tablespoons cornstarch to a medium saucepan.
Whisk thoroughly while the ingredients are still cold. Continue whisking until the cornstarch has completely dissolved and there are no visible lumps.
Place the saucepan over medium heat.
Cook for approximately 5–8 minutes, whisking constantly. As the mixture heats, it will gradually become thicker.
Once the pudding reaches a thick, smooth consistency, remove the saucepan from the heat.
Immediately whisk in the strawberry extract and, if desired, 1–2 drops of pink food coloring.
Set the Strawberry Layer
Pour the warm strawberry pudding into an 8 × 8-inch (20 × 20 cm) glass or ceramic dish.
Use a spatula to spread it into an even layer.
Refrigerate for approximately 30–45 minutes, or until the surface is sufficiently firm to support the next layer.
It does not need to be completely cold at this stage, but it should no longer be liquid or easily disturbed.
Prepare the Vanilla Layer
While the strawberry layer is chilling, begin preparing the vanilla pudding.
Add 2 cups milk, ⅓ cup sugar, and 3 tablespoons cornstarch to a clean saucepan.
Whisk everything together while cold until the cornstarch is completely incorporated.
Place over medium heat and cook for approximately 5–8 minutes, stirring or whisking continuously.
The mixture should become thick and creamy.
Remove from the heat.
Add the vanilla extract and butter.
Whisk until the butter has completely melted and the pudding is smooth and glossy.
Create the Second Layer
Remove the strawberry layer from the refrigerator.
Slowly pour the warm vanilla pudding over it.
For especially clean layers, pour the vanilla pudding over the back of a large spoon. This helps distribute the pudding gently and reduces the chance of damaging the strawberry layer.
Smooth the surface carefully with a spatula.
Chill the Dessert
Cover the dish with plastic wrap.
For the smoothest surface, place the plastic wrap directly against the pudding.
Refrigerate for at least 4 hours.
For the best texture and cleanest slices, chilling the dessert overnight is even better.
Add the Cocoa Topping
Just before serving, place 2–3 tablespoons of unsweetened cocoa powder into a fine-mesh sieve.
Lightly dust the entire surface of the vanilla layer.
Avoid adding the cocoa too early, as moisture from the pudding can cause the powder to darken and become slightly damp.
Best Tips for Perfect Layers
Dissolve the cornstarch completely. Always whisk the cornstarch into cold milk before heating. This greatly reduces the chance of lumps.
Keep stirring while cooking. Cornstarch pudding can thicken quickly, so continuous stirring helps create a smooth texture and prevents the bottom from sticking.
Don’t rush the first layer. The strawberry layer needs enough time to firm up before the vanilla pudding is added.
Pour gently. Using the back-of-a-spoon technique helps protect the strawberry layer and keeps the two colors distinct.
Don’t boil aggressively. Medium heat is sufficient. Gentle cooking produces a smoother pudding.
Chill thoroughly. Four hours is the minimum recommended chilling time, but an overnight rest gives the dessert a firmer, cleaner texture.
Dust with cocoa at the last moment. This keeps the topping looking fresh and elegant.
Best Ingredient Options
Milk
Whole milk gives the pudding a particularly creamy texture. You can use 2% milk, although the finished dessert will be slightly lighter.
Strawberry Flavor
Strawberry extract provides a concentrated flavor without adding extra liquid. If you prefer a more natural strawberry taste, you can replace part of the milk with finely puréed strawberries, but the pudding may require slight adjustment because of the additional moisture.
Vanilla
Pure vanilla extract provides the best classic flavor, but vanilla bean paste can also be used for a more pronounced vanilla profile.
Cocoa Powder
Use a good-quality unsweetened cocoa powder for the topping. Sift it before dusting to achieve a smooth, professional finish.
Recipe Variations
🍫 Chocolate & Vanilla
Replace the strawberry extract and pink coloring with 2 tablespoons unsweetened cocoa powder to create a chocolate-and-vanilla layered pudding.
🍓 Strawberry & Chocolate
Keep the strawberry bottom layer and replace the vanilla layer with chocolate pudding. Finish with a light dusting of cocoa.
🥥 Coconut Version
Replace approximately ½ cup of the milk in the vanilla layer with coconut milk for a subtle tropical flavor.
🍋 Strawberry & Lemon
Add a small amount of finely grated lemon zest to the strawberry layer for a brighter fruit flavor.
🍪 Biscuit Base
For a slightly different texture, add a thin layer of crushed vanilla biscuits mixed with melted butter underneath the strawberry pudding.
What to Serve With
This pudding is delicious on its own, but you can make it even more special with a few simple additions.
Serve individual portions with fresh strawberries, a spoonful of lightly whipped cream, or a few chocolate shavings.
For a dessert table, pair it with simple cookies, shortbread, fresh berries, or small pieces of chocolate cake.
A cup of coffee, espresso, tea, or hot chocolate also pairs beautifully with the creamy pudding.
Make-Ahead Instructions
This is an excellent make-ahead dessert.
Prepare the pudding completely up to 24 hours before serving.
Keep it covered and refrigerated until ready to serve.
Add the cocoa powder shortly before serving for the freshest appearance.
Storage
Store the finished pudding in the refrigerator, tightly covered.
It is best enjoyed within 3 days.
Keep the dessert refrigerated rather than leaving it at room temperature for extended periods because the pudding contains dairy.
Reheating
This dessert is designed to be served cold, so reheating is not recommended.
Simply remove it from the refrigerator shortly before serving.
Freezing
Freezing is not recommended.
The cornstarch-based pudding can develop a different texture after freezing and thawing, becoming watery or slightly grainy.
For the best results, prepare the dessert fresh and refrigerate it instead.
Common Mistakes to Avoid
Adding the cornstarch directly to hot milk: This can create stubborn lumps. Always mix the cornstarch with cold milk first.
Pouring the second layer too quickly: A forceful pour can break through the first layer and create a marbled appearance.
Skipping the chilling time: The layers need adequate time to firm up.
Using too much food coloring: A single drop may be enough to create a delicate pink shade.
Adding cocoa too early: Moisture can make the cocoa topping look uneven.
Nutrition Estimate
Approximate values per serving, assuming 8 servings and excluding optional garnishes:
| Nutrient | Approximate Amount |
| Calories | 170 kcal |
| Carbohydrates | 27 g |
| Protein | 4 g |
| Fat | 5 g |
| Saturated Fat | 3 g |
| Sugar | 19 g |
| Fiber | 1 g |
| Sodium | 55 mg |
Nutrition values are estimates and can vary depending on the specific ingredients and brands used.
Frequently Asked Questions
Can I make this dessert without food coloring?
Yes. The food coloring is completely optional. Without it, the strawberry layer will have a much lighter, naturally creamy color.
Can I use strawberry milk?
You can, but regular whole milk combined with strawberry extract gives you better control over the flavor and sweetness.
Why did my pudding develop lumps?
The most common reason is that the cornstarch was not fully dissolved before heating. Whisk the cold milk and cornstarch thoroughly before placing the saucepan on the stove.
Can I use a different dish?
Absolutely. You can use a rectangular baking dish, round serving dish, individual glasses, or small dessert cups.
How can I get very clean layers?
Allow the first layer to partially set before adding the second. Pour the second pudding slowly over the back of a spoon and refrigerate the finished dessert until completely firm.
Can I prepare it the day before?
Yes. In fact, preparing it the day before is ideal because the extended chilling time helps the layers become firm and easier to serve.
Final Thoughts
This Layered Strawberry & Vanilla Pudding is proof that a simple dessert can still look spectacular. The combination of silky strawberry pudding, creamy vanilla, and cocoa creates an attractive contrast of colors and flavors.
With basic ingredients, straightforward preparation, and no oven required, it is an easy dessert to prepare ahead for family dinners, celebrations, parties, and special occasions.