
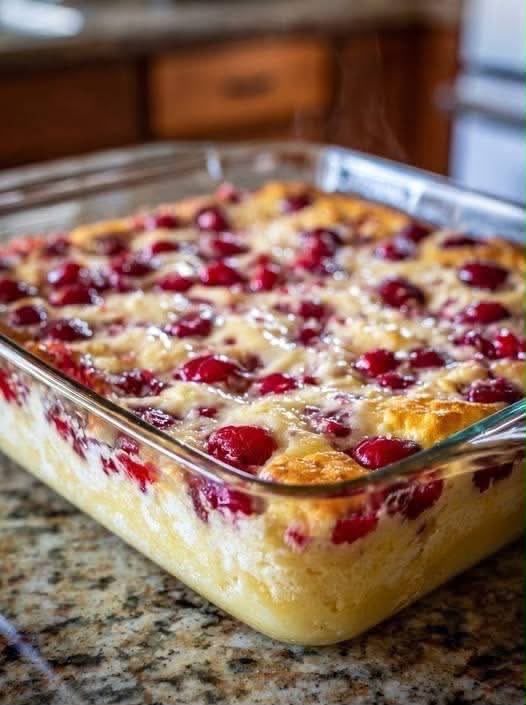
🍒 Classic Old-Fashioned Cherry Cobbler
This Classic Cherry Cobbler is the kind of comforting homemade dessert that feels nostalgic from the very first bite. A simple buttery batter is poured into a baking dish, topped with sweet cherries, and baked until the batter rises around the fruit to create a beautifully golden, tender crust.
The best part is how easy it is. There is no complicated pastry, no rolling pin, and no special equipment required. Just a handful of everyday ingredients and one baking dish.
Recipe Overview
| Category | Details |
| Prep Time | 10 minutes |
| Cook Time | 40–45 minutes |
| Cooling Time | 10–15 minutes |
| Total Time | About 1 hour |
| Servings | 6–8 |
| Difficulty | Easy |
| Method | Baking |
| Cuisine | American |
| Best For | Dessert, Family Gatherings, Holidays |
Why You’ll Love This Recipe
This cherry cobbler has an incredibly simple preparation method, making it perfect for both beginner and experienced home bakers.
The melted butter creates rich flavor and wonderfully golden edges, while the soft cake-like batter balances the sweet and slightly tangy cherry filling.
Another reason this recipe is so popular is its one-dish preparation. You don’t need to prepare a separate pie crust or spend time assembling individual pastries.
Served warm with vanilla ice cream, this old-fashioned cobbler becomes an especially irresistible dessert.
🍒 Ingredients
Cobbler Batter
| Ingredient | Quantity |
| Unsalted butter | ½ cup (1 stick / 113 g) |
| All-purpose flour | 1 cup (125 g) |
| Granulated sugar | 1 cup (200 g) |
| Baking powder | 1 teaspoon |
| Whole milk or 2% milk | 1 cup (240 ml) |
| Vanilla extract | 1 teaspoon |
Cherry Filling
| Ingredient | Quantity |
| Cherry pie filling | 1 can (21 oz / 595 g) |
Optional Topping
| Ingredient | Quantity |
| Coarse sugar | 1 tablespoon |
| Vanilla ice cream | For serving |
Step-by-Step Instructions
Preheat the Oven
Preheat your oven to 350°F (175°C).
Place an 8 × 8-inch or 9 × 9-inch baking dish inside the oven while it preheats.
Melt the Butter
Place the ½ cup of unsalted butter directly into the baking dish.
Allow the butter to melt completely, usually taking about 5 minutes.
Carefully remove the hot dish from the oven using oven mitts.
Make sure the butter is spread across the bottom of the dish.
Do not stir the butter into the batter.
Prepare the Batter
In a medium mixing bowl, whisk together:
- 1 cup all-purpose flour
- 1 cup granulated sugar
- 1 teaspoon baking powder
Pour in the 1 cup milk and 1 teaspoon vanilla extract.
Whisk until you have a relatively smooth batter.
A few tiny lumps are perfectly fine, so avoid overmixing.
Add the Batter
Carefully pour the batter evenly over the melted butter in the baking dish.
Do not stir.
The butter may rise around the edges of the batter, which is exactly what you want.
Add the Cherries
Spoon the cherry pie filling evenly over the top of the batter.
Again, do not stir.
It may look unusual at this stage, with the cherries sitting on top of the batter, but this is part of the magic of this old-fashioned cobbler.
As the dessert bakes, the batter rises around the cherries and forms a golden, tender crust.
Add Optional Sugar
For a slightly crispier and more sparkling crust, sprinkle approximately 1 tablespoon of coarse sugar evenly over the surface.
This step is optional.
Bake
Place the dish in the preheated oven.
Bake at 350°F (175°C) for 40–45 minutes.
The cobbler is ready when:
- The top is golden brown.
- The edges are bubbling.
- The center looks set rather than wet.
- The batter has risen around the cherries.
If your oven tends to bake unevenly, rotate the dish carefully halfway through baking.
Cool Slightly
Remove the cobbler from the oven and place it on a heat-safe surface.
Allow it to cool for approximately 10–15 minutes.
This short resting period allows the filling to thicken slightly while keeping the dessert pleasantly warm.
🍨 How to Serve
For the classic presentation, spoon the warm cherry cobbler into individual bowls.
Top each serving with a generous scoop of vanilla ice cream.
The contrast between the warm cherry filling, buttery cake-like crust, and cold melting ice cream is especially delicious.
You can also add a small amount of whipped cream or a light dusting of powdered sugar.
Best Tips for Perfect Cherry Cobbler
Don’t stir the layers. The unusual layering technique is what allows the batter to rise around the cherries during baking.
Use room-temperature milk if possible. It incorporates more easily into the dry ingredients.
Don’t overmix the batter. Mix only until the ingredients are combined for a tender texture.
Use a sturdy baking dish. Glass or ceramic dishes work particularly well for this recipe.
Be careful with the hot butter. The baking dish will be extremely hot when you remove it from the oven.
Watch the final few minutes. Baking times can vary between ovens, so look for a golden top and bubbling edges rather than relying only on the clock.
Let it rest before serving. Ten to fifteen minutes is enough to allow the filling to settle without losing that wonderful warm-dessert texture.
Best Ingredient Options
Cherry Pie Filling
Canned cherry pie filling makes this recipe incredibly convenient and consistent.
For a more homemade approach, you can prepare your own cherry filling using fresh or frozen pitted cherries, sugar, cornstarch, lemon juice, and a little water.
Butter
Unsalted butter gives you better control over the overall flavor. If using salted butter, you can still make the recipe successfully.
Milk
Whole milk produces the richest result, while 2% milk works well if that’s what you have available.
Vanilla
Pure vanilla extract gives the batter a warm, classic flavor. Vanilla bean paste can also be used.
🍒 Fresh Cherry Variation
If fresh cherries are in season, you can replace the canned filling with approximately 2 cups of pitted cherries.
Add the cherries to a saucepan with:
- ¼ cup granulated sugar
- 1 tablespoon cornstarch
- 2 tablespoons water
- 1 teaspoon lemon juice
Cook over medium heat for approximately 5–7 minutes, stirring gently, until the cherries soften and the juices thicken.
Allow the filling to cool slightly before spooning it over the batter.
Recipe Variations
🍑 Peach Cobbler
Replace the cherry filling with sliced peaches for a classic peach version.
🫐 Blueberry Cobbler
Use fresh or canned blueberry filling instead of cherries for a beautiful berry variation.
🍓 Mixed Berry Cobbler
Combine strawberries, blueberries, raspberries, and blackberries for a colorful fruit-filled dessert.
🍋 Lemon-Cherry Cobbler
Add 1 teaspoon finely grated lemon zest to the batter to complement the cherries with a fresh citrus flavor.
🍫 Chocolate Cherry Cobbler
Add a small amount of chocolate chips to the batter before adding the cherry filling for a chocolate-and-cherry dessert.
What to Serve With
The most classic accompaniment is vanilla ice cream.
You can also serve the cobbler with lightly sweetened whipped cream, crème fraîche, or a spoonful of plain yogurt.
For a special occasion, add fresh cherries and a few chocolate curls to each serving.
Coffee, espresso, black tea, or a glass of cold milk also pairs beautifully with this warm dessert.
Make-Ahead Instructions
You can prepare the batter shortly before baking, but this cobbler is best when baked fresh.
If you need to prepare it ahead, bake it several hours before serving and allow it to cool.
Cover it and store it according to the storage instructions below.
For the best texture, warm it gently before serving.
Storage
Allow leftover cobbler to cool completely.
Cover the baking dish tightly or transfer individual portions to airtight containers.
Refrigerate for up to 3–4 days.
Because the dessert contains dairy and fruit filling, refrigeration is recommended for longer storage.
Reheating
For individual portions, microwave for approximately 20–30 seconds, then check the temperature and continue in short intervals if necessary.
For the entire cobbler, cover loosely with foil and warm in a 300°F (150°C) oven for approximately 15–20 minutes.
Avoid overheating, as this can dry out the cake-like topping.
Freezing
Cherry cobbler can be frozen, although the topping may become slightly softer after thawing.
Allow the cobbler to cool completely before freezing.
Wrap the baking dish tightly with plastic wrap followed by aluminum foil, or place individual portions in freezer-safe containers.
Freeze for up to 2–3 months for the best quality.
Thaw overnight in the refrigerator before reheating.
Common Mistakes to Avoid
Stirring the Batter and Butter
Don’t mix the melted butter and batter together. Keeping the layers separate is important to the characteristic texture of this cobbler.
Stirring in the Cherries
The cherries should sit on top of the batter. They will naturally settle and become surrounded by the rising batter during baking.
Overmixing
Too much mixing can make the topping heavier. Whisk only until the ingredients are combined.
Cutting Immediately
Give the cobbler about 10–15 minutes to rest after baking. This makes it easier to serve and allows the filling to settle.
Underbaking
If the center still looks wet or liquid, continue baking for several more minutes and check again.
Nutrition Estimate
Approximate values per serving when divided into 8 portions:
| Nutrient | Approximate Amount |
| Calories | 360 kcal |
| Carbohydrates | 58 g |
| Protein | 4 g |
| Fat | 13 g |
| Saturated Fat | 8 g |
| Sugar | 39 g |
| Fiber | 1 g |
| Sodium | 180 mg |
Nutrition information is an estimate and will vary depending on the specific brands and ingredients used.
Frequently Asked Questions
Why does the batter go underneath the cherries?
The batter is deliberately poured into the melted butter and the cherries are placed on top. During baking, the batter rises around the fruit, creating the characteristic cobbler texture.
Can I use fresh cherries instead of canned filling?
Yes. Fresh or frozen pitted cherries work very well. You’ll need to cook them briefly with sugar and a thickener first so they develop a suitable pie-filling consistency.
Can I use frozen cherries?
Yes. Thawing them first is preferable because excess liquid can make the cobbler too wet.
Can I use a 9 × 13-inch pan?
You can, but the cobbler will be thinner and may require a shorter baking time. For the classic thick texture, an 8 × 8-inch or 9 × 9-inch dish is preferable.
Can I make this cobbler less sweet?
Yes. If using a particularly sweet canned cherry filling, you can reduce the sugar in the batter slightly. Keep in mind that changing the sugar quantity can affect the final texture.
How do I know when it’s done?
Look for a golden-brown top, bubbling cherry filling around the edges, and a set center. A toothpick inserted into the cake portion should come out without wet batter.
Final Thoughts
This Classic Old-Fashioned Cherry Cobbler is a wonderfully simple dessert that delivers big homemade flavor without complicated preparation.
The buttery batter, sweet cherries, and golden crust come together beautifully in one baking dish. Serve it warm with a scoop of vanilla ice cream for the ultimate comforting dessert.