
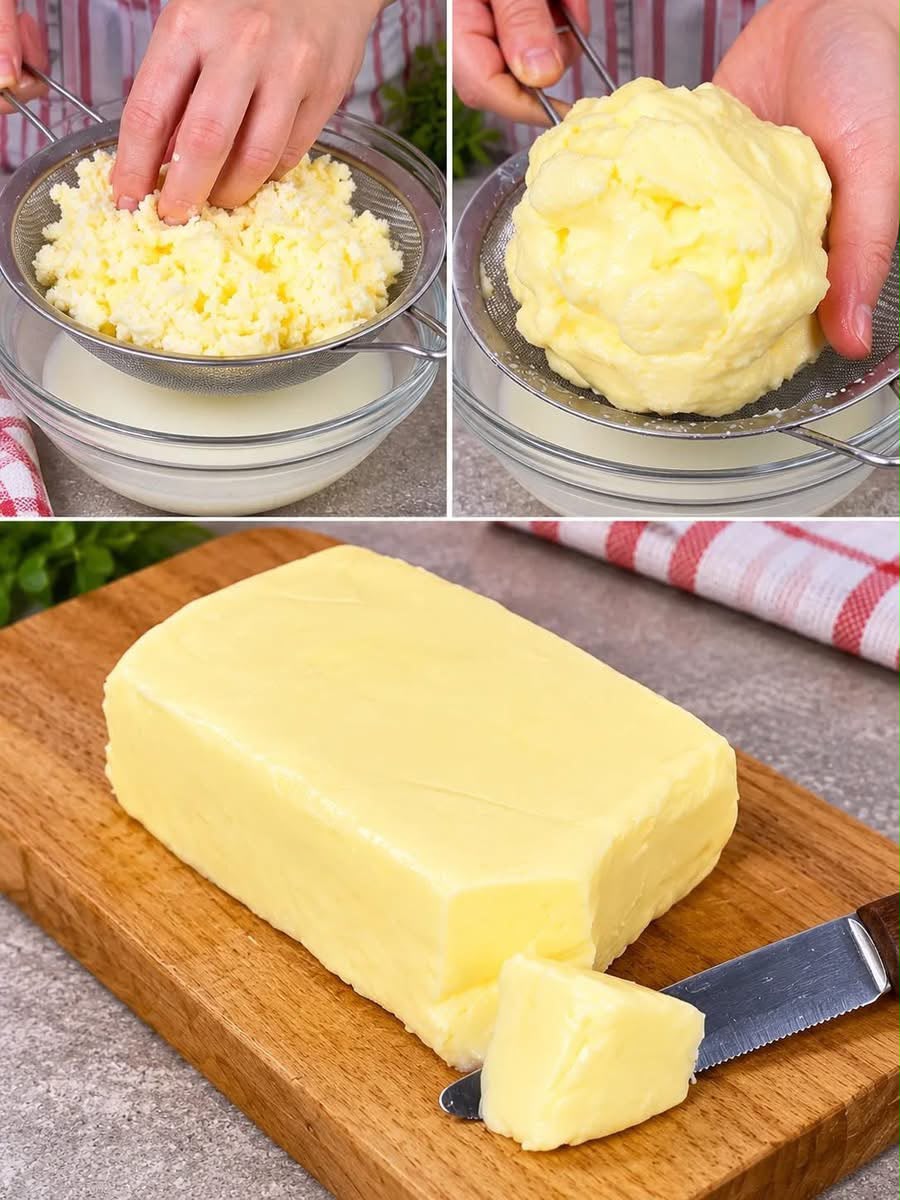
🧈 Homemade Butter From Heavy Cream
Fresh homemade butter is surprisingly easy to make. With just heavy whipping cream, ice water, and optional salt, you can transform cream into a rich, creamy block of fresh butter while collecting the naturally separated buttermilk.
The key is to continue mixing past the whipped-cream stage until the cream separates into golden butter solids and liquid buttermilk.
Recipe Overview
| Details | Information |
| Prep Time | 5 minutes |
| Churning Time | 5–10 minutes |
| Washing Time | 10 minutes |
| Total Time | About 20–25 minutes |
| Yield | About 170–225 g butter |
| Difficulty | Easy |
| Cuisine | Homemade / Traditional |
Why You’ll Love This Recipe
Homemade butter requires only a few ingredients and basic kitchen equipment.
The finished butter has a fresh, creamy flavor and can be shaped into a traditional block, log, or small portions.
You also get fresh buttermilk as a useful by-product, which can be used in pancakes, biscuits, waffles, cakes, and other baked goods.
Ingredients
| Ingredient | Quantity | Notes |
| 🥛 Heavy whipping cream | 473 ml / 2 cups | Use cream containing at least 36% milk fat |
| 🧊 Ice water | 2–3 cups | Used to wash and firm the butter |
| 🧂 Fine salt | ¼ teaspoon | Optional, for salted butter |
Equipment
A stand mixer, hand mixer, food processor, or traditional churn can be used.
You’ll also need a large bowl, fine-mesh sieve or cheesecloth, spatula, and clean container for storing the finished butter.
Step-by-Step Instructions
🥛 Take the Chill Off the Cream
Pour the heavy cream into a large mixing bowl.
Let it sit at room temperature for approximately 20–30 minutes before starting. It should still be cool but not extremely cold.
Avoid leaving dairy at room temperature for an extended period.
🌀 Whip the Cream
Place the bowl on your stand mixer and begin mixing at medium speed.
The cream will first become liquid and foamy, then gradually thicken into whipped cream.
Continue mixing rather than stopping at the whipped-cream stage.
🧈 Continue Churning
Keep mixing for approximately 5–10 minutes, although the exact time can vary depending on the equipment, cream temperature, and fat content.
The whipped cream will become grainy and eventually break apart.
You’ll suddenly see yellow butter clumps surrounded by a thin, milky liquid.
This is the separation you’re looking for.
Turn off the mixer immediately once the butter has clearly separated.
🥣 Strain the Buttermilk
Place a fine-mesh sieve over a clean bowl.
Pour the contents of the mixing bowl into the sieve.
Allow the liquid to drain completely.
The pale liquid is fresh buttermilk and can be reserved for cooking or baking.
💧 Wash the Butter
Transfer the butter solids into a clean bowl.
Pour approximately ½ cup of ice water over the butter.
Gently press and knead the butter with a spatula or clean hands to release remaining milk solids and liquid.
Drain the cloudy water.
Repeat the process with fresh ice water until the water becomes mostly clear.
This washing step is important because removing as much remaining buttermilk as possible helps the butter keep longer.
👐 Knead the Butter
Once the water is mostly clear, gather the butter together.
Use a spatula or butter paddles to press and knead it gently.
Continue pressing until most of the remaining liquid has been expelled.
Drain any water that collects in the bowl.
🧂 Add Salt
If you want salted butter, add ¼ teaspoon of fine salt.
Knead gently until the salt is evenly distributed.
For unsalted butter, simply leave the salt out.
🧈 Shape the Butter
Place the finished butter onto a piece of parchment paper.
Shape it into a block, log, or small individual portions.
Press the surface smooth with a spatula.
For the traditional appearance shown in the image, shape it into a compact rectangular block and smooth the edges.
❄️ Chill
Wrap the butter tightly in parchment paper or place it in an airtight container.
Refrigerate for at least 1 hour before serving.
The butter will become firmer as it chills.
Best Tips
Use heavy cream with at least 36% fat for the best results.
Don’t stop mixing when the cream becomes whipped cream. The important transformation happens afterward.
If the cream isn’t separating, continue mixing for several more minutes.
Washing the butter thoroughly with ice water is one of the most important steps. Remaining buttermilk can shorten the butter’s storage life.
Use very cold water during the washing stage to help firm the butter and make it easier to handle.
Avoid squeezing the butter aggressively because excessive handling can make the finished texture less pleasant.
Best Ingredient Options
Heavy Cream
Fresh heavy whipping cream with a high milk-fat percentage generally produces the best butter.
For a richer result, choose cream containing around 36–40% milk fat.
Salt
Fine sea salt or table salt can be used.
Start with a small quantity because it’s easy to add more salt but difficult to remove it.
Recipe Variations
🧂 Classic Salted Butter
Add ¼–½ teaspoon salt per 2 cups of cream, depending on your preference.
🌿 Herb Butter
Mix the finished butter with finely chopped fresh herbs such as parsley, chives, thyme, or rosemary.
🧄 Garlic Herb Butter
Combine softened homemade butter with finely minced garlic and fresh herbs for a flavorful spread.
🍯 Honey Butter
Mix softened unsalted butter with a small amount of honey for a sweet spread that’s excellent on warm bread or pancakes.
🌶️ Spiced Butter
Add a pinch of paprika, black pepper, chili flakes, or other preferred seasonings.
What to Serve With Homemade Butter
Fresh homemade butter is delicious spread over:
Warm crusty bread
Toast
Dinner rolls
Cornbread
Pancakes
Waffles
Biscuits
Roasted vegetables
Steamed potatoes
Freshly baked baguette
Make-Ahead Instructions
Homemade butter can be prepared ahead of time and refrigerated until needed.
For convenient use, divide the butter into smaller portions before refrigerating.
You can also freeze individual portions and thaw them in the refrigerator when needed.
Storage
Keep homemade butter in a clean, airtight container in the refrigerator.
For the best quality, use it within approximately 1–2 weeks, especially if it contains residual moisture or was made without commercial processing.
Always use clean utensils when removing butter from the container.
Reheating and Softening
Butter doesn’t need to be reheated.
If you want spreadable butter, remove the required amount from the refrigerator and allow it to soften at room temperature for a short period.
Avoid repeatedly warming and cooling the entire batch.
Freezing
Homemade butter freezes well.
Wrap it tightly in parchment paper or plastic wrap, then place it inside a freezer-safe airtight bag or container.
Freeze in convenient portions for approximately 3–6 months for best quality.
Thaw overnight in the refrigerator before using.
Common Mistakes to Avoid
Stopping at whipped cream: Keep mixing until the butter separates.
Using low-fat cream: Cream with insufficient fat may produce disappointing results.
Skipping the washing stage: Remaining buttermilk can negatively affect storage life.
Not draining enough liquid: Press the butter gently to remove as much residual liquid as possible.
Using warm water: Ice-cold water is preferable during the washing process because it helps firm the butter.
Over-salting: Start with a small quantity and adjust gradually.
Frequently Asked Questions
How much butter does 2 cups of cream make?
The yield depends on the fat content of the cream, but 2 cups of heavy cream can produce roughly 170–225 g of butter, with the remainder becoming buttermilk and moisture.
Why isn’t my cream turning into butter?
Make sure you’re using heavy cream with sufficient fat and continue mixing beyond the whipped-cream stage. Cream temperature and equipment can also affect how quickly separation occurs.
Can I use a hand mixer?
Yes. A hand mixer works well, although the process can create splashes once the butter separates, so use a sufficiently deep bowl.
Can I save the liquid?
Yes. The liquid separated during churning can be used in recipes such as pancakes, waffles, biscuits, and quick breads.
Does homemade butter need refrigeration?
Yes. Because homemade butter can retain moisture and milk solids, refrigeration is recommended.
Can I make unsalted butter?
Absolutely. Simply omit the salt.
Nutrition Estimate
Nutrition will vary according to the cream used and the amount of butter produced.
| Nutrient | Approximate Amount per 1 tbsp |
| Calories | 100 kcal |
| Fat | 11 g |
| Saturated Fat | 7 g |
| Carbohydrates | 0 g |
| Protein | 0 g |
| Sodium | Varies with added salt |
Final Thoughts
Making homemade butter is a simple kitchen project that turns ordinary heavy cream into a beautiful, fresh butter block.
The most important part is recognizing the stages: cream → whipped cream → grainy mixture → butter + buttermilk.
Once the butter separates, strain it, wash it thoroughly with ice water, knead out the remaining liquid, add salt if desired, and shape it into your preferred form. The result is wonderfully creamy homemade butter that’s perfect for spreading, baking, and serving with fresh bread.