
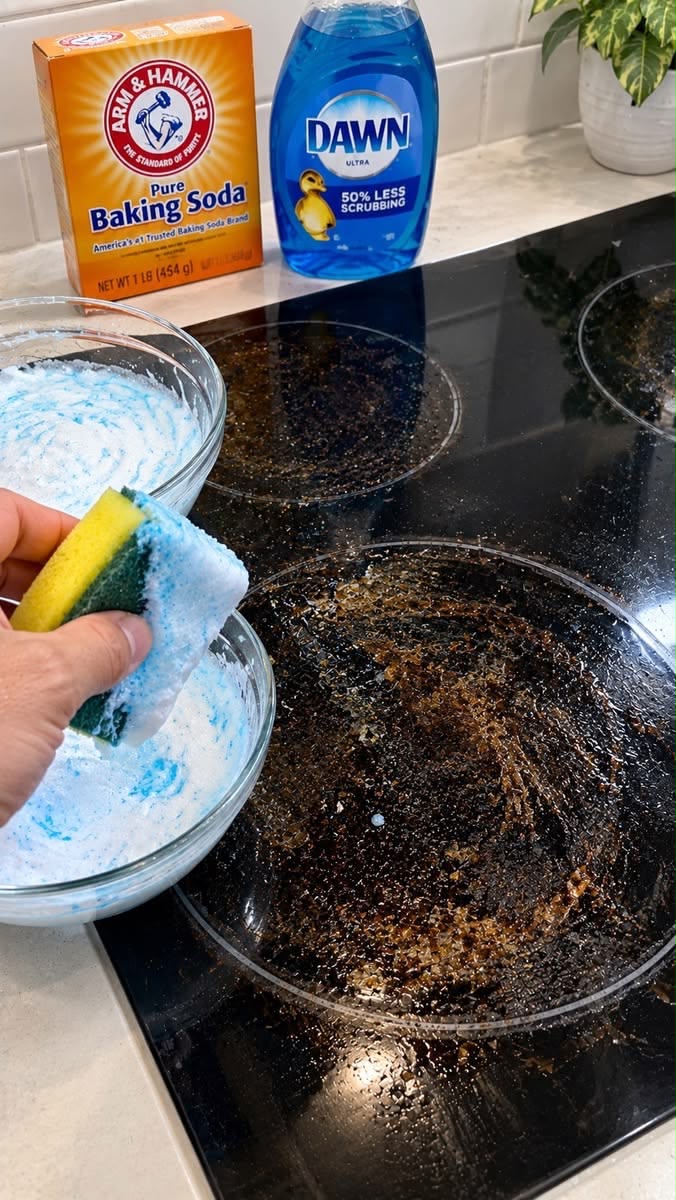
This homemade cleaning paste combines baking soda and dish soap to help loosen greasy residue and everyday grime around the kitchen. Its thick texture makes it easy to apply to selected areas, including compatible sinks, cookware, and certain stovetop surfaces.
Although this DIY cleaner is often called a “Miracle Cleaner,” results depend on the surface and the type of stain. Baking soda is mildly abrasive, so it can scratch delicate finishes, including some glass and ceramic cooktops. Always check the manufacturer’s cleaning instructions before use.
Recipe Overview
| Detail | Information |
| Preparation Time | 5 minutes |
| Application Time | 15–30 minutes, where appropriate |
| Total Time | 20–35 minutes |
| Difficulty | Easy |
| Yield | Approximately 1 cup of paste |
| Best For | Compatible sinks, durable surfaces, and selected cookware |
| Main Benefits | Helps loosen grease and everyday grime |
Why You’ll Love This Homemade Cleaner
Budget-Friendly: The recipe uses two common household ingredients, making it an affordable option for routine kitchen cleaning.
Easy to Prepare: Simply combine the ingredients to create a thick paste without specialized equipment.
Useful for Greasy Residue: Dish soap helps loosen oily deposits, while baking soda provides mild abrasive action.
Customizable Texture: You can adjust the consistency with small amounts of water or additional baking soda.
Versatile for Compatible Surfaces: The paste may be useful for selected kitchen cleaning tasks when the surface manufacturer permits mild abrasive products.
Ingredients
| Ingredient | Quantity | Purpose |
| Baking soda | 1 cup (approximately 150–200 g, depending on packing) | Helps loosen grime through mild abrasion |
| Dish soap | 2–3 tablespoons | Helps break down greasy residue |
| Water, optional | 1–2 tablespoons, added gradually | Adjusts the consistency |
Important: Water is the preferred optional addition for adjusting the texture. Do not add hydrogen peroxide unless you have verified that it is compatible with the intended surface and other ingredients. It is not necessary for this basic recipe.
Equipment Needed
- A clean mixing bowl
- A spoon or spatula
- A soft sponge
- A damp microfiber cloth
- A dry, clean cloth
Step-by-Step Instructions
Step 1: Add the Baking Soda
Pour 1 cup of baking soda into a clean bowl. Break up any lumps with a spoon so the powder is easier to mix.
Step 2: Add the Dish Soap
Add 2 tablespoons of dish soap and stir until the ingredients begin to form a thick paste.
If the mixture is too dry, add the remaining tablespoon of dish soap gradually.
Step 3: Adjust the Consistency
If necessary, add water 1 teaspoon at a time until the paste becomes smooth and spreadable.
The ideal texture should resemble thick cream or toothpaste. Avoid making it too runny, as a thicker paste is easier to control during application.
Step 4: Test the Surface
Before cleaning, check the manufacturer’s instructions and test the paste on a small, inconspicuous area of a compatible surface.
Do not use this abrasive paste on delicate finishes or any surface whose care instructions prohibit abrasive cleaners.
Step 5: Apply to the Dirty Area
Using a soft sponge, spread a thin layer over the greasy or stained area.
Avoid applying the paste to a hot stovetop. Make sure the cooking surface is switched off and completely cool before cleaning.
Step 6: Let It Sit Briefly
For compatible, durable surfaces, allow the paste to sit for approximately 5–10 minutes initially.
Although the original recipe suggests 15–30 minutes, a shorter contact time is a more cautious starting point. Do not allow the paste to dry completely on the surface.
Step 7: Gently Wipe Away the Dirt
Use a soft, non-abrasive sponge to loosen the residue. Apply gentle pressure and avoid steel wool, scouring pads, or rough brushes that could scratch the finish.
For stubborn deposits, repeat the process if the surface instructions permit it.
Step 8: Rinse Thoroughly
Wipe away the paste with a clean, damp microfiber cloth. Rinse the cloth frequently until all powder and soap residue have been removed.
Step 9: Dry and Polish
Use a dry microfiber cloth to remove remaining moisture and leave the surface clean.
For cookware, rinse thoroughly and wash again with ordinary dish soap if needed before using it for food preparation.
Best Tips for Using the Miracle Cleaner
Start With a Small Amount: A thin layer is usually easier to remove and reduces unnecessary residue.
Use a Soft Sponge: Gentle cleaning helps protect finishes from scratches.
Never Clean a Hot Cooktop: Wait until the surface has cooled completely before applying any cleaning product.
Remove All Residue: Baking soda and soap can leave a visible film if the surface is not rinsed thoroughly.
Treat Burnt-On Food Carefully: Do not scrape delicate glass surfaces with abrasive tools. Use a cooktop cleaner and scraper specifically approved by the manufacturer when necessary.
Prepare Small Batches: This makes the paste easier to use and avoids unnecessary storage.
Best Cleaning Options for Different Surfaces
| Surface | Recommended Approach |
| Stainless steel sink | Mild dish soap and a soft sponge; test baking soda first |
| Durable enamel sink | Use a cleaner approved for the enamel finish |
| Glass-ceramic cooktop | Use a dedicated cooktop cleaner and approved non-abrasive tools |
| Induction cooktop | Follow the manufacturer’s glass-surface cleaning instructions |
| Stainless steel cookware | Use a suitable cookware cleaner and a non-scratching sponge |
| Nonstick cookware | Use warm water, dish soap, and a soft sponge |
| Marble or natural stone | Use a stone-safe, pH-neutral cleaner |
Special warning for glass and induction cooktops: Baking soda can scratch certain finishes, particularly if rubbed against trapped food particles. A manufacturer-approved cooktop cleaner is the safer choice for these surfaces.
Common Mistakes to Avoid
Scrubbing Too Hard: Excessive friction can scratch finishes and leave permanent marks.
Using the Paste on Every Surface: Glass, polished stone, nonstick coatings, and delicate finishes may require different products.
Applying It to a Hot Surface: Heat can cause rapid drying and may make residue harder to remove.
Leaving the Paste to Dry: Dried baking soda can be more difficult to wipe away.
Adding Too Much Water: An overly thin mixture can run off the surface and become harder to control.
Mixing in Extra Cleaning Chemicals: Avoid combining this paste with bleach, ammonia-based products, or other cleaners. Additional ingredients do not automatically improve cleaning performance.
Storage and Shelf Life
For the best results, prepare only the amount you need for one cleaning session. Store dry baking soda and dish soap in their original containers according to their labels.
Because this homemade paste has no validated shelf life, it is preferable to prepare a fresh batch as needed rather than keeping a wet mixture for an extended period. Keep it away from children and pets.
Frequently Asked Questions
Does this Miracle Cleaner remove burnt-on grease?
It may help loosen some greasy residue on compatible, durable surfaces. Heavily carbonized food may require a specialized cleaner or a manufacturer-approved cleaning tool.
Can I use it on a glass-ceramic stovetop?
It is not the safest first choice because baking soda is mildly abrasive and can scratch some cooktop finishes. Use a cleaner specifically approved for your stovetop.
Can I use this paste on stainless steel sinks?
Possibly, but test a hidden area first and follow the sink manufacturer’s instructions. Use a soft sponge and avoid aggressive scrubbing.
Is hydrogen peroxide necessary?
No. Baking soda and dish soap are sufficient for this basic recipe. Adding hydrogen peroxide is unnecessary and may introduce compatibility concerns depending on the surface and product formulation.
Can I use it on nonstick pans?
It is better to avoid this abrasive paste on nonstick coatings. Warm water, ordinary dish soap, and a soft sponge are generally safer choices.
How long should I leave the paste on a surface?
Start with 5–10 minutes on a compatible surface, unless the manufacturer’s instructions specify otherwise. Do not allow it to dry completely.
Does this cleaner disinfect kitchen surfaces?
No. This recipe is intended to help remove dirt and grease, not to provide proven disinfection. Use an appropriate product labeled for the surface if disinfection is required.
Final Thoughts
This homemade baking soda and dish soap paste is an easy DIY option for helping remove everyday grease and grime from certain compatible kitchen surfaces. Its thick consistency makes it convenient to apply, and the ingredients are inexpensive and widely available.
For the best results, prepare a small batch, test it before use, clean gently, and rinse thoroughly. Most importantly, choose a cleaning method that matches your surface. Glass-ceramic cooktops, induction surfaces, nonstick pans, and natural stone may require specialized, non-abrasive products to prevent scratches and permanent damage.