
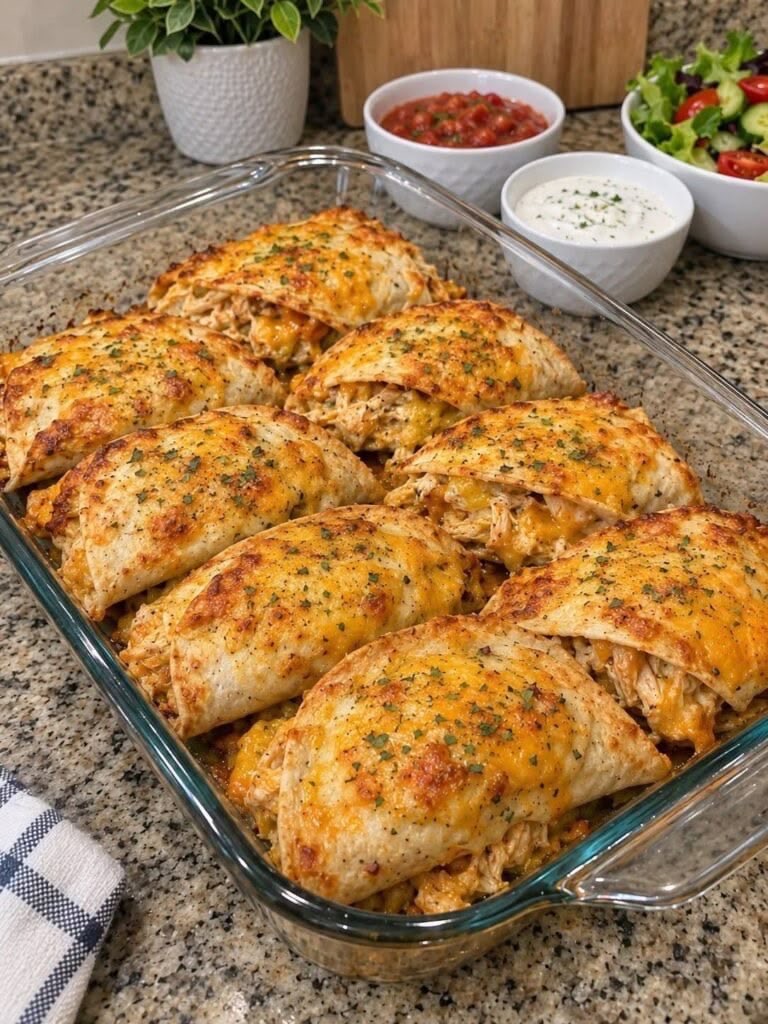
These cheesy baked chicken tortilla pockets are an easy, family-friendly meal filled with tender shredded chicken, flavorful salsa, sautéed onions, garlic, and plenty of melted cheese. Wrapped in soft flour tortillas and baked until golden and crispy around the edges, they deliver all the delicious flavors of chicken quesadillas in a convenient oven-baked dish.
Perfect for busy weeknight dinners, casual lunches, or family gatherings, this simple recipe uses everyday ingredients and requires minimal preparation. Serve the pockets with sour cream, fresh salsa, or guacamole for a satisfying meal everyone will love.
Recipe Overview
| Details | Information |
| Preparation Time | 15 minutes |
| Cooking Time | 15–20 minutes |
| Total Time | 30–35 minutes |
| Servings | 6–8 pockets |
| Course | Lunch or Dinner |
| Cuisine | Mexican-inspired |
| Cooking Method | Oven-baked |
| Oven Temperature | 375°F (190°C) |
Why You’ll Love This Recipe
These baked chicken tortilla pockets are crispy on the outside, tender on the inside, and packed with cheesy goodness. The combination of shredded chicken, salsa, garlic, and melted cheese creates a flavorful filling without requiring complicated cooking techniques.
Baking the pockets together in one dish makes preparation easy and cleanup simple. You can also customize the filling with your favorite vegetables, seasonings, and cheeses to create a delicious homemade meal that suits your family’s preferences.
Ingredients
For the Chicken Filling
- 2–3 boneless, skinless chicken breasts (approximately 1–1¼ lb or 450–570 g), cooked and shredded
- 1 medium onion, finely chopped
- 2 garlic cloves, minced
- ⅔ cup (150 ml) salsa or prepared tomato sauce
- 1 tablespoon fajita seasoning, or a mixture of cumin, paprika, salt, and black pepper
- 1 tablespoon olive oil
- 1 cup (100 g) shredded cheddar or mozzarella cheese, for mixing into the filling
For the Tortilla Pockets
- 6–8 medium flour tortillas
- 1 cup (100 g) additional shredded cheese, such as cheddar, mozzarella, or Mexican-style cheese
- 1–2 tablespoons olive oil or melted butter, for brushing
Optional Toppings and Serving Suggestions
- Sour cream
- Fresh salsa
- Guacamole
- Fresh cilantro, chopped
- Sliced jalapeños
- Shredded lettuce
Step-by-Step Instructions
Step 1: Prepare the Chicken
Cook the chicken breasts using your preferred method, such as simmering them in water or baking them until the thickest part reaches an internal temperature of 165°F (74°C).
Allow the chicken to cool slightly, then shred it using two forks. Set aside while preparing the sauce.
If you already have cooked or rotisserie chicken available, you can use it to save time.
Step 2: Sauté the Onion and Garlic
Preheat your oven to 375°F (190°C).
Heat the olive oil in a large skillet over medium heat. Add the chopped onion and cook for 3–4 minutes, stirring occasionally, until softened.
Add the minced garlic and cook for another 30 seconds, stirring continuously to prevent it from burning.
Step 3: Make the Chicken Filling
Add the shredded chicken to the skillet, followed by the salsa and fajita seasoning.
Stir thoroughly until the chicken is evenly coated with the sauce and spices. Allow the mixture to simmer for 3–5 minutes so the flavors can combine.
Remove the skillet from the heat and stir in approximately half of the shredded cheese intended for the filling. Mix until the cheese begins to melt.
The filling should be moist and flavorful but not watery. If there is excess liquid, simmer it for another minute or two before assembling the tortillas.
Step 4: Prepare the Baking Dish
Lightly grease a large rectangular baking dish with olive oil or butter.
Arrange your tortillas on a clean work surface. If they feel stiff, warm them in the microwave for 10–15 seconds to make folding easier.
Step 5: Fill and Fold the Tortillas
Spoon a generous portion of the chicken mixture onto one half of each tortilla, leaving a small border around the edges.
Fold the other half over the filling to create a half-moon shape. Press gently to help the tortilla hold its shape.
Arrange the folded tortillas in the prepared baking dish, placing them close together with the folded edges facing down where possible.
Avoid overfilling the tortillas, as too much filling can cause them to open during baking.
Step 6: Add the Oil and Cheese
Brush the tops of the folded tortillas lightly with olive oil or melted butter. This helps them turn golden and crisp in the oven.
Sprinkle the remaining shredded cheese evenly over the tortilla pockets, making sure each one receives a generous topping.
Step 7: Bake Until Golden
Place the baking dish in the preheated oven and bake for 15–20 minutes.
The tortilla edges should become lightly golden and crispy, while the cheese on top should melt completely and develop a lightly browned surface.
If you want a more deeply golden cheese topping, switch to the broiler for the final 1–2 minutes, watching carefully to prevent burning.
Step 8: Rest and Serve
Remove the baking dish from the oven and let the tortilla pockets rest for approximately 3–5 minutes.
Serve warm with bowls of salsa, sour cream, or guacamole. Add fresh cilantro or sliced jalapeños for extra flavor, and pair with a crisp salad for a complete meal.
Best Tips for Perfect Chicken Tortilla Pockets
Use tortillas that are flexible enough to fold without cracking. Warming them briefly before filling makes the process much easier.
Keep the chicken filling thick rather than watery. Excess liquid can make the tortillas soggy and cause them to split during baking.
For the best melted cheese, combine cheddar for a rich flavor with mozzarella for a stretchy, gooey texture. Brush the tortilla surfaces lightly with oil rather than soaking them, which helps them become crisp without feeling greasy.
Allow the pockets to rest for a few minutes after baking so the filling settles and the cheese is less likely to spill out when serving.
Best Ingredient Options
Chicken: Boneless, skinless chicken breasts provide a lean, tender filling. Chicken thighs are another excellent choice if you prefer a juicier texture.
Tortillas: Medium flour tortillas are easy to fold and become lightly crisp around the edges. Whole-wheat tortillas can also be used.
Cheese: Cheddar adds a bold, savory flavor, mozzarella creates a stretchy texture, and Monterey Jack melts smoothly. A Mexican-style cheese blend is convenient and delicious.
Salsa: Choose mild, medium, or hot salsa according to your taste. A thick salsa works best because it adds flavor without making the filling too wet.
Seasoning: Fajita seasoning is an easy option, but you can also combine ground cumin, paprika, garlic powder, black pepper, and a little salt.
Recipe Variations
Spicy Chicken Tortilla Pockets
Add chili powder, cayenne pepper, or diced jalapeños to the chicken filling for a spicy version. Serve with cool sour cream to balance the heat.
Chicken and Black Bean Pockets
Mix ½ cup of drained black beans and ½ cup of corn into the chicken filling for extra texture, color, and a more substantial meal.
Creamy Chicken and Cheese Pockets
Add 2–3 tablespoons of cream cheese to the warm chicken mixture before filling the tortillas. This creates a richer, creamier center.
BBQ Chicken Tortilla Pockets
Replace the salsa with your favorite barbecue sauce and combine the chicken with cheddar cheese and a little finely chopped onion for a smoky, sweet variation.
Chicken and Vegetable Pockets
Add sautéed bell peppers, mushrooms, or spinach to the filling. Cook the vegetables first and drain any excess moisture to help keep the tortillas crisp.
What to Serve With Chicken Tortilla Pockets
Serve these cheesy pockets with Mexican rice, black beans, corn salad, or roasted vegetables for a hearty dinner.
For a lighter meal, pair them with a fresh green salad, cucumber and tomato salad, or steamed vegetables. Salsa, sour cream, and guacamole are excellent dipping options that add freshness and creaminess to every bite.
Make-Ahead Instructions
Prepare the shredded chicken filling up to 2 days in advance and store it in an airtight container in the refrigerator.
When ready to serve, reheat the filling until hot, assemble the tortilla pockets, brush with oil, sprinkle with cheese, and bake as directed.
You can also assemble the pockets shortly before baking and refrigerate them briefly. For the best texture, avoid leaving assembled tortillas in the refrigerator for an extended period because the filling can soften the shells.
Storage Instructions
Allow leftover tortilla pockets to cool slightly before transferring them to an airtight container.
Refrigerate within 2 hours of cooking and store for up to 3–4 days. Keep the dipping sauces in separate containers.
For food safety, reheat the chicken filling until it reaches 165°F (74°C).
Reheating Instructions
Oven: Place the tortilla pockets in an oven-safe dish and reheat at 350°F (175°C) for approximately 8–12 minutes, or until heated through.
Air Fryer: Reheat at 325°F (160°C) for 3–5 minutes, checking frequently until the tortilla edges become crisp and the filling is hot.
Microwave: Heat an individual pocket for 30–60 seconds, then continue in short intervals as needed. The tortilla will be softer than when reheated in the oven or air fryer.
Freezing Instructions
For the best results, freeze the cooked chicken filling separately for up to 3 months in a freezer-safe container.
Thaw it overnight in the refrigerator, reheat thoroughly, and assemble fresh tortilla pockets before baking.
Fully assembled pockets can also be frozen, but the tortillas may soften after thawing. If freezing assembled portions, cool them completely, wrap individually, and store in a freezer-safe container for up to 2 months for best quality. Thaw in the refrigerator before reheating.
Common Mistakes to Avoid
Using too much sauce: A watery filling can make the tortillas soggy. Simmer the chicken mixture until thick enough to stay inside the pockets.
Overfilling the tortillas: Too much chicken and cheese can cause the tortillas to open during baking. Use a generous but manageable portion.
Skipping the oil brushing: A light coating of oil or melted butter helps the tortilla surfaces become golden and crisp.
Using cold, stiff tortillas: Tortillas that are not flexible can crack when folded. Warm them briefly before assembling.
Overbaking the pockets: Excessive baking can dry out the chicken and make the tortilla edges too hard. Remove the dish once the cheese is melted and the edges are golden.
Nutrition Estimate
The following values are approximate and vary depending on tortilla size, chicken quantity, cheese type, and toppings.
| Nutrient | Estimated Amount per Serving |
| Calories | 350–450 kcal |
| Protein | 25–35 g |
| Carbohydrates | 25–35 g |
| Total Fat | 14–22 g |
| Saturated Fat | 5–9 g |
| Fiber | 2–4 g |
| Sodium | 500–850 mg |
Estimate based on 8 servings without optional toppings.
Frequently Asked Questions
Can I use leftover cooked chicken?
Yes. Leftover roasted chicken or rotisserie chicken works perfectly. Shred it, mix it with the sautéed onions, garlic, salsa, and seasoning, and continue with the recipe.
Can I make these tortilla pockets in an air fryer?
Yes. Assemble the pockets and brush them lightly with oil. Air-fry at approximately 350°F (175°C) for 6–10 minutes, depending on their size and your appliance. Arrange them in a single layer and check frequently to prevent burning.
Which cheese works best for this recipe?
Cheddar gives the pockets a rich, savory flavor, while mozzarella provides a stretchy texture. Monterey Jack or a Mexican-style cheese blend also works beautifully.
How do I keep the tortillas crispy?
Use a thick chicken filling, avoid excess salsa, brush the tortillas lightly with oil, and bake until the edges are golden. Serve shortly after baking for the best crunch.
Can I prepare this recipe without salsa?
Yes. Replace the salsa with a thick tomato sauce seasoned with cumin, paprika, garlic, and black pepper. You can also use a little chicken broth, but simmer the filling until excess liquid evaporates.
Can I add vegetables to the filling?
Absolutely. Bell peppers, corn, black beans, mushrooms, and spinach are excellent additions. Cook watery vegetables first and drain any excess liquid.
Can I make these pockets ahead for a party?
Yes. Prepare the filling in advance and refrigerate it. Assemble and bake the tortilla pockets shortly before serving so they stay warm, cheesy, and crisp.
Final Thoughts
These cheesy baked chicken tortilla pockets are a simple, versatile recipe that combines juicy seasoned chicken, flavorful salsa, tender onions, and melted cheese inside golden flour tortillas.
Whether you’re preparing a quick weeknight dinner, a casual lunch, or a party appetizer, these easy pockets are guaranteed to be a welcome addition to the table. Customize them with your favorite fillings, serve with fresh salsa and guacamole, and enjoy every warm, cheesy bite!