
Introduction
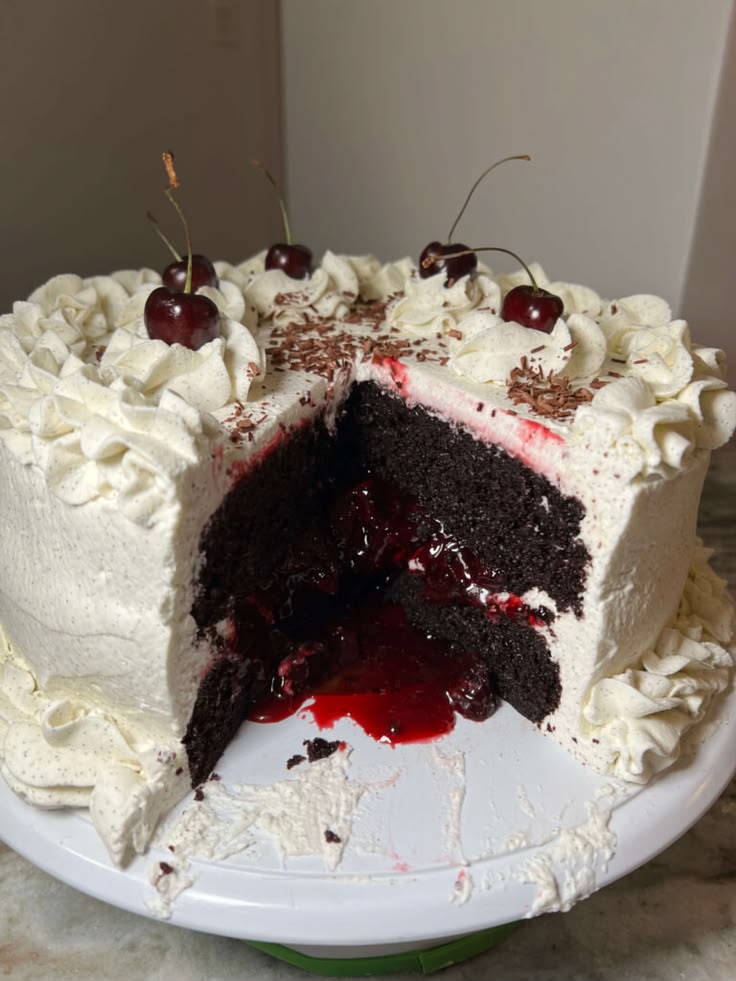
Bring a touch of elegance to your dessert table with this classic Black Forest Cake. Made with rich, moist chocolate cake layers, a sweet and tangy homemade cherry filling, and clouds of fluffy whipped cream, this beautiful dessert is as delicious as it is impressive.
Finished with fresh cherries, delicate chocolate shavings, and decorative whipped cream rosettes, this traditional-inspired cake is perfect for birthdays, holidays, family celebrations, and special occasions.
Recipe Overview
| Preparation | Time |
| Prep Time | 45 minutes |
| Cook Time | 35 minutes |
| Cooling Time | 1 hour |
| Chilling Time | 2 hours |
| Total Active Time | 1 hour 20 minutes |
| Total Time | Approximately 4 hours 20 minutes |
| Servings | 10–12 |
| Course | Dessert |
| Cuisine | German-inspired |
| Difficulty | Intermediate |
Why You’ll Love This Recipe
This Black Forest Cake combines everything you want in a special dessert: soft chocolate sponge, juicy cherries, and light whipped cream. Every bite offers a delicious contrast between rich cocoa flavor and refreshing fruit.
The homemade cherry filling creates a beautiful ruby-red center, while the white whipped cream frosting gives the cake its elegant bakery-style appearance. Although it looks impressive, each component is simple enough to prepare in a home kitchen.
Ingredients
For the Chocolate Cake
| Ingredient | Quantity |
| All-purpose flour | 1¾ cups |
| Granulated sugar | 2 cups |
| Unsweetened cocoa powder | ¾ cup |
| Baking powder | 1½ teaspoons |
| Baking soda | 1½ teaspoons |
| Salt | ½ teaspoon |
| Large eggs | 2 |
| Buttermilk | 1 cup |
| Vegetable oil | ½ cup |
| Vanilla extract | 2 teaspoons |
| Hot water or hot coffee | 1 cup |
For the Cherry Filling
| Ingredient | Quantity |
| Pitted fresh or frozen cherries | 3 cups |
| Granulated sugar | ½ cup |
| Cornstarch | 3 tablespoons |
| Water | ¼ cup |
| Lemon juice | 1 tablespoon |
For the Whipped Cream Frosting
| Ingredient | Quantity |
| Heavy whipping cream, very cold | 3 cups |
| Powdered sugar | ½ cup |
| Vanilla extract | 1 teaspoon |
| Mascarpone cheese (optional) | 2 tablespoons |
For Decoration
| Ingredient | Quantity |
| Fresh whole cherries with stems | 8–10 |
| Chocolate shavings | ¼ cup |
Step-by-Step Instructions
Step 1: Prepare the Cake Pans
Preheat your oven to 350°F (175°C). Grease two 8-inch or 9-inch round cake pans and line the bottoms with parchment paper.
Step 2: Mix the Dry Ingredients
In a large mixing bowl, whisk together the flour, granulated sugar, cocoa powder, baking powder, baking soda, and salt until evenly combined.
Step 3: Prepare the Chocolate Batter
Add the eggs, buttermilk, vegetable oil, and vanilla extract. Mix until the ingredients are incorporated and the batter is smooth.
Gradually pour in the hot water or coffee while mixing carefully. The batter will be thin, which is normal and helps create a moist chocolate cake.
Step 4: Bake the Cake Layers
Divide the batter evenly between the prepared pans. Bake for 30–35 minutes, or until a toothpick inserted into the center comes out clean or with a few moist crumbs.
Allow the cakes to cool in their pans for approximately 10 minutes before transferring them to a wire rack. Let them cool completely before assembling.
Step 5: Make the Cherry Filling
Place the pitted cherries, sugar, and lemon juice in a medium saucepan.
In a small bowl, whisk the cornstarch with the water until smooth. Pour this mixture into the saucepan.
Cook over medium heat, stirring regularly, until the cherries release their juices and the mixture becomes thick, glossy, and jam-like, approximately 5–8 minutes.
Remove from the heat and allow the cherry filling to cool completely. Refrigerate it briefly if necessary, but make sure it is cold before assembling the cake.
Step 6: Prepare the Whipped Cream Frosting
Place a mixing bowl and beaters in the refrigerator for 10–15 minutes.
Pour the cold heavy whipping cream into the chilled bowl. Add the powdered sugar and vanilla extract. If using mascarpone, add it as well.
Whip on medium speed until firm peaks form. Stop as soon as the cream holds its shape to avoid overwhipping.
Step 7: Assemble the First Layer
Place one completely cooled chocolate cake layer on a serving plate or cake stand.
Spread a thin layer of whipped cream over the surface. Pipe a thick ring of whipped cream around the outer edge to create a barrier that will hold the cherry filling in place.
Spoon the cooled cherry filling into the center, spreading it evenly without overflowing the cream border.
Step 8: Add the Second Cake Layer
Carefully place the second chocolate cake layer on top. Press gently to secure it without squeezing out the filling.
Spread the remaining whipped cream over the top and sides of the cake, creating a smooth, even finish.
Step 9: Decorate the Cake
Transfer some whipped cream into a piping bag fitted with a decorative star tip.
Pipe rosettes around the top edge of the cake. Place one fresh cherry on each rosette and sprinkle chocolate shavings over the center.
Refrigerate the finished cake for at least 2 hours before slicing. This helps the filling and frosting set properly.
Best Tips
Always make sure the chocolate cake layers and cherry filling are completely cool before assembling. Warm ingredients can melt the whipped cream and make the cake unstable.
Create a firm whipped cream border around the filling to prevent cherry juices from leaking through the sides. For cleaner slices, chill the assembled cake thoroughly and use a sharp knife warmed in hot water and wiped dry between cuts.
For a traditional Black Forest flavor, you can brush the cake layers lightly with cherry syrup before adding the filling. If you choose to use Kirsch, a cherry liqueur, check that it suits your dietary preferences.
Best Ingredient Options
Dutch-process cocoa powder gives the chocolate sponge a deep color and smooth cocoa flavor. Sour cherries or Morello cherries are excellent choices because their natural tartness balances the sweetness of the frosting.
Fresh cherries work beautifully during cherry season, while frozen pitted cherries are convenient throughout the year. Mascarpone cheese can also be added to the whipped cream to help create a richer, more stable frosting.
Recipe Variations
For an easy party dessert, turn this recipe into a Black Forest trifle by cutting the chocolate cake into cubes and layering it with cherry filling and whipped cream in a glass serving bowl.
For an extra chocolatey finish, add a smooth chocolate ganache drip around the top edges. You can also make individual Black Forest cupcakes using the same chocolate cake batter, filling each cupcake with cherry compote and finishing with whipped cream.
What to Serve With
Serve this rich chocolate cherry cake with freshly brewed coffee, cappuccino, or a strong espresso. The slight bitterness of coffee balances the sweetness of the whipped cream and chocolate.
For an extra-indulgent dessert, add a scoop of vanilla bean ice cream or a small bowl of fresh seasonal berries.
Make-Ahead Instructions
The chocolate cake layers can be baked up to 2 days ahead. Once completely cooled, wrap them tightly in plastic wrap and store them in the refrigerator.
The cherry filling can be prepared up to 3 days in advance and kept in an airtight container in the refrigerator.
For the best texture, prepare the whipped cream frosting and assemble the cake on the day you plan to serve it.
Storage
Store the assembled Black Forest Cake in an airtight cake container in the refrigerator for up to 3–4 days.
Because the frosting contains fresh whipped cream, keep the cake refrigerated and avoid leaving it at room temperature for extended periods.
Reheating
Black Forest Cake should not be reheated because heat will melt the whipped cream frosting and affect the texture of the filling.
For the best flavor, remove individual slices from the refrigerator approximately 10–15 minutes before serving.
Freezing
The unfrosted chocolate cake layers can be frozen for up to 3 months. Wrap each completely cooled layer tightly in plastic wrap, followed by a layer of aluminum foil.
Thaw the cake layers overnight in the refrigerator before assembling.
Freezing the fully assembled cake is not recommended because whipped cream can lose its smooth texture after thawing.
Common Mistakes to Avoid
Assembling the cake while the chocolate layers are still warm can cause the whipped cream to melt and the cake to slide apart. Always allow sufficient cooling time.
Adding warm or runny cherry filling can also cause the cream barrier to collapse. Make sure the filling is thick and completely chilled before using it.
Another common mistake is overwhipping the cream. Stop once firm peaks form, as continuing to beat can cause the cream to become grainy and eventually separate.
Nutrition Estimate
| Nutrient | Amount per Serving |
| Calories | 520 kcal |
| Protein | 6 g |
| Carbohydrates | 64 g |
| Fat | 28 g |
| Fiber | 4 g |
| Sugar | 43 g |
Nutrition values are approximate and may vary depending on the ingredients, brands, and portion sizes used.
Frequently Asked Questions
Can I use canned cherry pie filling instead of homemade filling?
Yes. Canned cherry pie filling is a convenient alternative. Use approximately 2 cups, making sure it is thick enough to stay inside the whipped cream border.
Can I use frozen cherries?
Absolutely. Frozen pitted cherries work very well. Thawing them first is optional, but drain excess liquid if they release too much water.
How do I keep whipped cream stable?
Use very cold heavy whipping cream and a chilled mixing bowl. Adding a small amount of mascarpone can help the frosting hold its shape for longer.
Why is my cherry filling too runny?
It may need additional cooking time or a little more cornstarch slurry. Simmer gently until thickened, then allow it to cool completely before assembling the cake.
Can I make Black Forest Cake one day ahead?
Yes. You can assemble the cake a day ahead and refrigerate it in a covered cake container. Add the fresh cherry decorations shortly before serving for the best appearance.
What makes Black Forest Cake special?
Its signature combination of chocolate cake, cherries, and whipped cream creates a delicious balance of rich, fruity, and creamy flavors.
Final Thoughts
This Classic Black Forest Cake is a beautiful homemade dessert that brings together moist chocolate layers, glossy cherry filling, and light whipped cream frosting. Whether you’re celebrating a birthday, hosting a holiday dinner, or simply craving an elegant chocolate dessert, this recipe is sure to impress.
Prepare it ahead, keep it chilled, and enjoy every delicious slice with family and friends.