
Introduction
If you love crispy fried chicken with a golden, crunchy coating and tender, juicy meat inside, these homemade Crispy Fried Chicken Drumsticks are a must-try! Made with simple pantry ingredients, flavorful seasonings, and a tangy buttermilk marinade, this easy fried chicken recipe delivers delicious results every time.
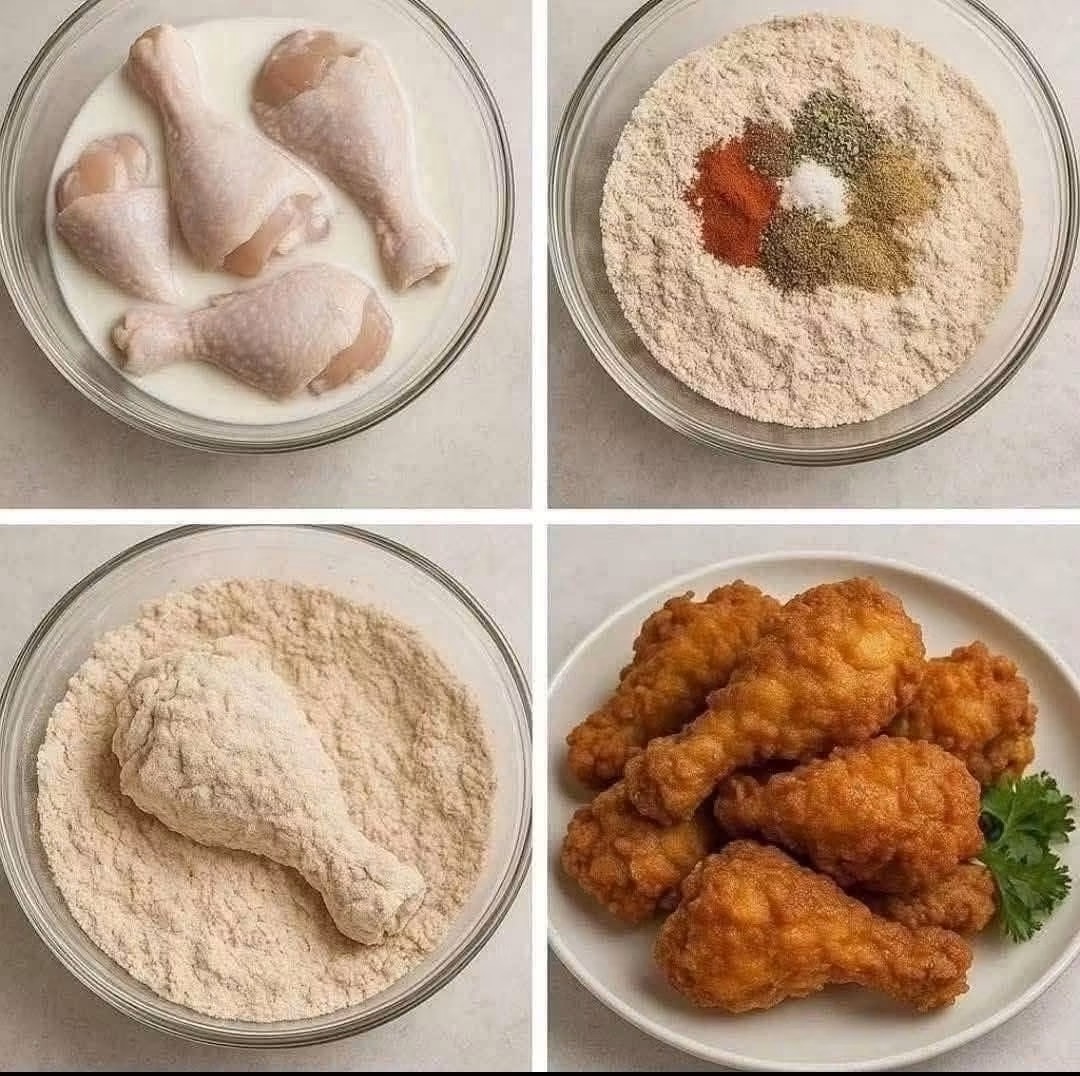
The secret to great fried chicken is allowing the drumsticks to soak in buttermilk before coating them in seasoned flour. This helps tenderize the meat and creates a flavorful base for a crunchy crust.
Perfect for family dinners, weekend gatherings, picnics, or game-day meals, these crispy chicken drumsticks pair beautifully with French fries, coleslaw, mashed potatoes, or your favorite dipping sauce.
Recipe Overview
| Detail | Information |
| Recipe Name | Crispy Fried Chicken Drumsticks |
| Prep Time | 15 minutes |
| Marinating Time | 30 minutes to overnight |
| Cook Time | 25–35 minutes per batch, depending on quantity and equipment |
| Total Time | Approximately 1 hour, excluding extended marinating |
| Servings | 3–4 |
| Cooking Method | Deep-frying |
| Cuisine | American-inspired |
| Difficulty | Easy |
| Main Ingredients | Chicken drumsticks, buttermilk, flour, and spices |
Why You’ll Love This Recipe
Extra Crispy Coating: The seasoned flour creates a crunchy, golden crust that makes every bite satisfying.
Juicy Chicken: Marinating the drumsticks in buttermilk helps improve tenderness and adds a subtle tangy flavor.
Simple Ingredients: You only need a few everyday ingredients and basic seasonings to make this delicious meal.
Easy to Customize: Adjust the spices to make the chicken mild, smoky, garlicky, or spicy.
Perfect for Family Meals: Serve these drumsticks with classic sides for a filling dinner everyone can enjoy.
Better Than Takeout: Homemade fried chicken allows you to control the seasonings, cooking temperature, and freshness.
Ingredients
For the Chicken
| Ingredient | Quantity |
| Chicken drumsticks | 6–8 pieces |
| Buttermilk | 1–2 cups (240–480 ml), as needed |
| Lemon juice or vinegar, if making a substitute | 1 tablespoon |
For the Seasoned Flour Coating
| Ingredient | Quantity |
| All-purpose flour | 2 cups (250 g) |
| Paprika | 1 tablespoon |
| Garlic powder | 1 teaspoon |
| Onion powder | 1 teaspoon |
| Dried oregano or thyme | 1 teaspoon |
| Black pepper | 1 teaspoon |
| Salt | 1 teaspoon, or to taste |
For Frying
| Ingredient | Quantity |
| Vegetable or canola oil | Enough for deep-frying |
Buttermilk Substitute
If you don’t have buttermilk, combine 1 cup (240 ml) of milk with 1 tablespoon of lemon juice or white vinegar. Let the mixture stand for 5–10 minutes before using it.
Step-by-Step Instructions
Step 1: Prepare the Chicken
Pat the chicken drumsticks dry with paper towels before placing them in a large bowl. If the drumsticks are particularly large, make two or three shallow cuts in the thickest parts to help the seasoning reach the meat.
Pour the buttermilk over the chicken, making sure each piece is coated. Cover the bowl and refrigerate for at least 30 minutes. For deeper flavor, marinate for 4 hours or overnight.
Always marinate chicken in the refrigerator rather than at room temperature.
Step 2: Mix the Seasoned Flour
In a large shallow bowl, combine the all-purpose flour, paprika, garlic powder, onion powder, dried oregano or thyme, black pepper, and salt.
Whisk everything together until the seasonings are evenly distributed throughout the flour. This ensures that every drumstick receives a balanced coating.
Step 3: Coat the Drumsticks
Remove one drumstick from the buttermilk, allowing excess liquid to drip off.
Place it in the seasoned flour and press the flour firmly onto all sides, including around the ends. Turn the chicken several times to ensure an even coating.
For an extra-crispy crust, dip the floured drumstick briefly back into the buttermilk, then coat it in the seasoned flour a second time.
Place the coated drumsticks on a wire rack and let them rest for 10–15 minutes. This helps the coating adhere during frying.
Step 4: Heat the Oil
Pour vegetable or canola oil into a heavy-bottomed pot or deep fryer, following the cookware manufacturer’s guidance and leaving sufficient space to prevent overflowing.
Heat the oil to 350°F (175°C), checking the temperature with a cooking thermometer.
Maintaining the correct temperature is essential. Oil that is too cool can produce greasy chicken, while excessively hot oil may brown the coating before the meat cooks through.
Step 5: Fry the Chicken
Carefully lower the drumsticks into the hot oil in small batches. Avoid overcrowding the pot, as adding too much chicken at once can lower the oil temperature.
Fry for approximately 12–18 minutes per batch, turning occasionally for even browning. Cooking time will depend on the size of the drumsticks and how much the oil temperature fluctuates.
The coating should become deep golden brown and crisp. Check the thickest part of each drumstick with a food thermometer, avoiding the bone.
Chicken is safe to eat when it reaches an internal temperature of at least 165°F (74°C).
If the crust browns before the chicken reaches a safe temperature, finish cooking the drumsticks in a preheated 350°F (175°C) oven until they reach the required internal temperature.
Step 6: Drain and Rest
Transfer the cooked drumsticks to a wire rack set over a baking tray. This allows excess oil to drain while helping the crust remain crisp.
Let the chicken rest for a few minutes before serving.
Avoid stacking the hot drumsticks on top of one another, as trapped steam can soften the coating.
Step 7: Serve and Enjoy
Serve the crispy fried chicken drumsticks while they are hot and freshly cooked.
Add your favorite side dishes, sprinkle with a little extra paprika if desired, and serve with barbecue sauce, honey mustard, garlic sauce, or ranch-style dressing.
Best Tips for Perfect Fried Chicken
Use Buttermilk: The mild acidity helps tenderize the chicken and creates a flavorful surface for the flour coating.
Season Every Layer: Seasoning the flour thoroughly gives the crust more flavor. You can also lightly season the chicken itself, keeping the total salt level in mind.
Let the Coating Rest: Allowing the coated drumsticks to rest before frying helps the flour adhere better.
Maintain the Oil Temperature: Keep the oil near 350°F (175°C). Fry in batches and allow the temperature to recover between batches.
Use a Wire Rack: A rack prevents steam from collecting underneath the chicken and keeps the crust crisp.
Check the Internal Temperature: Color alone cannot confirm that chicken is fully cooked. Use a food thermometer to verify at least 165°F (74°C).
Avoid Covering the Chicken: Covering freshly fried drumsticks traps steam and can make the crust soggy.
Best Ingredient Options
Chicken Drumsticks: Choose similarly sized pieces so they cook at approximately the same rate. Pat them dry before marinating for easier handling.
Buttermilk: Traditional buttermilk gives the chicken a tangy flavor. A milk-and-lemon-juice mixture is a convenient substitute.
All-Purpose Flour: Regular all-purpose flour creates a classic crunchy coating. For a lighter, crisper texture, replace up to ½ cup of the flour with cornstarch.
Paprika: Regular paprika adds color and a mild pepper flavor. Smoked paprika gives the coating a deeper, smoky taste.
Garlic and Onion Powder: These seasonings add savory flavor without introducing excess moisture to the flour.
Dried Herbs: Oregano and thyme both work well. Use whichever you prefer or combine them for a more aromatic coating.
Frying Oil: Use a neutral oil with a high smoke point, such as canola, sunflower, or vegetable oil.
Recipe Variations
Spicy Crispy Chicken: Add ½–1 teaspoon of cayenne pepper or chili powder to the seasoned flour for a spicy kick.
Garlic-Paprika Chicken: Increase the garlic powder slightly and add smoked paprika for a richer savory flavor.
Extra-Crunchy Chicken: Double-coat the drumsticks by dipping them in buttermilk and seasoned flour a second time.
Herb-Seasoned Chicken: Add dried thyme, oregano, or a small amount of dried rosemary to create an aromatic coating.
Oven-Finished Fried Chicken: Fry the drumsticks until the coating is golden, then transfer them to a preheated oven to finish cooking if needed.
Air Fryer Alternative: Arrange coated drumsticks in a single layer, lightly spray the surface with oil, and cook at approximately 380°F (193°C), turning halfway through. Cooking time varies with size and equipment; verify that the thickest part reaches 165°F (74°C). The texture will differ from traditional deep-fried chicken.
What to Serve With Crispy Fried Chicken
French Fries: Golden fries make a classic combination with crunchy chicken.
Creamy Coleslaw: A refreshing cabbage slaw balances the rich, savory coating.
Mashed Potatoes: Creamy mashed potatoes with gravy create a comforting family dinner.
Macaroni and Cheese: Cheesy pasta adds a creamy side dish that pairs beautifully with crispy chicken.
Corn on the Cob: Sweet corn provides a simple, colorful accompaniment.
Fresh Garden Salad: A crisp salad with tomatoes, cucumbers, and a light dressing helps balance the meal.
Dipping Sauces: Barbecue sauce, honey mustard, garlic sauce, and spicy mayonnaise are excellent choices.
Make-Ahead Instructions
You can marinate the drumsticks up to 24 hours in advance, provided they remain refrigerated.
The seasoned flour mixture can also be prepared ahead of time and stored in an airtight container until needed. Keep the dry mixture separate from the raw chicken and any utensils that have touched it.
For the best texture, coat the drumsticks shortly before frying. If you need to coat them in advance, refrigerate them on a rack in a suitable covered container and cook them within a safe timeframe.
Storage
Allow leftover chicken to cool slightly before refrigerating it in a shallow, airtight container.
Refrigerate cooked chicken within 2 hours of cooking, or within 1 hour if the surrounding temperature is above 90°F (32°C).
Properly refrigerated cooked chicken can be stored for 3–4 days.
Keep the chicken separate from raw meat and discard any leftovers that have been left at unsafe temperatures for too long.
Reheating
Oven Method: Preheat the oven to 375°F (190°C). Arrange the drumsticks on a wire rack over a baking tray and heat until the center reaches 165°F (74°C). This method helps restore the crisp coating.
Air Fryer Method: Reheat at approximately 350°F (175°C), turning as needed, until the chicken is heated through to 165°F (74°C).
Microwave Method: Microwave in short intervals until thoroughly heated. This is convenient, but the coating may become softer.
Avoid reheating chicken repeatedly. Reheat only the portion you intend to eat.
Freezing
Cooked fried chicken can be frozen for longer storage.
Allow the drumsticks to cool, then arrange them in a single layer and freeze until firm. Transfer them to a freezer-safe container or airtight freezer bag, removing as much excess air as possible.
For the best quality, use frozen cooked chicken within approximately 2–3 months.
Thaw frozen chicken in the refrigerator rather than on the counter. Reheat it in the oven or air fryer until the center reaches 165°F (74°C).
Common Mistakes to Avoid
Skipping the Marinade: A short buttermilk soak adds flavor and helps improve the texture of the meat.
Using Wet, Excessively Dripping Chicken: Too much liquid can cause the flour coating to become uneven. Let the excess buttermilk drip off before dredging.
Not Pressing on the Flour: A light dusting may not create a substantial crust. Press the seasoned flour onto the chicken and let the coating rest before frying.
Overcrowding the Pot: Too many drumsticks at once can reduce the oil temperature and lead to greasy results. Fry in manageable batches.
Using Oil That Is Too Hot: Excessively hot oil can burn the outside while leaving the inside undercooked. Monitor the temperature throughout cooking.
Relying Only on Color: Golden-brown skin does not guarantee that the chicken is safe to eat. Check the internal temperature of every piece.
Draining on a Flat Plate for Too Long: Steam can collect underneath the chicken and soften the crust. A wire rack is preferable.
Storing Chicken at Room Temperature: Refrigerate leftovers promptly to reduce the risk of foodborne illness.
Nutrition Estimate
The following values are approximate and will vary according to the size of the drumsticks, amount of flour retained, oil absorption, and serving size.
| Nutrient | Estimated Amount per Drumstick |
| Calories | 250–350 kcal |
| Protein | 20–27 g |
| Total Fat | 13–23 g |
| Saturated Fat | 3–6 g |
| Carbohydrates | 8–15 g |
| Fiber | 0–1 g |
| Sugar | 1–3 g |
| Sodium | 300–600 mg |
These estimates are for one medium drumstick with its coating and do not include dipping sauces or side dishes. They are not laboratory-tested nutrition values.
Frequently Asked Questions
1. How long should I fry chicken drumsticks?
Medium drumsticks generally take about 12–18 minutes in oil maintained near 350°F (175°C). Larger pieces may take longer. Always check that the thickest part reaches at least 165°F (74°C).
2. Why is my fried chicken coating not crispy?
The coating may become soft if the oil is too cool, the pot is overcrowded, or the chicken is stacked while hot. Maintain the oil temperature, fry in batches, and drain the chicken on a wire rack.
3. Can I use milk instead of buttermilk?
Yes. Combine 1 cup (240 ml) of milk with 1 tablespoon of lemon juice or vinegar and let it stand for 5–10 minutes before using it as a substitute.
4. Can I prepare the chicken the night before?
Yes. Marinate the chicken in buttermilk in a covered container in the refrigerator for up to 24 hours. For the best crust, coat it in seasoned flour shortly before frying.
5. How do I know when the chicken is fully cooked?
Insert a food thermometer into the thickest part of the meat without touching the bone. The internal temperature should reach at least 165°F (74°C).
6. Can I make this recipe without deep-frying?
Yes. You can use an air fryer or oven, although the coating will have a different texture. Lightly coating the chicken with oil helps the flour brown more evenly.
7. Can I freeze leftover fried chicken?
Yes. Freeze the cooked drumsticks in airtight, freezer-safe packaging. For the best quality, use them within 2–3 months and reheat until they reach 165°F (74°C).
8. What oil is best for frying chicken?
Canola, sunflower, and vegetable oils are suitable choices because they have relatively high smoke points and neutral flavors.
9. Can I make the chicken spicier?
Absolutely. Add cayenne pepper, chili powder, or extra black pepper to the flour mixture. Start with a small amount and adjust to your taste.
10. What is the best way to keep fried chicken crispy?
Drain it on a wire rack rather than covering it or stacking it. If you’re making multiple batches, keep the cooked chicken on a rack in a low oven, around 200°F (95°C), until serving, while avoiding prolonged holding.
Final Thoughts
These Crispy Fried Chicken Drumsticks are a delicious homemade favorite with a flavorful crust, tender meat, and plenty of seasoning in every bite. With a simple buttermilk marinade, a well-seasoned flour coating, and careful temperature control, you can create satisfying fried chicken for family dinners, gatherings, or weekend treats.
Serve the drumsticks hot with your favorite sides and sauces for a complete meal. Once you master the basic recipe, experiment with different herbs and spices to make it your own.
Food Safety Reminder: Handle raw chicken carefully, prevent cross-contamination, and cook every drumstick to an internal temperature of at least 165°F (74°C). Deep-frying requires caution because hot oil can cause serious burns.