
Introduction
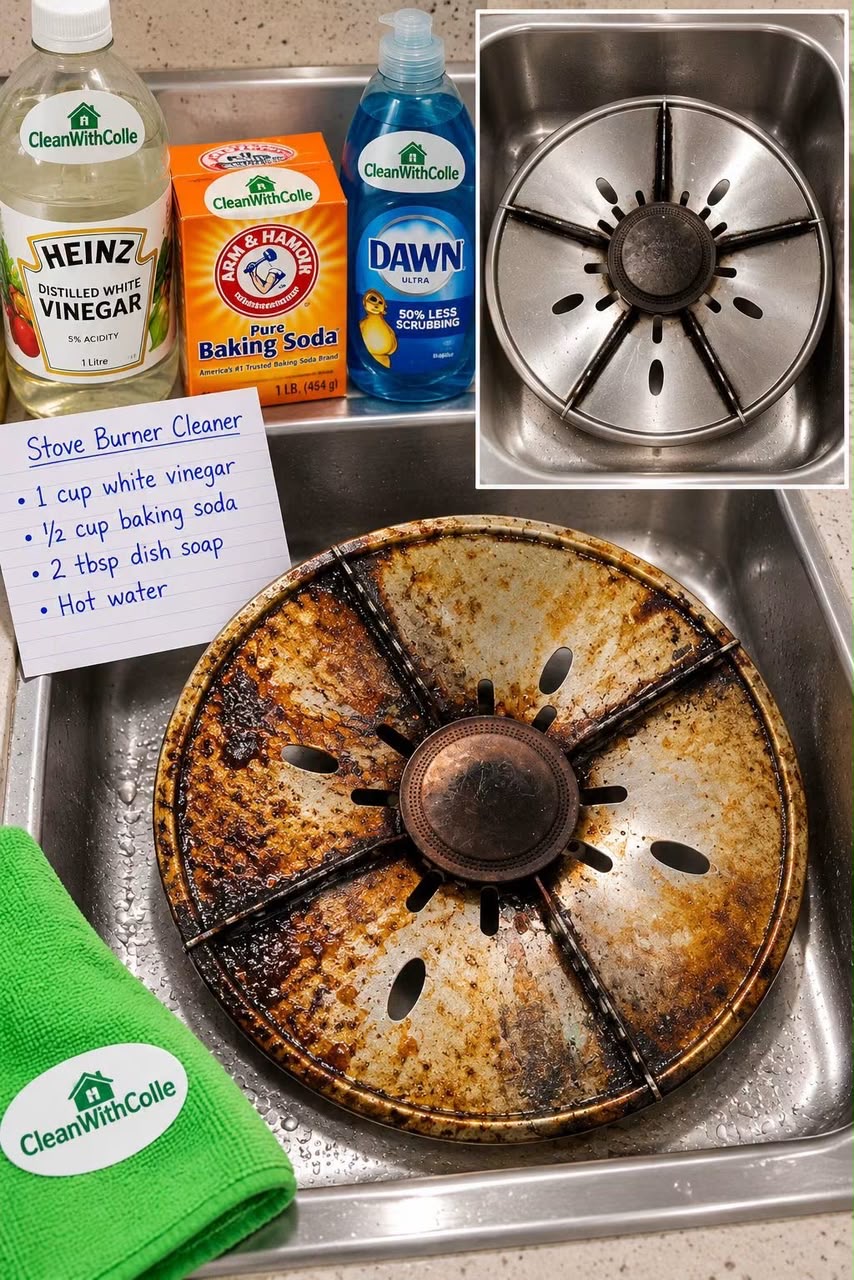
Greasy stove burners and dirty cooker grates can be difficult to clean, especially when cooking oil, food splashes, and burnt-on residue build up over time. Fortunately, a few common household cleaning supplies can help loosen grime and make routine kitchen cleaning easier.
This DIY stove burner cleaner combines white vinegar, baking soda, dish soap, and hot water to tackle everyday grease and surface residue. With a little soaking time and gentle scrubbing, you can refresh compatible stove components without immediately reaching for expensive cleaning products.
However, not every burner or grate can be soaked safely. Always check your stove manufacturer’s instructions before cleaning, particularly if the components are made from aluminum, cast iron, brass, or have a protective coating.
Recipe Overview
| Detail | Information |
| Preparation Time | 5 minutes |
| Soaking Time | 30–60 minutes |
| Scrubbing Time | 5–15 minutes |
| Total Time | Approximately 40–80 minutes |
| Difficulty | Easy |
| Cleaning Method | Soaking and scrubbing |
| Best For | Compatible removable grates and greasy stove components |
| Main Ingredients | White vinegar, baking soda, dish soap, hot water |
| Estimated Cost | Low |
Why You’ll Love This Cleaning Method
This homemade stove cleaner uses affordable household ingredients that are easy to find in supermarkets. It can help loosen everyday grease and make scrubbing easier without requiring a complicated cleaning routine.
The soaking process gives the cleaning solution time to soften residue, reducing the need for aggressive scrubbing. This can be especially useful for removable grates that accumulate oil and food splashes during regular cooking.
It is also easy to adapt to your kitchen. By choosing a suitable sponge and checking the manufacturer’s care instructions, you can clean compatible components while reducing the risk of surface damage.
Ingredients and Supplies
| Ingredient or Supply | Quantity | Purpose |
| White vinegar | 1 cup (240 ml) | Helps loosen certain deposits and residue |
| Baking soda | ½ cup | Provides mild abrasive cleaning action |
| Dish soap | 2 tablespoons | Helps break down greasy residue |
| Hot water | Enough to cover the removable component | Helps soften grease |
| Large basin or suitable sink | 1 | Holds the component during cleaning |
| Soft sponge or nylon brush | 1 | Scrubbing away loosened grime |
| Clean cloth or towel | 1–2 | Drying components thoroughly |
| Cleaning gloves | Optional | Protecting sensitive hands |
Important: Avoid soaking burner assemblies, electrical igniters, gas ports, or other components that the manufacturer says must remain dry. Do not use vinegar on materials that are sensitive to acids, and do not use steel wool on delicate finishes.
Step-by-Step Instructions
Step 1: Turn Off the Stove and Let It Cool
Turn off all burners and allow the stove to cool completely before cleaning.
If you have a gas stove, make sure all controls are off. Remove only the parts that the manufacturer identifies as removable and safe to wash.
Never soak electrical components, igniters, wiring, or gas valves.
Step 2: Prepare the Sink or Cleaning Basin
Place the removable grate or compatible component in a large basin or sink.
If you are cleaning several pieces, make sure there is enough space to handle them safely without scratching their surfaces.
For delicate or coated components, use a plastic basin rather than placing them directly against a hard sink surface.
Step 3: Apply the Baking Soda
Sprinkle the baking soda over the greasy areas of the removable component.
Spread it evenly across visible residue. Baking soda provides mild abrasive action that can help loosen grime during gentle scrubbing.
Step 4: Add the Dish Soap and Vinegar
Pour the dish soap over the affected areas, followed by the white vinegar.
The mixture may fizz as the vinegar reacts with the baking soda. This reaction is normal, but the bubbles themselves do not guarantee stronger cleaning performance.
Do not combine this mixture with bleach or other household cleaning chemicals.
Step 5: Add Hot Water Carefully
Add hot water to the basin if the component’s material and manufacturer instructions permit soaking.
Use hot tap water rather than boiling water, and avoid sudden temperature changes that could damage enamel or other finishes.
The component should be covered only if it is safe to immerse. If soaking is not permitted, apply a small amount of the cleaning mixture with a damp sponge instead.
Step 6: Let It Soak for 30–60 Minutes
Allow compatible removable grates to soak for 30–60 minutes to help soften grease and food residue.
Check the component periodically. Do not leave aluminum, coated parts, or acid-sensitive materials in vinegar for extended periods.
For heavily greasy items, gentle repeat cleaning may be safer than prolonged soaking.
Step 7: Scrub Away the Residue
Remove the component from the basin and use a soft sponge or nylon brush to scrub the remaining grime.
Work in small circular motions and focus on greasy areas. Start with gentle pressure rather than immediately using a harsh abrasive.
Steel wool should be used only when the manufacturer explicitly permits it for that exact material and finish.
Step 8: Rinse Thoroughly
Rinse the component with clean water to remove all traces of vinegar, baking soda, and dish soap.
Check corners, grooves, and other areas where residue may collect.
Step 9: Dry Completely Before Reinstalling
Dry the cleaned component thoroughly with a clean towel, then allow it to air-dry if needed.
For gas stove components, ensure that all permitted removable parts are completely dry and that burner ports are clear before reinstalling them according to the manufacturer’s instructions.
Never operate a stove with wet electrical or ignition components.
Best Tips
Always identify the material of your stove grates before choosing a cleaning method. Cast iron, enamel-coated grates, aluminum parts, and stainless steel components have different care requirements.
Use hot tap water rather than boiling water, and avoid sudden temperature changes. These precautions help reduce the risk of damaging enamel or other finishes.
Start with a soft sponge or nylon brush. If the grease does not come off immediately, repeat a short, suitable cleaning treatment instead of applying excessive pressure.
Most importantly, keep gas ports, igniters, electrical parts, and valve assemblies dry. Cleaning these components incorrectly can interfere with safe stove operation.
Best Ingredient Options
White vinegar: Standard white vinegar can help loosen certain deposits and residue. Avoid using it on surfaces or metals that are sensitive to acidic cleaners.
Baking soda: Household baking soda offers mild abrasive action for compatible surfaces. It is not suitable for every finish, so test carefully.
Dish soap: A grease-cutting dishwashing liquid helps remove cooking oil and food residue. A small amount is usually sufficient.
Hot water: Hot tap water helps soften grease. Avoid boiling water and check whether the component can be immersed.
Soft sponge or nylon brush: These are good starting options for many removable components. Avoid abrasive pads unless the manufacturer approves them.
Cleaning Variations
For lightly greasy grates, warm water and dish soap may be enough. Soak compatible removable parts briefly, then scrub with a soft brush and rinse well.
For suitable stainless steel components, apply a baking soda paste made with a little water and gently rub the surface. Rinse thoroughly and dry with a clean cloth.
For delicate enamel-coated grates, use warm water, mild dish soap, and a non-scratch sponge. Avoid steel wool and harsh abrasives that could chip or dull the coating.
For cast iron, follow the stove manufacturer’s specific care instructions. Prolonged soaking and acidic cleaners may damage certain cast iron finishes, so a suitable degreaser and careful drying may be a better choice.
What to Clean With This Method
This cleaning method is intended for compatible removable stove grates and other components that the manufacturer permits to be soaked.
It is not suitable for every part of a cooker. Burner heads, gas ports, igniters, electrical components, control knobs, and valve assemblies may require a different method.
If you are unsure whether a component can be immersed in water or exposed to vinegar, consult the appliance manual before proceeding.
Make-Ahead Instructions
There is no need to prepare the cleaning solution in advance. Mix the ingredients immediately before use for a simple, fresh cleaning treatment.
Do not store the combined mixture in a sealed container. The reaction between vinegar and baking soda releases carbon dioxide gas, which can create pressure in a closed container.
If you are cleaning several compatible grates, prepare the solution as needed and use it promptly.
Storage
Store vinegar, baking soda, and dish soap separately in their original containers according to their labels.
Keep cleaning supplies away from children and pets. Never transfer cleaning products into bottles that could be mistaken for food or beverages.
Discard the used cleaning mixture according to local guidance, and rinse the basin after cleaning.
After-Cleaning Care
Once the grates have been cleaned, rinsed, and dried, inspect them for remaining residue or signs of damage.
Make sure every component is reinstalled in the correct position according to the appliance manual. For gas burners, ensure that the parts are dry and correctly seated before turning the stove on.
Regularly wiping up spills after the stove cools can help prevent grease from building up and reduce the need for intensive cleaning sessions.
Common Mistakes to Avoid
Soaking every stove component is a common mistake. Some parts must remain dry, and water can damage igniters, electrical systems, and other sensitive components. Remove and soak only parts that the manufacturer identifies as washable.
Leaving vinegar on acid-sensitive metals can cause discoloration or corrosion. Check the material before cleaning and avoid prolonged exposure to acidic solutions.
Using steel wool on delicate finishes can cause scratches, dullness, or permanent damage. Start with a soft sponge or nylon brush and use stronger tools only when explicitly approved.
Using boiling water can also damage some coated components, especially if the temperature changes suddenly. Hot tap water is generally a safer choice for compatible parts.
Finally, reinstalling wet components can interfere with burner operation. Rinse thoroughly, dry completely, and follow the manufacturer’s reassembly instructions.
Safety Precautions
Turn off the stove and let it cool completely before cleaning. Wear gloves if your skin is sensitive, and keep the cleaning solution away from your eyes.
Never mix this cleaning method with bleach, ammonia, or other incompatible household chemicals.
Do not pour liquid into gas ports, igniters, electrical parts, or control assemblies. If you smell gas, stop cleaning, avoid operating electrical switches, leave the area if necessary, and contact your gas supplier or emergency service according to local safety guidance.
If a burner does not ignite normally after cleaning, turn it off and consult the appliance manual or a qualified technician rather than attempting repairs yourself.
Expected Results
| Type of Residue | What to Expect |
| Light cooking grease | May loosen with dish soap and warm water |
| Moderate greasy buildup | Soaking and gentle scrubbing may help |
| Dried food splashes | May soften during soaking |
| Heavy, carbonized residue | May require a manufacturer-approved degreaser or repeated cleaning |
| Delicate or coated finishes | Require gentle, material-specific cleaning |
| Acid-sensitive metal components | Should not be exposed to vinegar unless approved |
Results depend on the component material, the age of the residue, and the manufacturer’s cleaning guidance. Some burnt-on marks may remain even after the surface is clean.
Frequently Asked Questions
Does vinegar and baking soda remove stove grease?
The combination may help loosen some residue, but the fizzing reaction does not guarantee superior cleaning. Dish soap, suitable soaking, and gentle scrubbing are often the most useful parts of the process.
How long should stove grates soak?
For compatible removable grates, 30–60 minutes may help soften grease. Always check the manufacturer’s instructions first, particularly for cast iron, aluminum, and coated components.
Can I use steel wool on stove grates?
Only if the manufacturer approves it for the exact material and finish. Steel wool can scratch enamel, coated surfaces, and certain stainless steel finishes.
Can I use this mixture on gas burner heads?
Do not soak gas burner heads unless the appliance manual explicitly permits it. Burner ports and igniters must be kept clear and dry, and some components require a specific cleaning procedure.
Can I use boiling water?
Hot tap water is generally preferable. Boiling water and sudden temperature changes can damage some finishes, so follow the appliance manufacturer’s instructions.
Is this method suitable for cast iron grates?
Not always. Prolonged soaking and acidic vinegar can damage certain cast iron finishes. Follow the stove manufacturer’s cleaning recommendations and use a suitable alternative if necessary.
What if the grease does not come off?
Repeat a suitable cleaning treatment or use a degreaser approved for the component’s material. Avoid aggressive scraping or harsh abrasives that could damage the finish.
How often should I clean stove grates?
Clean spills and splashes regularly once the stove has cooled. A deeper cleaning can be performed when grease builds up, following the manufacturer’s care instructions.
Final Thoughts
Cleaning greasy stove grates does not always require an expensive specialty cleaner. White vinegar, baking soda, dish soap, and warm water may help loosen everyday residue when used on compatible removable components.
The most important step is choosing a cleaning method that matches the material of your stove. Avoid soaking sensitive parts, scrub gently, rinse thoroughly, and allow every component to dry completely before reinstalling it.
With regular maintenance and the right cleaning technique, you can keep your stove looking cleaner while helping protect its finish and safe operation.