
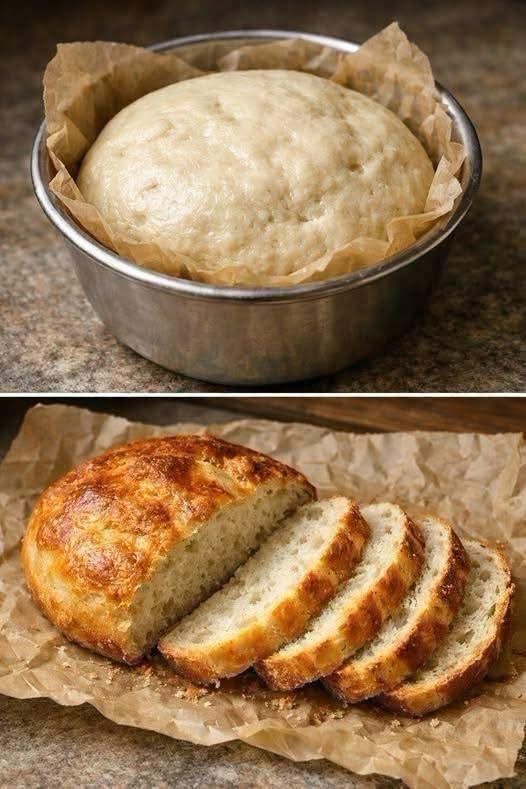
There is nothing quite like the smell of freshly baked homemade bread filling your kitchen. This Easy No-Knead Homemade Bread recipe gives you a beautifully golden crust and a soft, airy interior without the hard work of traditional kneading.
Made with simple pantry ingredients like flour, yeast, salt, sugar, and water, this beginner-friendly bread is perfect for anyone who wants to enjoy fresh homemade bread without complicated techniques or special equipment.
The dough is mixed in just a few minutes, allowed to rise until fluffy, and baked until golden brown. Whether you serve it with soup, use it for sandwiches, or enjoy a warm slice with butter, this easy homemade bread is a recipe you’ll want to make again and again.
Recipe Overview
| Detail | Information |
| Recipe Name | Easy No-Knead Homemade Bread |
| Cuisine | Homemade / European-inspired |
| Course | Bread, Side Dish |
| Prep Time | 10 minutes |
| First Rise | 1 hour 30 minutes–2 hours |
| Second Rise | 30 minutes |
| Cook Time | 30–35 minutes |
| Total Time | Approximately 2 hours 40 minutes–3 hours 15 minutes |
| Servings | 8–10 slices |
| Difficulty | Easy |
| Oven Temperature | 425°F (220°C) |
Why You’ll Love This Recipe
No kneading required. Simply mix the ingredients together with a spoon or spatula and let the yeast do the work. This makes the recipe ideal for beginners and busy home cooks.
Simple, everyday ingredients. You don’t need expensive bread-making equipment or unusual ingredients to create a delicious loaf at home.
A crispy golden crust. Baking at a high temperature helps the outside develop a beautiful crust while the inside stays soft and tender.
Perfect for everyday meals. Enjoy this bread with soups, salads, eggs, cheese, sandwiches, or your favorite homemade dishes.
Easy to customize. You can add herbs, seeds, whole-wheat flour, or roasted garlic to create different flavors using the same basic method.
Ingredients
| Ingredient | Quantity | Purpose |
| All-purpose flour or bread flour | 400 g (about 3⅓ cups) | Forms the structure of the bread |
| Active dry yeast or instant yeast | 7 g (about 2¼ teaspoons) | Helps the dough rise |
| Salt | 5 g (about 1 teaspoon) | Enhances flavor |
| Sugar or honey | 5 g (about 1 teaspoon) | Adds a little sweetness and supports yeast activity |
| Warm water | 350 ml (about 1½ cups) | Hydrates the flour and activates the yeast |
| Olive oil, optional | 1 tablespoon | For brushing the surface |
Note: Flour measurements by volume can vary depending on how the flour is scooped. Weighing the flour is recommended for the most consistent results.
Step-by-Step Instructions
Step 1: Mix the Dough
In a large mixing bowl, combine the flour, yeast, sugar, and salt. Stir briefly to distribute the ingredients evenly.
Pour in the warm water, ideally around 95–100°F (35–38°C). Mix with a wooden spoon or spatula until all the flour is incorporated and a sticky, wet dough forms.
The dough should look rough and sticky rather than smooth. There is no need to knead it.
If using active dry yeast, follow the package directions for whether it should be dissolved in warm water first. Instant yeast can generally be mixed directly with the flour.
Step 2: Let the Dough Rise
Cover the bowl with a clean kitchen towel or plastic wrap.
Leave the dough in a warm, draft-free place for 1 hour 30 minutes to 2 hours, or until it has approximately doubled in size and bubbles appear on the surface.
The exact rising time depends on your kitchen temperature and the activity of your yeast. In a cooler room, the dough may need additional time.
Step 3: Transfer the Dough to the Pan
Line a round baking pan or oven-safe pot with parchment paper.
Using a spatula, gently transfer the risen dough into the prepared pan. Avoid excessive handling, as you want to preserve the air bubbles that help create a light texture.
If the dough is difficult to handle, lightly wet or oil your hands rather than adding too much extra flour.
Cover the pan loosely and let the dough rise for another 30 minutes.
Step 4: Preheat the Oven
Preheat your oven to 425°F (220°C).
If desired, lightly brush the top of the dough with olive oil for a golden finish. You can also leave it plain for a more traditional crust.
For a crispier crust, place an oven-safe tray on the lower rack and carefully add a little hot water when the bread goes into the oven to create steam. Keep your hands away from the steam and hot surfaces.
Step 5: Bake the Bread
Place the pan in the preheated oven and bake for 30–35 minutes, or until the bread is golden brown and cooked through.
The loaf should sound hollow when tapped on the bottom after it is removed from the pan. If you use a kitchen thermometer, the center should generally reach about 200–210°F (93–99°C).
If the top browns too quickly before the center is cooked, loosely cover it with aluminum foil for the remaining baking time.
Step 6: Cool Before Slicing
Remove the bread from the oven and carefully lift it out of the pan using the parchment paper.
Transfer it to a wire rack and allow it to cool for at least 30–45 minutes before slicing.
Cooling helps the interior finish setting and prevents the bread from becoming gummy. Slice with a serrated bread knife and serve.
Best Tips for Perfect No-Knead Bread
Measure the flour accurately. Too much flour can produce dense bread, while too little may leave the dough excessively loose. A kitchen scale provides the most reliable results.
Use warm, not hot, water. Water that is too hot can damage the yeast and prevent the dough from rising properly.
Don’t add too much extra flour. No-knead dough is naturally wetter and stickier than traditional bread dough. A sticky texture is expected.
Give the dough enough time to rise. Look for visible bubbles and an increase in volume rather than relying only on the clock.
Handle the dough gently. Excessive handling can knock out some of the air that develops during fermentation.
Preheat the oven fully. A properly heated oven helps the bread develop a good crust and bake evenly.
Let the loaf cool before cutting. Slicing too early can compress the soft interior and make it seem undercooked.
Best Ingredient Options
All-purpose flour: A convenient choice that produces a soft, everyday loaf.
Bread flour: Contains more protein and can provide a slightly chewier texture and stronger structure.
Whole-wheat flour: Replace up to 100 g of the white flour with whole-wheat flour for a heartier loaf. You may need to adjust the water slightly because whole-wheat flour absorbs more moisture.
Honey: A simple alternative to sugar that adds a subtle flavor.
Olive oil: Optional, but useful for brushing the crust and adding a delicate flavor.
Instant yeast: Can generally be mixed directly with the dry ingredients, making preparation even easier.
Recipe Variations
Garlic Herb Bread: Add 1 teaspoon of garlic powder and 1–2 tablespoons of chopped fresh herbs, such as rosemary or parsley, to the dry ingredients.
Whole-Wheat No-Knead Bread: Replace part of the all-purpose flour with whole-wheat flour and adjust the water as needed for a moist dough.
Seeded Homemade Bread: Sprinkle sesame, sunflower, or pumpkin seeds over the loaf before baking. You can also mix a small amount into the dough.
Cheese Bread: Fold in approximately 75 g of grated cheddar or another firm cheese before the first rise.
Rustic Crusty Bread: Bake the dough in a preheated oven-safe Dutch oven with its lid on for approximately 25 minutes, then remove the lid and bake for another 10–15 minutes. Only use cookware rated for the oven temperature, and follow the manufacturer’s instructions.
Honey Whole-Wheat Bread: Use honey instead of sugar and replace a portion of the white flour with whole-wheat flour for a slightly sweeter, more rustic loaf.
What to Serve With Homemade Bread
Butter and jam: Serve a warm slice with butter, honey, or your favorite fruit jam for a simple breakfast.
Soups and stews: This bread is perfect for dipping into vegetable soup, lentil soup, tomato soup, or a hearty homemade stew.
Eggs and cheese: Pair it with scrambled eggs, omelets, soft cheese, or sliced cheese for a satisfying breakfast or snack.
Sandwiches: Once completely cooled, slice the loaf and use it for chicken sandwiches, tuna sandwiches, or fresh vegetable sandwiches.
Olive oil and herbs: Serve slices with olive oil and a pinch of dried herbs for an easy appetizer.
Salads: Add homemade bread alongside a fresh garden salad or a Mediterranean-style meal.
Make-Ahead Instructions
You can prepare the dough ahead of time by mixing the ingredients, covering the bowl, and refrigerating it for a slower rise. The timing will vary with your refrigerator temperature and yeast activity, so allow the dough to become visibly puffy before baking.
For the most reliable results with this recipe, prepare the dough on the day you plan to bake it.
You can also bake the loaf in advance and store it once completely cooled. Reheat individual slices when you’re ready to serve.
Storage
Store completely cooled bread in a bread box or an airtight bag at room temperature for approximately 2–3 days.
Avoid sealing the bread while it is still warm, as trapped steam can make the crust soft and encourage moisture buildup.
For longer storage, slice the loaf and freeze it in a freezer-safe bag.
Reheating
Oven method: Preheat the oven to 350°F (175°C). Warm the loaf for approximately 8–12 minutes, or until heated through. A few drops of water on the crust can help refresh it.
Toaster method: Toast individual slices until warm and lightly crisp.
Microwave method: Heat a slice for about 10–15 seconds. This is convenient for a quick snack, but the bread may become chewy as it cools.
Freezing
This homemade bread freezes well for up to 3 months for the best quality.
Allow the loaf to cool completely before freezing. Slice it first if you want to remove only a few pieces at a time.
Place the slices in a freezer-safe bag, press out excess air, and seal tightly. Separate portions with parchment paper if necessary.
To serve, thaw slices at room temperature or toast them directly from frozen. For a whole loaf, thaw at room temperature and warm it briefly in the oven to refresh the crust.
Common Mistakes to Avoid
Using water that is too hot: Excessively hot water can damage the yeast. Use comfortably warm water rather than boiling or very hot water.
Adding too much flour: The dough should be sticky. Adding large amounts of flour can make the loaf heavy and dry.
Not allowing enough rising time: Under-risen dough often produces a dense loaf. Wait until the dough is visibly expanded and bubbly.
Using expired yeast: Old or improperly stored yeast may not work effectively. Check the expiration date and storage instructions.
Skipping the second rise: The short second rise helps the dough become lighter before baking.
Opening the oven repeatedly: Frequent opening causes temperature fluctuations that can affect baking. Check the loaf toward the end of the recommended baking time.
Cutting the bread while hot: The interior needs time to set. Allow the bread to cool before slicing for the best texture.
Nutrition Estimate
The following estimates are based on the ingredients listed, without optional olive oil, and will vary according to the flour brand and portion size.
| Nutrient | Approximate Amount Per Serving |
| Serving Size | 1 slice, assuming 10 slices |
| Calories | 150–165 kcal |
| Carbohydrates | 31–34 g |
| Protein | 4–5 g |
| Total Fat | 0.5–1.5 g |
| Saturated Fat | Less than 0.5 g |
| Fiber | 1–2 g |
| Sugars | Less than 1 g |
| Sodium | 180–220 mg |
Frequently Asked Questions
Can I make homemade bread without kneading?
Yes. This recipe relies on a wet dough and a longer rising period instead of traditional kneading. Mixing the ingredients thoroughly and allowing enough time for fermentation helps develop the bread’s structure.
Why is my no-knead dough so sticky?
The high water content is intentional. A wet dough helps produce a soft interior and supports the development of air bubbles. Use a spatula or lightly wet hands to transfer it rather than adding excessive flour.
Can I use fresh yeast instead of dry yeast?
Yes. You can use approximately 15 g of fresh baker’s yeast in place of 7 g of dry yeast. Dissolve it in some of the warm water before mixing, following the yeast manufacturer’s guidance.
Can I make this bread without sugar?
Yes. You can omit the small amount of sugar or honey. The yeast can still ferment using sugars naturally available from the flour, although rising speed and browning may vary.
Why didn’t my bread rise?
Possible causes include inactive yeast, water that was too hot, a cold environment, or insufficient rising time. Check the yeast’s freshness and allow the dough to rise until it visibly expands.
How do I get a crispier crust?
Bake the bread in a fully preheated oven and allow it to cool on a wire rack. Baking in a covered Dutch oven followed by an uncovered finishing period can also help produce a crisp, rustic crust.
Can I use whole-wheat flour?
Yes. Start by replacing about one-quarter of the white flour with whole-wheat flour. Since whole-wheat flour absorbs more water, you may need a little extra moisture.
How can I tell when the bread is fully baked?
The crust should be golden brown, and the bottom should sound hollow when tapped. A thermometer inserted into the center should generally read around 200–210°F (93–99°C).
Can I bake this bread in a Dutch oven?
Yes, provided the Dutch oven is oven-safe at the required temperature. Preheat it according to the manufacturer’s instructions and carefully transfer the dough using parchment paper. Baking with the lid on initially helps retain steam.
How long does homemade bread stay fresh?
It is generally best within the first 1–2 days and can be stored at room temperature for around 2–3 days. Freeze leftover slices if you want to keep them longer.
Final Thoughts
This Easy No-Knead Homemade Bread proves that making fresh bread at home doesn’t have to be complicated. With just a few everyday ingredients, minimal hands-on preparation, and a little patience, you can enjoy a loaf with a golden crust and a soft, tender center.
Serve it alongside your favorite meals, turn it into sandwiches, or enjoy a freshly cut slice with butter. Once you try this simple method, homemade bread may become a regular part of your kitchen routine.
Give this no-knead bread recipe a try, and enjoy the wonderful taste and aroma of freshly baked bread right from your own oven!