
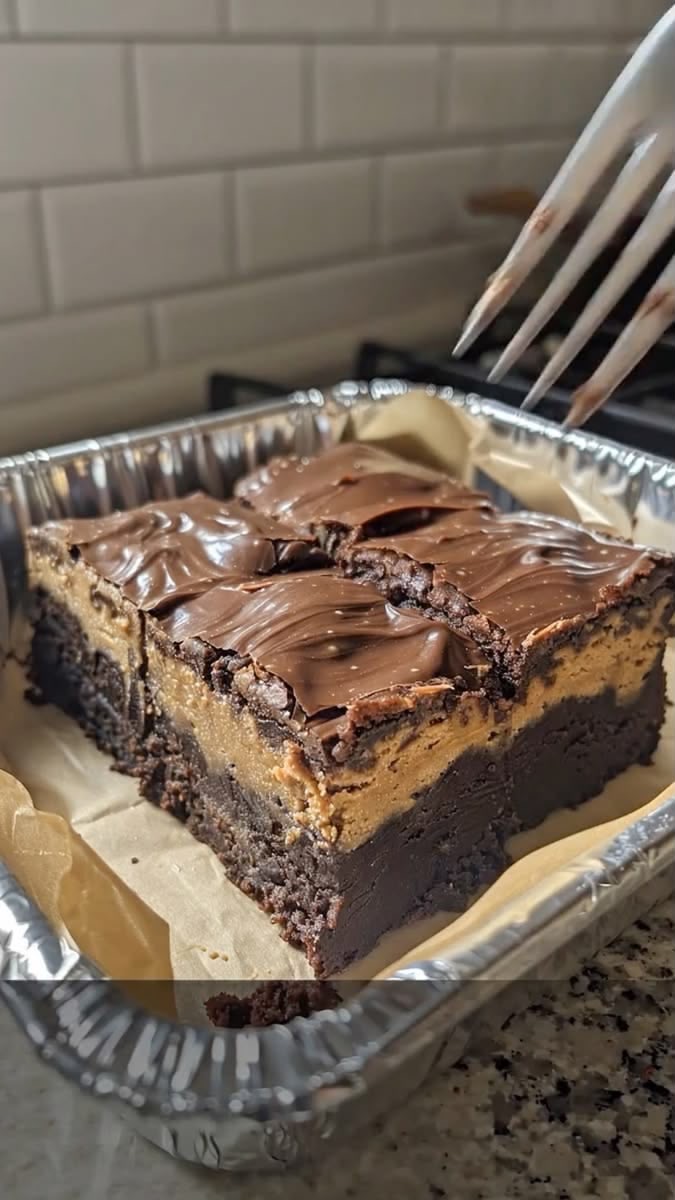
These Fudgy Chocolate Peanut Butter Brownies combine a rich, chocolatey brownie base with a thick, creamy peanut butter layer and a smooth chocolate topping. The result is an indulgent dessert with a soft, fudgy center, a creamy peanut butter filling, and a delicious chocolate finish.
Recipe Overview
| Category | Details |
| Prep Time | 20 minutes |
| Bake Time | 20–22 minutes |
| Chill Time | 1 hour |
| Total Time | About 1 hour 45 minutes |
| Servings | 12–16 brownies |
| Cuisine | American-inspired |
| Difficulty | Easy |
Ingredients
For the Brownie Base
| Ingredient | Amount |
| Unsalted butter, melted | 115 g |
| Granulated sugar | 150 g |
| Large eggs | 2 |
| Vanilla extract | 1 teaspoon |
| Unsweetened cocoa powder | 50 g |
| All-purpose flour | 65 g |
| Salt | ¼ teaspoon |
For the Peanut Butter Layer
| Ingredient | Amount |
| Creamy peanut butter | 250 g |
| Unsalted butter, softened | 60 g |
| Powdered sugar | 120 g |
| Vanilla extract | 1 teaspoon |
| Salt | 1 pinch |
For the Chocolate Topping
| Ingredient | Amount |
| Dark or milk chocolate, chopped or chocolate chips | 150 g |
| Peanut butter | 2 tablespoons |
You can substitute coconut oil for the peanut butter in the chocolate topping if desired.
Step-by-Step Instructions
1. Prepare the Baking Pan
Preheat your oven to 175°C (350°F).
Line a square baking pan with parchment paper, leaving some paper hanging over the sides. This will make it easier to lift the brownies out after chilling.
A 20 × 20 cm (8 × 8-inch) pan works well for thick brownies.
2. Make the Brownie Batter
In a large mixing bowl, whisk together the melted butter and granulated sugar until well combined.
Add the eggs and vanilla extract and whisk until smooth.
Add the unsweetened cocoa powder, flour, and salt.
Stir gently until everything is incorporated and you have a smooth brownie batter. Avoid overmixing once the flour has been added.
3. Bake the Brownie Base
Pour the batter into the prepared pan and spread it evenly.
Bake for approximately 20–22 minutes.
The edges should look set while the center remains slightly soft. Be careful not to overbake if you want a fudgy texture.
Remove from the oven and allow the brownie base to cool completely before adding the peanut butter layer.
4. Make the Peanut Butter Layer
In a medium bowl, combine the creamy peanut butter, softened butter, powdered sugar, vanilla extract, and a pinch of salt.
Beat until the mixture becomes smooth, thick, and creamy.
Spread the peanut butter mixture evenly over the completely cooled brownie base.
Use a spatula or the back of a spoon to create a smooth, even layer.
5. Make the Chocolate Topping
Place the chopped chocolate and 2 tablespoons of peanut butter in a microwave-safe bowl.
Microwave in 30-second intervals, stirring thoroughly after each interval until completely melted and smooth.
Alternatively, melt the chocolate and peanut butter together gently over a double boiler.
6. Add the Chocolate Layer
Pour the melted chocolate mixture over the peanut butter layer.
Use a spatula to gently spread it into an even layer, covering the entire surface.
7. Chill
Place the pan in the refrigerator for at least 1 hour, or until the chocolate topping and peanut butter layer are firm.
For especially clean slices, you can chill the brownies a little longer.
8. Slice and Serve
Use the parchment paper overhang to carefully lift the brownies from the pan.
Place them on a cutting board.
For clean, sharp cuts, use a large knife and wipe the blade between slices.
Cut into squares and serve.
Best Tips
For truly fudgy brownies, avoid overbaking the brownie base. The center should remain slightly soft when the pan comes out of the oven.
Make sure the brownie base is completely cool before adding the peanut butter layer. Otherwise, the peanut butter mixture may soften or melt.
Use creamy peanut butter for the smoothest filling.
Let the chocolate topping fully set before slicing for clean layers.
For sharper cuts, refrigerate the brownies well and use a warm, clean knife.
Best Ingredient Options
Dark chocolate creates a richer, more intense chocolate flavor, while milk chocolate produces a sweeter and creamier topping.
Creamy peanut butter gives the smoothest texture. Natural peanut butter can also work, but make sure it is thoroughly stirred before measuring.
Unsalted butter gives you better control over the overall saltiness of the dessert.
Dutch-process or natural unsweetened cocoa powder can be used depending on the flavor you prefer.
Recipe Variations
For extra crunch, stir chopped roasted peanuts into the peanut butter layer.
For a chocolate-peanut butter swirl, reserve a small amount of melted chocolate and drizzle it over the top before chilling.
For a richer chocolate flavor, use dark chocolate with a higher cocoa percentage for the topping.
For a salted chocolate finish, sprinkle a small amount of flaky sea salt over the melted chocolate before refrigerating.
What to Serve With
These brownies are delicious with a glass of cold milk, coffee, or hot chocolate.
For a decadent dessert, serve a warm or slightly softened brownie with a scoop of vanilla ice cream.
Fresh strawberries or raspberries also provide a pleasant contrast to the rich chocolate and peanut butter.
Make-Ahead Instructions
These brownies are ideal for making ahead because the layers need time to set.
You can prepare them a day in advance and keep them covered in the refrigerator until ready to serve.
Allow them to sit at room temperature for a few minutes before serving if you prefer a softer texture.
Storage
Store the brownies in an airtight container in the refrigerator for up to 5 days.
For the best texture, place parchment paper between layers if stacking them.
Reheating
These brownies are usually best served chilled or at room temperature.
If you prefer a softer brownie texture, allow an individual piece to sit at room temperature for approximately 15–20 minutes before serving.
Freezing
These brownies freeze well.
Cut them into individual squares and wrap each piece tightly in plastic wrap.
Place the wrapped brownies in a freezer-safe container or bag and freeze for up to 2–3 months.
Thaw overnight in the refrigerator or for a short time at room temperature before serving.
Common Mistakes to Avoid
Do not overbake the brownie base because this can turn a fudgy brownie into a dry, cakey one.
Do not spread the peanut butter layer over a warm brownie base.
Avoid overheating the chocolate because it can become thick or seize.
Do not cut the brownies before the chocolate topping has fully set.
Avoid using too much pressure when spreading the chocolate layer, as it can disturb the peanut butter underneath.
Nutrition Estimate
| Nutrient | Approximate Amount per Brownie |
| Calories | 350–450 kcal |
| Protein | 7–9 g |
| Carbohydrates | 35–45 g |
| Fat | 22–28 g |
| Saturated Fat | 8–12 g |
| Fiber | 3–5 g |
| Sugar | 25–32 g |
Nutrition information is an estimate and depends on the brands, chocolate type, and final serving size.
Frequently Asked Questions
How do I make brownies extra fudgy?
The most important step is avoiding overbaking. Remove the brownies when the edges are set but the center still looks slightly soft.
Can I use crunchy peanut butter?
Yes. Crunchy peanut butter will add small pieces of peanuts throughout the creamy layer.
Can I use milk chocolate instead of dark chocolate?
Absolutely. Milk chocolate creates a sweeter topping, while dark chocolate gives the brownies a more intense chocolate flavor.
Do these brownies need to be refrigerated?
Because the peanut butter layer contains butter and the chocolate topping needs to remain firm, refrigeration is recommended for storage.
Can I freeze these brownies?
Yes. They freeze very well when individually wrapped and stored in an airtight freezer-safe container.
How can I get perfectly clean brownie slices?
Chill the brownies until firm, then use a large sharp knife. Wipe the knife clean between each cut for neat, defined layers.
Final Thoughts
These Fudgy Chocolate Peanut Butter Brownies are the perfect combination of rich chocolate and creamy peanut butter. With three irresistible layers—a fudgy brownie base, smooth peanut butter filling, and glossy chocolate topping—they make an indulgent homemade dessert for holidays, parties, bake sales, or everyday sweet cravings.