
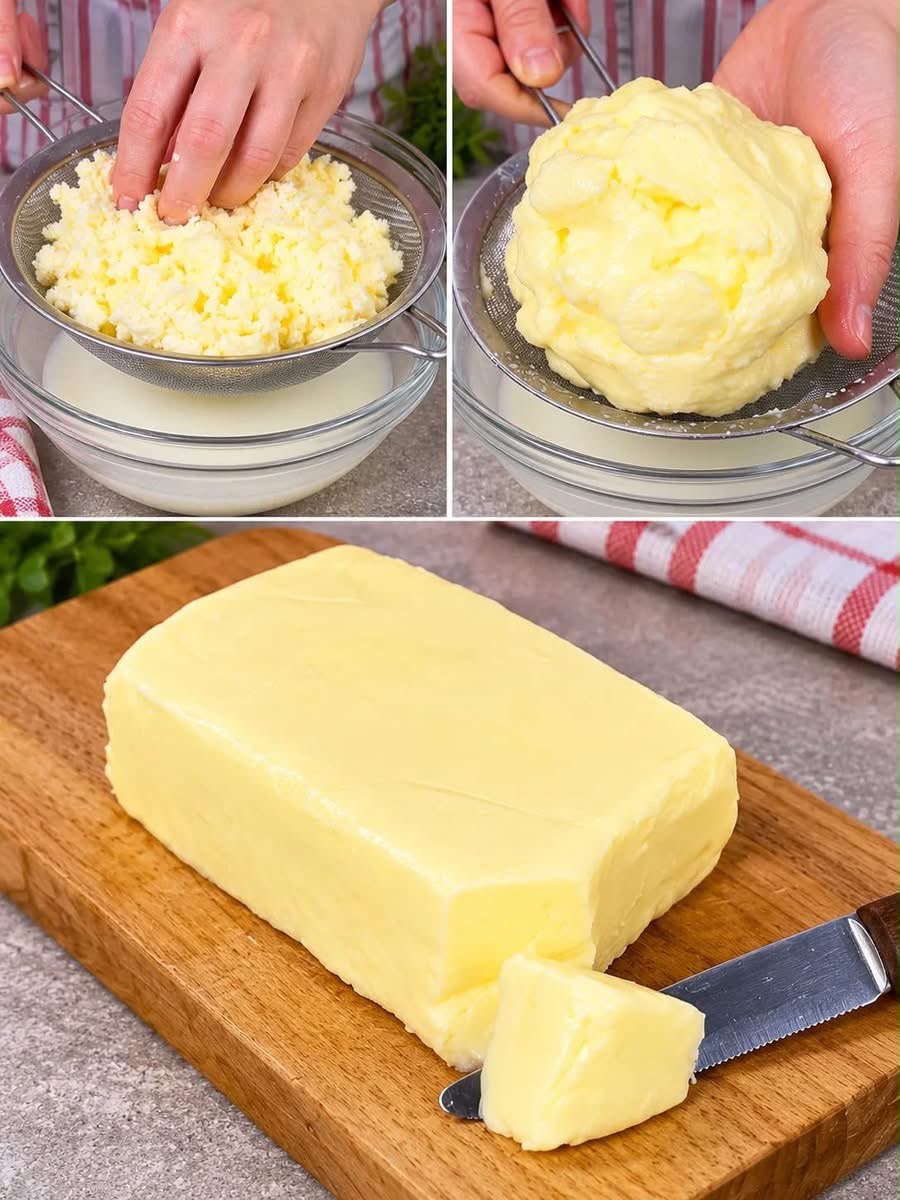
Making homemade butter is much easier than it might seem. With just one ingredient—cold heavy cream—you can transform fresh dairy cream into rich, creamy butter right in your own kitchen.
The process simply involves whipping the cream beyond the whipped-cream stage until the milk fat separates from the liquid buttermilk. After draining, rinsing, and kneading the butter, you will have fresh homemade butter ready to spread on bread, use in baking, or add to your favorite recipes.
Recipe Overview
| Category | Details |
| Recipe | Homemade Butter |
| Preparation Time | 10 minutes |
| Churning Time | 5–15 minutes |
| Rinsing & Shaping | 10 minutes |
| Chilling Time | 1 hour |
| Total Time | About 1 hour 35 minutes |
| Yield | Approximately 350–450 g butter |
| Difficulty | Easy |
| Main Ingredient | Heavy cream |
Why You’ll Love This Recipe
Homemade butter requires very few ingredients and basic kitchen equipment.
The finished butter has a fresh, rich flavor and a wonderfully creamy texture.
You can choose between unsalted butter and lightly salted butter depending on how you plan to use it.
The liquid left behind during the process is homemade buttermilk, which can be saved and used in pancakes, waffles, biscuits, or enriched breads.
Making butter at home is also a fun kitchen project and an easy way to see how cream transforms into butter.
Ingredients
For the Butter
| Ingredient | Amount |
| Full-fat heavy cream | 1 liter |
| Fine salt | ½ teaspoon, optional |
| Ice-cold water | As needed |
Use cream containing approximately 30–35% milk fat or higher. The cream should be very cold before you begin.
Equipment
| Equipment | Purpose |
| Electric mixer or stand mixer | Whipping and churning the cream |
| Fine-mesh strainer | Separating butter from buttermilk |
| Large bowl | Collecting the liquid |
| Large bowl of ice water | Rinsing the butter |
| Parchment paper | Shaping and wrapping the butter |
| Butter mold | Optional |
You can also use a large clean glass jar with a secure lid and shake it vigorously if you do not have a mixer.
Step-by-Step Instructions
1. Chill the Cream
Make sure the heavy cream is very cold before starting.
Cold cream helps the butter separate more efficiently.
Pour the cream into the bowl of a stand mixer or electric mixer.
2. Whip the Cream
Begin mixing at medium-high speed.
The cream will first become liquid and then gradually thicken into whipped cream.
Continue beating beyond the whipped-cream stage.
At this point, it may look like the cream has gone too far, but this is exactly what you want.
3. Separate the Butter and Buttermilk
Keep mixing.
The whipped cream will eventually break apart. Small yellowish clumps of butter will begin to form while a pale, milky liquid separates from them.
This liquid is buttermilk.
The transformation can happen relatively quickly once the cream reaches this stage, so keep an eye on the mixture.
4. Drain the Buttermilk
Place a fine-mesh strainer over a large bowl.
Pour the contents of the mixer bowl into the strainer.
The butter solids will remain in the strainer while the buttermilk drains into the bowl underneath.
Do not throw the liquid away.
Homemade buttermilk can be used to make pancakes, waffles, biscuits, muffins, or homemade bread.
5. Gather the Butter
Using clean hands or a spatula, gather the yellow butter pieces together.
Press them gently to form one compact ball.
At this stage, the butter will still contain some remaining buttermilk.
6. Rinse the Butter
Place the butter into a bowl of ice-cold water.
Gently knead and press the butter under the cold water.
This helps remove the remaining buttermilk.
Drain the cloudy water and replace it with fresh ice-cold water.
Repeat the rinsing process approximately 2–3 times, or until the water remains clear after gently working the butter.
Removing as much remaining buttermilk as possible helps the homemade butter keep better.
7. Drain and Dry the Butter
Remove the butter from the water and gently press it to release excess moisture.
Pat the outside with clean paper towels if necessary.
The goal is to remove as much water as possible without melting the butter.
8. Add Salt
If you want salted butter, add approximately ½ teaspoon of fine salt.
Knead the butter gently until the salt is evenly distributed.
For unsalted butter, simply skip this step.
9. Shape the Butter
Place the butter on a sheet of parchment paper.
Use a spatula, butter paddle, or knife to shape it into a neat rectangle or log.
You can also press it into a butter mold for a more decorative presentation.
10. Chill
Wrap the butter tightly in parchment paper or place it in an airtight container.
Refrigerate for at least 1 hour.
The butter will firm up as it chills and will then be ready to slice, spread, or use in cooking and baking.
Best Tips
Use very cold heavy cream for the best results. Chilling the cream before starting makes the separation process easier.
Do not stop when the cream becomes whipped cream. Continue beating until the yellow butter solids separate from the liquid.
Use a deep mixing bowl because the liquid can splash when the cream suddenly separates.
Keep the butter cold throughout the rinsing process. Ice-cold water helps keep the butter firm while removing the remaining buttermilk.
Take your time during the rinsing stage. Removing excess buttermilk and moisture helps improve the butter’s keeping quality.
Best Ingredient Options
Heavy cream containing at least 30–35% milk fat works well for homemade butter.
For a richer flavor, use high-fat cream when available.
Fine salt is ideal for making lightly salted butter because it distributes evenly throughout the butter.
You can also leave the butter completely unsalted, which makes it more versatile for baking and cooking.
Recipe Variations
For classic unsalted butter, simply omit the salt.
For lightly salted butter, add ½ teaspoon of fine salt and adjust according to taste.
For herb butter, knead finely chopped fresh herbs into the finished butter.
For garlic butter, mix softened homemade butter with finely minced garlic and herbs.
For honey butter, combine the finished butter with a small amount of honey for a sweet spread.
What to Serve With
Fresh homemade butter is delicious spread over warm bread, toast, baguettes, or homemade rolls.
Use it with pancakes, waffles, muffins, or freshly baked biscuits.
It is also excellent for sautéing vegetables, preparing sauces, or enriching mashed potatoes.
For breakfast, serve it with warm bread and honey or homemade jam.
Make-Ahead Instructions
Homemade butter can be prepared ahead of time.
After rinsing and shaping, wrap it tightly and refrigerate until needed.
You can prepare the butter a day or two before using it for baking or cooking.
Storage
Store homemade butter in an airtight container or wrap it tightly in parchment paper.
Keep it refrigerated.
Because homemade butter can contain more residual moisture and buttermilk than commercially processed butter, good rinsing and proper refrigeration are particularly important.
For longer storage, freezing is an excellent option.
Reheating
Butter does not need to be reheated.
If you want soft butter for spreading, remove the desired amount from the refrigerator and let it sit at room temperature for a short time.
Avoid leaving homemade butter at room temperature for extended periods.
Freezing
Homemade butter freezes well.
Wrap it tightly in parchment paper and then place it in a freezer-safe bag or airtight container.
For convenience, divide it into smaller portions before freezing.
Thaw the amount you need in the refrigerator and use it once softened.
Common Mistakes to Avoid
Do not use warm cream. Very cold cream makes the churning process more effective.
Do not stop mixing when the cream becomes whipped cream. The cream must be churned further until the butter separates.
Do not skip the rinsing step. Remaining buttermilk can negatively affect the butter’s storage life.
Do not rinse the butter with warm water because it can soften or melt the butter.
Do not leave excess water trapped inside the butter. Press and knead it gently during the rinsing process to remove as much moisture as possible.
Nutrition Estimate
Nutrition will vary depending on the fat content of the cream and the final yield.
| Nutrient | Approximate Amount per 1 Tbsp |
| Calories | 100–105 kcal |
| Fat | 11–12 g |
| Saturated Fat | 7–8 g |
| Protein | 0–1 g |
| Carbohydrates | 0 g |
| Sugar | 0 g |
| Sodium | Depends on added salt |
Frequently Asked Questions
How much butter can I make from 1 liter of cream?
The exact yield depends on the fat content of the cream and how efficiently the butter is separated and drained. One liter of cream can typically produce several hundred grams of butter.
Why isn’t my cream turning into butter?
The cream may not be cold enough, or it may simply need more mixing. Continue whipping beyond the whipped-cream stage until yellow butter clumps and liquid buttermilk appear.
Can I make butter without a mixer?
Yes. A large glass jar with a secure lid can be used. Add the cold cream, leaving plenty of room for movement, close the jar tightly, and shake vigorously until the cream separates. This method requires more physical effort.
What can I do with the leftover buttermilk?
Do not discard it. Use it in pancakes, waffles, biscuits, muffins, quick breads, or brioche-style doughs.
Why do I need to rinse homemade butter?
Rinsing removes remaining buttermilk from the butter. This helps improve its storage quality and gives the finished butter a cleaner flavor.
Can I make salted butter?
Yes. After rinsing and draining the butter, add approximately ½ teaspoon of fine salt and knead it gently until evenly distributed.
How long does homemade butter last?
Its storage life depends on how thoroughly it was rinsed, how much moisture remains, and how it is stored. Keep it refrigerated in an airtight container and use it promptly for the best quality.
Final Thoughts
Making homemade butter from heavy cream is a simple and satisfying kitchen project. With cold cream, a mixer, and ice water, you can transform cream into fresh, creamy butter in just a few steps.
The finished butter can be left unsalted for baking or lightly salted for spreading on warm bread and toast.
And because the process also produces fresh buttermilk, you get an additional useful ingredient for pancakes, biscuits, waffles, and homemade breads.