
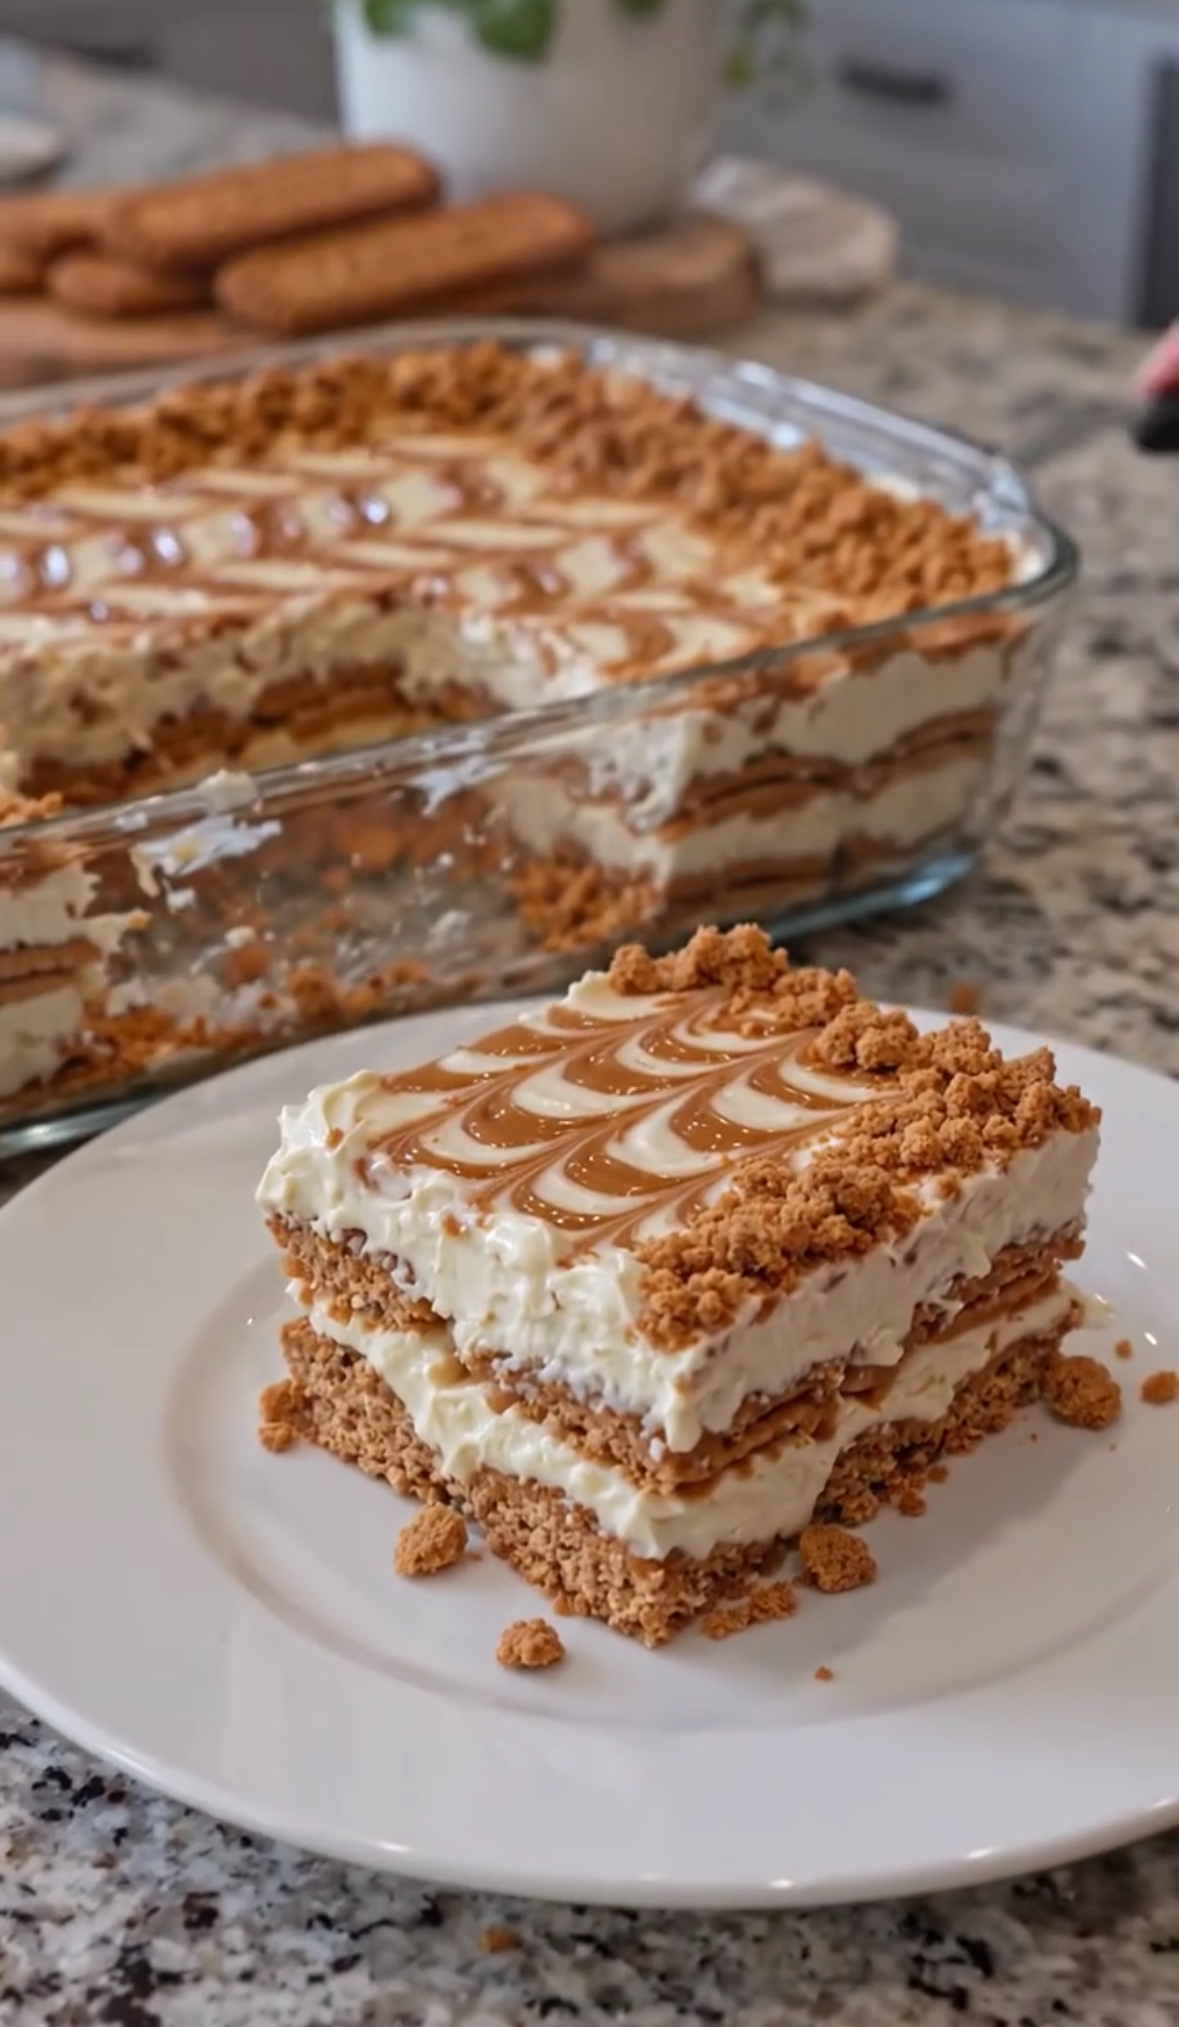
This creamy no-bake Biscoff cookie dessert features layers of crunchy caramelized biscuits, fluffy cream filling, and a beautiful cookie butter swirl. Inspired by the dessert in the photo, this easy icebox cake is perfect for family gatherings, holiday celebrations, dinner parties, or anyone who loves simple homemade desserts.
The best part is that you don’t need an oven. With a few everyday ingredients, you can create an elegant layered dessert with a rich, caramel-like flavor and a smooth, cheesecake-style filling. It’s an excellent choice when you’re looking for an easy no-bake dessert recipe that looks impressive without requiring complicated baking techniques.
This recipe uses Biscoff-style caramelized biscuits and cookie butter spread to recreate the golden layers and decorative topping shown in the image. The dessert becomes softer, creamier, and easier to slice after chilling in the refrigerator.
Recipe Overview
| Recipe Detail | Information |
| Recipe Name | No-Bake Biscoff Cookie Cream Dessert |
| Cuisine | European-inspired dessert |
| Category | No-bake dessert, icebox cake |
| Preparation Time | 25 minutes |
| Cooking Time | 0 minutes |
| Chilling Time | 6–8 hours |
| Total Time | 6 hours 25 minutes to 8 hours 25 minutes |
| Servings | 9–12 |
| Difficulty | Easy |
| Cooking Method | No-bake, refrigerator-set |
| Main Ingredients | Biscoff biscuits, heavy whipping cream, cream cheese, cookie butter |
| Best For | Parties, family desserts, holidays, potlucks |
Why You’ll Love This Recipe
This no-bake cookie dessert combines a light, fluffy cream filling with the rich caramel flavor of Biscoff biscuits. Every bite offers a delicious contrast between soft cookie layers and smooth, velvety cream.
It’s also a wonderful alternative to traditional baked cakes. You don’t need an oven, special baking equipment, or advanced pastry skills. Simply prepare the filling, layer the ingredients, decorate the top, and let the refrigerator do the work.
The recipe is ideal for busy families and anyone searching for easy dessert recipes, make-ahead desserts, or affordable homemade treats. You can prepare it the night before a celebration, leaving you more time to enjoy your guests.
Another advantage is its elegant presentation. The cookie butter drizzle and golden biscuit crumbs create a bakery-style finish that looks beautiful on a dessert table.
Ingredients
The following ingredients make one medium rectangular dessert, approximately 9–12 servings.
For the Cream Filling
| Ingredient | Quantity | Purpose |
| Heavy whipping cream | 2 cups (480 ml) | Creates a light, fluffy texture |
| Cream cheese, softened | 8 oz (225 g) | Adds richness and structure |
| Powdered sugar | ½ cup (60 g) | Sweetens the filling |
| Vanilla extract | 1 teaspoon | Enhances the flavor |
| Biscoff cookie butter | ¼ cup (60 g) | Adds caramelized cookie flavor |
For the Cookie Layers
| Ingredient | Quantity | Purpose |
| Biscoff biscuits | 24–30 biscuits | Creates the layered base |
| Milk | ½ cup (120 ml) | Lightly softens the biscuits |
| Biscoff cookie butter | ⅓ cup (80 g) | Adds flavor between layers |
For the Topping
| Ingredient | Quantity | Purpose |
| Biscoff cookie butter | ¼ cup (60 g) | Creates the decorative drizzle |
| Crushed Biscoff biscuits | ½ cup (50 g) | Adds a crunchy garnish |
| Whole biscuits | 2–4, optional | Decorative finishing touch |
Ingredient note: Biscoff is a popular brand of caramelized biscuits and cookie butter. Similar caramelized biscuits and speculoos cookie spreads can be used if the original products are unavailable.
Step-by-Step Instructions
Step 1: Prepare the Baking Dish
Choose a rectangular glass baking dish approximately 8 × 8 inches or 9 × 9 inches. Make sure it is clean and completely dry.
Arrange your ingredients nearby so the cream filling and cookie layers are easy to assemble.
Step 2: Beat the Cream Cheese
Place the softened cream cheese in a large mixing bowl. Add the powdered sugar and vanilla extract.
Beat with an electric mixer for approximately 2 minutes, until the mixture is smooth and creamy. Scrape down the sides of the bowl to remove any lumps.
Add ¼ cup of cookie butter and mix until fully incorporated.
Step 3: Whip the Heavy Cream
In a separate chilled bowl, beat the cold heavy whipping cream until stiff peaks form, approximately 3–5 minutes depending on your mixer.
The cream should hold its shape without becoming grainy or buttery.
Gently fold the whipped cream into the cream cheese mixture in two or three additions. Use a spatula and slow folding movements to maintain the light, airy texture.
Step 4: Prepare the Biscuits
Pour the milk into a shallow bowl.
Dip each Biscoff biscuit into the milk for approximately 1 second per side. The biscuits should be lightly moistened rather than soaked.
Arrange a single layer of biscuits across the bottom of your dish. Break a few biscuits into smaller pieces to fill any gaps.
Step 5: Add the First Cream Layer
Spread half of the prepared cream filling evenly over the biscuit layer.
Use a spatula to reach the corners and create a smooth surface.
Warm ⅓ cup of cookie butter in the microwave for approximately 10–15 seconds, stirring afterward. Drizzle a small amount over the cream and gently swirl it through the surface.
Step 6: Repeat the Layers
Add another layer of lightly moistened biscuits over the cream filling.
Spread the remaining cream mixture evenly over the biscuits.
For a dessert similar to the one pictured, aim for distinct biscuit and cream layers. Depending on the size of your dish, you can divide the filling into three portions and use additional biscuits to create more layers.
Step 7: Decorate the Top
Warm the remaining ¼ cup of cookie butter until it is fluid but not hot.
Transfer it to a small piping bag or use a spoon to create thin parallel lines across the cream.
Drag a toothpick or skewer perpendicular to the lines, alternating directions to create a decorative feathered pattern.
Sprinkle crushed Biscoff biscuits around the edges and add a few extra crumbs wherever desired.
Step 8: Refrigerate Until Set
Cover the dish and refrigerate for at least 6–8 hours. Overnight chilling is even better.
This resting time allows the biscuits to soften, the cream filling to firm up, and the flavors to blend together.
Cut into squares with a sharp knife and serve chilled.
Best Tips for Perfect Results
Use cold heavy whipping cream and softened cream cheese. These two ingredients require different temperatures for the best results: cold cream whips more effectively, while softened cream cheese blends smoothly without lumps.
Avoid soaking the biscuits in milk. A quick dip is sufficient because the biscuits will continue absorbing moisture from the cream while the dessert chills.
For clean, attractive slices, allow the dessert to chill overnight. Wipe your knife between cuts to keep the cream layers neat and the caramelized cookie topping beautiful.
If your cookie butter is too thick to drizzle, warm it in short microwave intervals. Let it cool slightly before adding it to the cream so it doesn’t melt or loosen the filling.
Best Ingredient Options
Heavy whipping cream: Choose cream with approximately 35% fat or more for a stable, fluffy filling. Lower-fat cream may not whip properly.
Cream cheese: Full-fat block cream cheese is generally best for a firm, rich filling. Spreadable cream cheese can be softer and may produce a less stable dessert.
Biscoff biscuits: Original caramelized biscuits provide the characteristic spiced caramel flavor. Other crisp speculoos biscuits are suitable substitutes.
Cookie butter: Smooth cookie butter creates the most attractive drizzle and swirls. Crunchy cookie butter works too, although the finish will be less uniform.
Milk: Whole milk works well, but reduced-fat milk is also suitable. You can use oat milk or another milk alternative if needed.
Powdered sugar: This dissolves easily into the cream cheese. Adjust the amount slightly depending on your preferred sweetness.
Recipe Variations
Chocolate Biscoff dessert: Add a thin layer of chocolate ganache between the biscuit layers for a richer chocolate and caramel combination.
Biscoff cheesecake icebox cake: Increase the cream cheese to 12 oz (340 g) and adjust the powdered sugar to taste for a denser, cheesecake-inspired filling.
Coffee-flavored cookie dessert: Replace the dipping milk with cooled, lightly sweetened coffee to create a tiramisu-inspired flavor.
Banana Biscoff dessert: Add thin slices of ripe banana between the biscuit and cream layers. Assemble shortly before chilling for the freshest flavor.
Lighter version: Use reduced-fat cream cheese and a smaller amount of cookie butter. The texture may be softer, and the dessert will still contain sugar and fat, but the flavor remains enjoyable.
Individual dessert cups: Assemble the biscuits and cream in small glasses instead of a large dish. These portions are convenient for parties, dessert buffets, and meal preparation.
What to Serve With This Dessert
This creamy Biscoff icebox cake pairs beautifully with freshly brewed coffee, espresso, or black tea. The slight bitterness of these drinks balances the sweet caramelized biscuit flavor.
For a dessert platter, serve it with fresh strawberries, raspberries, or sliced bananas. Their freshness provides a pleasant contrast to the rich cream filling.
If you’re serving it after a large meal, keep the portions small because the cream cheese and cookie butter make this a rich dessert.
For special occasions, pair it with a scoop of vanilla ice cream or a small serving of chocolate mousse for a more indulgent dessert selection.
Make-Ahead Instructions
This no-bake Biscoff dessert is particularly convenient because it needs several hours to set in the refrigerator.
You can prepare the entire dessert up to 24 hours before serving. Cover the dish tightly and keep it refrigerated.
For the best presentation, add the final biscuit crumbs shortly before serving if you prefer them to remain crunchy. The cookie butter decoration can be added before chilling.
Storage
Store leftover dessert in an airtight container or cover the baking dish tightly with plastic wrap or a suitable lid.
Keep it refrigerated at 40°F (4°C) or below and consume it within 3 days for the best quality. Because the filling contains dairy, avoid leaving the dessert at room temperature for more than 2 hours, or 1 hour when temperatures exceed 90°F (32°C).
The biscuits will gradually soften as the dessert sits, giving it a texture similar to a soft layered cheesecake.
Reheating
No reheating is required. This dessert is designed to be served cold.
Remove it from the refrigerator just before serving. If the cream filling is too firm, let it stand for approximately 5 minutes at room temperature before slicing.
Avoid heating the assembled dessert because the whipped cream filling may melt and separate.
Freezing
You can freeze this dessert, although freezing may slightly change the texture of the cream filling.
For best results, freeze individual portions in airtight, freezer-safe containers for up to 1 month. Thaw them in the refrigerator overnight before serving.
Add fresh biscuit crumbs after thawing for a more appealing finish. Do not thaw the dessert on the kitchen counter for extended periods.
Common Mistakes to Avoid
Overwhipping the cream: Whipping beyond stiff peaks can create a grainy texture. Stop once the cream holds its shape.
Using cold cream cheese straight from the refrigerator: Cold cream cheese can leave lumps in the filling. Allow it to soften before mixing.
Soaking the biscuits for too long: Excess milk can make the layers mushy and difficult to slice. Dip quickly and arrange immediately.
Skipping the chilling time: Cutting the dessert too early can cause the layers to slide apart. Allow at least 6–8 hours for the best structure.
Adding hot cookie butter to the filling: Excessive heat can loosen the cream mixture. Allow melted cookie butter to cool until just warm before using it near the filling.
Using a loose or runny filling: Heavy cream that hasn’t been whipped sufficiently may cause the dessert to collapse. Use high-fat cream and whip it to stiff peaks.
Adding too much sugar: Biscoff biscuits and cookie butter are already sweet. Measure the powdered sugar carefully and adjust to your taste.
Nutrition Estimate
The following values are approximate and will vary with ingredient brands, portion size, and the amount of topping used.
| Nutrient | Estimated Amount per Serving |
| Serving Size | 1 of 12 portions |
| Calories | 380–450 kcal |
| Total Fat | 25–32 g |
| Saturated Fat | 14–19 g |
| Carbohydrates | 32–42 g |
| Sugars | 20–28 g |
| Protein | 4–6 g |
| Sodium | 180–300 mg |
These figures are estimates, not laboratory-tested nutrition information. For more precise values, calculate the nutrition using the exact products and quantities you use.
Frequently Asked Questions
Can I make this Biscoff dessert without cream cheese?
Yes. You can make a version using whipped cream mixed with a thick vanilla pudding or mascarpone-based filling. The flavor and firmness will differ from the original recipe.
Can I use graham crackers instead of Biscoff biscuits?
Yes. Graham crackers work well, although they have a milder flavor. Add a little cinnamon to the cream filling if you’d like a warmer, spiced taste.
How long does this no-bake dessert need to chill?
Allow at least 6–8 hours in the refrigerator. Overnight chilling is recommended for neat slices and soft, cohesive biscuit layers.
Why is my cream filling runny?
Common causes include underwhipped cream, warm ingredients, soft cream cheese, or excessive liquid from soaking the biscuits. Make sure your cream is cold and properly whipped before folding it into the filling.
Can I make this recipe without an electric mixer?
Yes, but whipping cream by hand takes more time and effort. A balloon whisk and a chilled metal bowl can help you achieve the required consistency.
Can I prepare this dessert two days ahead?
Yes, although the biscuit layers will become softer over time. For the best texture and flavor, prepare it the day before serving and keep it refrigerated.
Is this dessert suitable for a party?
Absolutely. It can be prepared in advance, sliced into individual portions, and served directly from the refrigerator. Individual dessert cups are another convenient option for large gatherings.
Can I use homemade cookie butter?
Yes, provided it has a smooth, spreadable consistency. Homemade versions may have different sweetness and fat levels, so the flavor and texture may vary.
How do I get the decorative swirl on top?
Pipe thin, parallel lines of slightly warmed cookie butter across the cream. Drag a toothpick through the lines at regular intervals, alternating direction to create the feathered pattern.
Can I make this dessert gluten-free?
You can make a gluten-free version using certified gluten-free caramelized biscuits and a compatible cookie spread. Check all product labels for gluten-containing ingredients and cross-contamination warnings.
Final Thoughts
This No-Bake Biscoff Cookie Cream Dessert is a delicious way to turn simple ingredients into an elegant homemade treat. With caramelized biscuits, fluffy cream cheese filling, and a smooth cookie butter topping, it delivers the flavor of a bakery-style dessert without the time and effort of baking.
It’s perfect for anyone searching for easy no-bake desserts, creamy icebox cakes, make-ahead party desserts, or simple recipes for family gatherings. The layers are easy to customize, and the decorative topping makes every slice look special.
For the best results, use cold whipping cream, dip the biscuits quickly, and allow plenty of time for the dessert to chill. Prepare it the night before, serve it cold, and enjoy a rich, creamy dessert that is as beautiful as it is satisfying.
SEO keywords naturally included: no-bake Biscoff dessert, Biscoff icebox cake, easy no-bake dessert recipe, creamy cookie dessert, no-bake cheesecake dessert, make-ahead desserts, easy dessert recipes for parties, caramelized biscuit dessert, and homemade dessert recipes.