
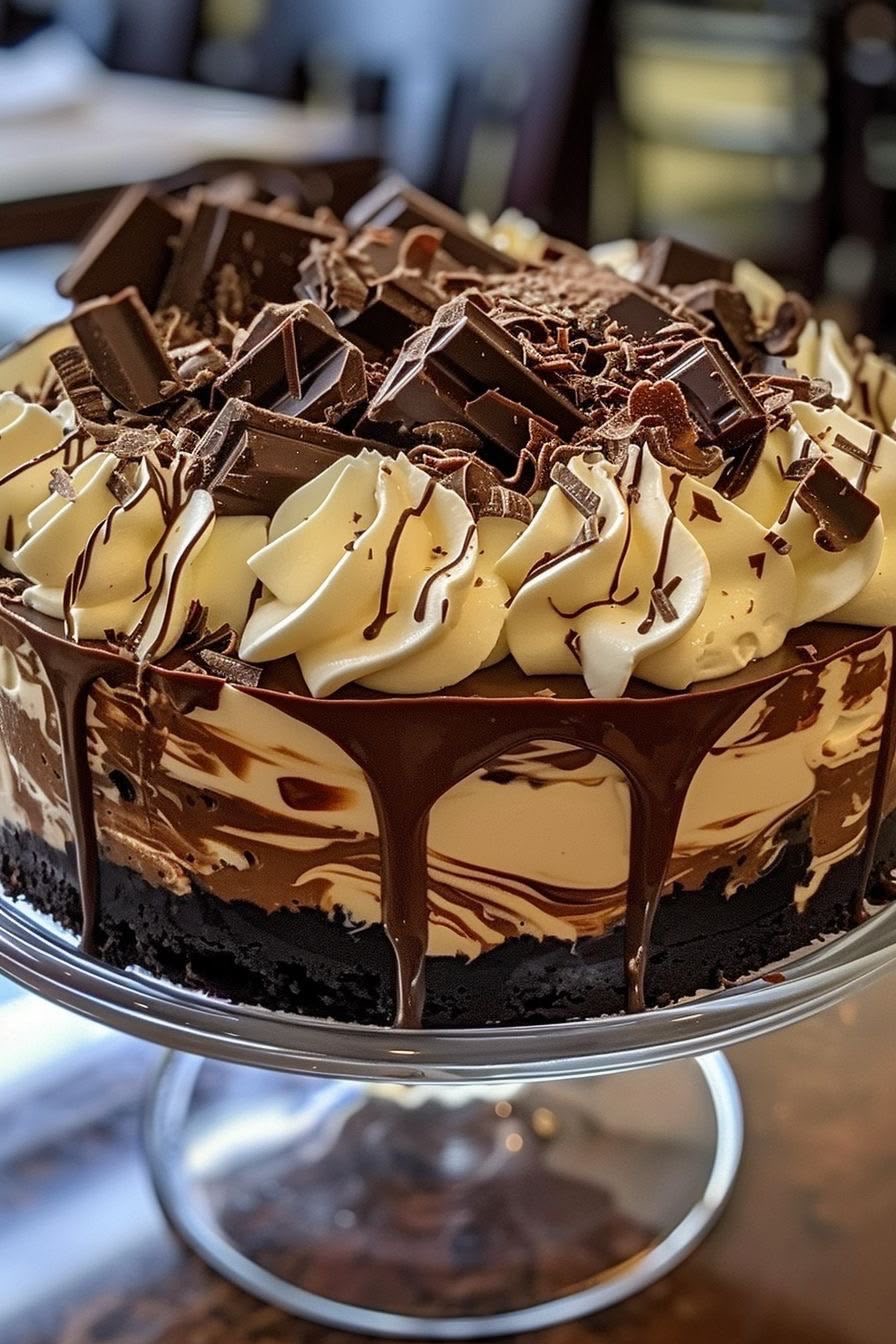
This No-Bake Chocolate Marble Cheesecake is a rich and creamy dessert made with a crisp chocolate cookie crust, a smooth vanilla cheesecake filling, and beautiful swirls of melted dark chocolate.
The cheesecake is finished with a silky chocolate ganache drip, generous swirls of whipped cream, chocolate chunks, chocolate shavings, and a delicate drizzle of chocolate sauce.
It looks elegant enough for birthdays and celebrations but is surprisingly simple to prepare because there is no baking involved.
Recipe Overview
| Details | Information |
| Prep Time | 35 minutes |
| Chilling Time | At least 6 hours |
| Total Time | About 6 hours 35 minutes |
| Servings | 10–12 |
| Pan Size | 8-inch (20 cm) springform pan |
| Baking | No baking required |
| Difficulty | Easy to Intermediate |
Why You’ll Love This Recipe
This cheesecake has an incredibly creamy texture without requiring an oven or a water bath.
The chocolate cookie crust adds a delicious cocoa flavor and a satisfying crunchy contrast to the smooth filling.
The dark chocolate swirls create a beautiful marble effect, making every slice look different.
The silky ganache drip and whipped cream decoration give the cheesecake a bakery-style appearance that is perfect for special occasions.
Ingredients
For the Chocolate Cookie Crust
| Ingredient | Amount |
| Chocolate sandwich cookies, such as Oreos | 250 g |
| Unsalted butter, melted | 80 g |
For the Cheesecake Filling
| Ingredient | Amount |
| Cream cheese, softened | 600 g |
| Powdered sugar | 120 g |
| Vanilla extract | 1 teaspoon |
| Heavy whipping cream, very cold | 300 ml |
| Dark chocolate, melted and slightly cooled | 150 g |
For the Chocolate Ganache
| Ingredient | Amount |
| Dark chocolate, finely chopped | 100 g |
| Heavy cream | 100 ml |
For the Decoration
| Ingredient | Amount |
| Heavy whipping cream, whipped until firm | 250 ml |
| Dark chocolate chunks or squares | As needed |
| Chocolate shavings | As needed |
| Chocolate sauce | For drizzling |
Step-by-Step Instructions
Step 1: Prepare the Chocolate Cookie Crust
Place the chocolate cookies in a food processor and pulse until finely crushed.
If you don’t have a food processor, place the cookies in a sealed food bag and crush them with a rolling pin.
Transfer the cookie crumbs to a bowl and add the melted butter.
Mix thoroughly until the crumbs are evenly coated and the mixture resembles wet sand.
Line the bottom of an 8-inch (20 cm) springform pan with parchment paper.
Transfer the cookie mixture into the pan.
Press it firmly and evenly over the bottom using the back of a spoon or the bottom of a measuring cup.
Place the pan in the refrigerator for approximately 30 minutes to allow the crust to firm up.
Step 2: Prepare the Cream Cheese Mixture
Make sure the cream cheese is softened to room temperature.
Place the cream cheese, powdered sugar, and vanilla extract in a large mixing bowl.
Beat with an electric mixer until completely smooth and creamy.
Scrape down the sides of the bowl as needed to ensure there are no lumps.
Step 3: Whip the Cream
Pour the 300 ml of very cold heavy whipping cream into a separate bowl.
Whip until firm peaks form.
Be careful not to overwhip the cream, as it can become grainy and eventually turn into butter.
Step 4: Combine the Cheesecake Filling
Gently fold the whipped cream into the cream cheese mixture using a spatula.
Fold carefully until the mixture is smooth, creamy, and evenly combined.
Avoid vigorous mixing because you want to preserve the light texture of the whipped cream.
Step 5: Create the Chocolate Marble Effect
Remove the chilled crust from the refrigerator.
Spread approximately half of the white cheesecake mixture over the cookie crust.
Spoon large dollops of the melted and slightly cooled dark chocolate over the cheesecake layer.
Add the remaining cheesecake mixture on top.
Use the tip of a knife or a wooden skewer to gently swirl the chocolate through the cheesecake mixture.
Create several loose swirling motions rather than mixing everything together.
The goal is to create visible chocolate ribbons throughout the cheesecake.
Smooth the top gently without completely removing the marble pattern.
Step 6: Chill the Cheesecake
Cover the springform pan and refrigerate for at least 6 hours.
For the best texture, refrigerate overnight.
The cheesecake needs enough time to become firm enough to slice cleanly.
Step 7: Prepare the Chocolate Ganache
Finely chop the 100 g of dark chocolate and place it in a heatproof bowl.
Heat the 100 ml of heavy cream in a small saucepan until it begins to gently simmer.
Do not bring it to a vigorous boil.
Pour the hot cream over the chopped chocolate.
Let it sit undisturbed for approximately 1 minute.
Then gently stir from the center outward until the chocolate has completely melted and the ganache becomes smooth and glossy.
Allow the ganache to cool slightly so it is warm and pourable but not hot.
Step 8: Create the Ganache Drip
Carefully remove the chilled cheesecake from the springform pan.
Place it on a serving plate or cake stand.
Pour the warm ganache over the center of the cheesecake.
Use a spatula to gently push some of the ganache toward the edges.
Allow small amounts of ganache to naturally drip over the sides.
For an attractive drip effect, don’t push all of the ganache over the edges. Create drips of different lengths around the cake.
Place the cheesecake in the refrigerator for a few minutes to allow the ganache to set slightly.
Step 9: Decorate With Whipped Cream
Transfer the 250 ml of firmly whipped cream into a piping bag fitted with a large star tip.
Pipe generous swirls of whipped cream around the upper edge of the cheesecake.
Try to space the rosettes evenly for a clean, elegant appearance.
Step 10: Add the Chocolate Decorations
Place dark chocolate squares or large chocolate chunks in the center of the cheesecake.
Scatter chocolate shavings around the chocolate pieces.
Finish by drizzling thin lines of chocolate sauce over the whipped cream rosettes.
For the most attractive presentation, keep the chocolate decorations slightly varied in size and shape.
Step 11: Serve
Refrigerate the decorated cheesecake until ready to serve.
For the best texture, allow it to sit at room temperature for approximately 10–15 minutes before slicing.
Use a sharp knife to cut the cheesecake into clean wedges.
Wipe the knife between cuts for neat slices with clearly visible chocolate marbling.
Best Tips
Use full-fat cream cheese for the richest and creamiest cheesecake texture.
Make sure the cream cheese is softened before mixing to prevent lumps.
The heavy cream must be very cold when whipping.
Allow the melted chocolate to cool slightly before adding it to the cheesecake. Very hot chocolate can soften the cream mixture.
Do not over-swirl the chocolate. A few gentle movements create a much prettier marble effect than excessive mixing.
Chill the cheesecake overnight whenever possible for the firmest texture and cleanest slices.
Let the ganache cool slightly before creating the drip so it doesn’t melt the whipped cream or become too runny.
Best Ingredient Options
Dark chocolate with around 50–70% cocoa works particularly well because it provides a rich chocolate flavor without making the cheesecake excessively sweet.
Chocolate sandwich cookies create an easy and flavorful crust, but chocolate graham crackers can also be used.
For the creamiest filling, use full-fat block-style cream cheese rather than a soft spreadable variety.
Freshly whipped heavy cream provides the best flavor and texture for the decoration.
Recipe Variations
For a stronger chocolate flavor, use 70% dark chocolate in both the marble filling and ganache.
For a sweeter cheesecake, replace some of the dark chocolate with semi-sweet chocolate.
Add a teaspoon of instant espresso powder to the melted chocolate for a deeper chocolate flavor.
For a festive version, decorate the cheesecake with chocolate curls, mini chocolate truffles, or chocolate-covered strawberries.
You can also add a thin layer of chocolate ganache between the cookie crust and cheesecake filling for an extra-rich dessert.
What to Serve With Chocolate Marble Cheesecake
Serve each slice with a small cup of coffee or espresso.
Fresh berries such as strawberries, raspberries, or blueberries provide a refreshing contrast to the rich chocolate.
A scoop of vanilla ice cream can turn this cheesecake into an especially indulgent dessert.
For chocolate lovers, serve it with a small glass of cold milk or a warm chocolate drink.
Make-Ahead Instructions
This cheesecake is ideal for making ahead.
Prepare the cheesecake the day before serving and refrigerate it overnight.
The ganache and decorations can be added several hours before serving.
For the freshest appearance, add the whipped cream and chocolate decorations on the day you plan to serve the cheesecake.
Storage
Store the cheesecake covered in the refrigerator.
It will keep well for approximately 3–4 days.
Because of the cream cheese and whipped cream, keep the cheesecake refrigerated whenever it is not being served.
Reheating
This is a no-bake chilled dessert and should not be reheated.
Simply remove it from the refrigerator about 10–15 minutes before serving.
Freezing
The undecorated cheesecake can be frozen for up to approximately 1 month.
Wrap it tightly in plastic wrap and place it in a freezer-safe container.
Thaw it slowly overnight in the refrigerator.
For the best appearance, add the whipped cream, ganache drip, and chocolate decorations after thawing.
Common Mistakes to Avoid
Do not use warm cream cheese because it can make the filling too soft.
Avoid overwhipping the heavy cream.
Do not add very hot melted chocolate to the cheesecake mixture.
Avoid overmixing the marble pattern because the chocolate can blend completely into the white filling.
Do not pour extremely hot ganache over the cheesecake because it can soften the filling and melt the whipped cream.
Do not skip the chilling time. The cheesecake needs several hours to become firm enough to slice properly.
Nutrition Estimate
Nutrition values are approximate and will vary depending on the specific cookies, chocolate, cream cheese, and portion size used.
| Nutrient | Approximate Amount Per Serving |
| Calories | 500–600 kcal |
| Protein | 7–9 g |
| Carbohydrates | 40–50 g |
| Fat | 35–42 g |
| Sugar | 25–35 g |
| Fiber | 3–5 g |
Frequently Asked Questions
Can I make this cheesecake without a springform pan?
Yes. You can use a deep cake pan lined thoroughly with parchment paper, leaving enough overhang to lift the cheesecake out once chilled.
Why is my cheesecake too soft?
The cheesecake needs sufficient chilling time. Refrigerate it for at least 6 hours, preferably overnight.
Also make sure the whipped cream has been whipped to firm peaks before folding it into the cream cheese mixture.
Can I use milk chocolate instead of dark chocolate?
Yes. Milk chocolate will make the cheesecake sweeter and milder. Semi-sweet chocolate is another good option if you prefer a balanced flavor.
How do I create a good marble effect?
Add the melted chocolate in several dollops throughout the cheesecake layer, then gently swirl with the tip of a knife or skewer.
Avoid stirring too much, or the white and chocolate layers will blend together.
How do I make clean slices?
Chill the cheesecake thoroughly and use a sharp knife. Wipe the blade with a warm, damp towel between each cut.
Can I make this cheesecake the day before?
Absolutely. Preparing it the day before is actually recommended. The extra chilling time helps the cheesecake become firm and improves the texture.
Final Thoughts
This No-Bake Chocolate Marble Cheesecake is an elegant dessert that combines a crunchy chocolate cookie crust with a silky cream cheese filling and rich dark chocolate swirls.
The glossy ganache drip, fluffy whipped cream, and chocolate decorations give it a stunning bakery-style finish without requiring complicated baking techniques.
Make it ahead, chill it overnight, decorate it with plenty of chocolate, and slice it just before serving for a decadent dessert that is perfect for birthdays, holidays, celebrations, and special family dinners.
⚠️ This recipe may not be suitable for everyone. If you have food allergies, intolerances, or specific dietary or medical needs, consult a qualified healthcare professional regarding your individual diet.