
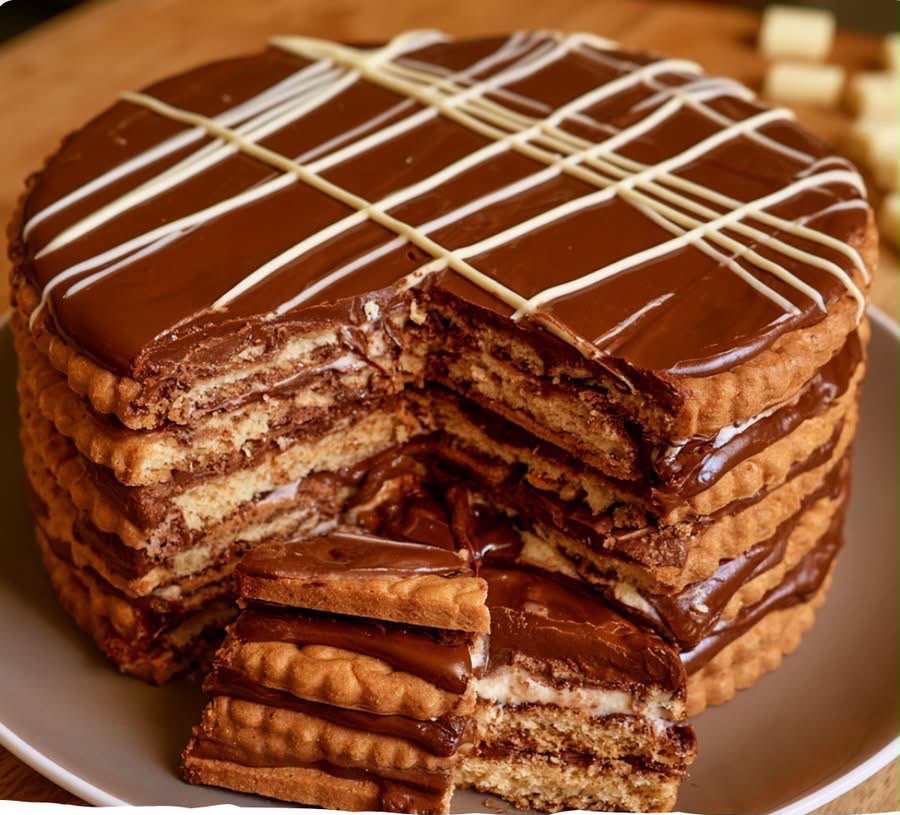
This No-Bake Giant Biscuit & Nutella Icebox Cake is an irresistibly indulgent dessert made with layers of tender tea biscuits, creamy chocolate hazelnut spread, and fluffy whipped cream. After several hours in the refrigerator, the biscuits soften into a deliciously cake-like texture while still retaining enough structure to create beautiful slices.
The best part is that there is no oven required. Simply dip the biscuits briefly in vanilla-infused milk, layer them with Nutella and whipped cream, cover the top with chocolate ganache, and finish with a delicate white chocolate drizzle.
It is an easy chocolate dessert that looks impressive on a dessert table and is perfect for birthdays, family gatherings, holidays, afternoon tea, or whenever you are craving something rich and chocolatey.
Recipe Overview
| Details | Information |
| Prep Time | 25 minutes |
| Chill Time | 3–4 hours |
| Total Time | About 4 hours 25 minutes |
| Servings | 6–8 |
| Course | Dessert |
| Cuisine | European-inspired |
| Difficulty | Easy |
| Method | No-Bake |
Why You’ll Love This Recipe
This dessert requires no oven, making it especially convenient when you want a homemade treat without complicated baking.
The combination of chocolate hazelnut spread, whipped cream, and softened biscuits creates a wonderfully creamy and rich texture.
The tall layered presentation makes the dessert look much more elaborate than it actually is.
You can prepare it several hours in advance, and the overnight chilling time actually improves the texture.
Ingredients
Biscuit Layers
| Ingredient | Amount |
| Large round tea biscuits | 4–5 |
| Warm milk | ½ cup |
| Vanilla extract | 1 tsp |
You can use large digestive-style biscuits, Marie biscuits, butter cookies, or several smaller biscuits arranged together to create each round layer.
Chocolate Filling
| Ingredient | Amount |
| Nutella or chocolate hazelnut spread | 1½ cups |
| Heavy whipping cream | 1 cup |
| Powdered sugar | 1–2 tbsp, optional |
| Vanilla extract | ½ tsp, optional |
The whipped cream adds lightness and balances the richness of the chocolate hazelnut spread.
Chocolate Topping
| Ingredient | Amount |
| Dark or milk chocolate ganache | ½ cup |
| White chocolate | 2 tbsp, melted |
You can also use slightly warmed chocolate hazelnut spread instead of ganache for the topping.
Step-by-Step Instructions
1. Prepare the Milk Soak
Pour the warm milk into a shallow dish.
Stir in the vanilla extract.
The milk should be warm rather than hot. A warm soak helps soften the biscuits without making them fall apart immediately.
2. Whip the Cream
Pour the cold heavy whipping cream into a mixing bowl.
Using a hand mixer or stand mixer, whip until soft peaks form.
If desired, add powdered sugar and ½ teaspoon vanilla extract for lightly sweetened whipped cream.
Do not overwhip the cream. It should be fluffy and spreadable rather than stiff and grainy.
3. Prepare the First Biscuit Layer
Briefly dip one large biscuit into the milk mixture.
Dip it for only a moment on each side. The biscuit should be lightly moistened, not saturated.
Place it carefully on a serving plate.
If using smaller biscuits, arrange them closely together to form a round layer.
4. Add the Nutella
Spread a generous layer of Nutella over the biscuit.
Use the back of a spoon or a small offset spatula to spread it evenly.
For easier spreading, let the Nutella sit at room temperature for a few minutes before assembling.
5. Add the Whipped Cream
Spread a thin layer of whipped cream over the Nutella.
You do not need a very thick cream layer because the dessert already contains a generous amount of chocolate hazelnut spread.
Keep the layers as even as possible to create a neat tower.
6. Continue Layering
Repeat the process with the remaining biscuits.
Briefly dip each biscuit into the milk mixture, place it on top of the previous layer, then add Nutella and whipped cream.
Continue until all the biscuits have been used and you have created a tall layered cake.
Gently press each layer into place, but do not push too hard because the softened biscuits can break.
7. Add the Chocolate Topping
Prepare your chocolate ganache if needed.
Allow it to cool slightly so it is spreadable but not hot.
Spoon the ganache over the top biscuit and spread it into an even layer.
If using Nutella instead, gently warm it until it becomes easy to spread, then cover the top of the cake.
8. Create the White Chocolate Decoration
Melt the white chocolate carefully in short intervals in the microwave or over a gentle double boiler.
Transfer it to a small piping bag or drizzle it directly from a spoon.
Create several thin, parallel lines across the chocolate topping.
Using a toothpick, drag through the lines in alternating directions to create a beautiful crisscross or spiderweb-style pattern.
9. Chill the Cake
Carefully transfer the dessert to the refrigerator.
Chill for at least 3–4 hours.
For the best texture, refrigerate it overnight.
This resting time allows the biscuits to absorb moisture from the milk, cream, and chocolate layers, transforming their texture into something much softer and more cake-like.
10. Slice and Serve
Remove the cake from the refrigerator just before serving.
Use a sharp knife to cut it into wedges.
For especially clean slices, wipe the knife with a warm, slightly damp cloth between cuts.
Serve chilled.
Best Tips for Success
Dip the biscuits very quickly. The biggest mistake is allowing them to sit in the milk too long. They should soften gradually during refrigeration.
Use room-temperature Nutella for easier spreading. If the chocolate spread is particularly thick, warm it very gently.
Keep your whipped cream cold before whipping. Cold cream generally whips more easily and creates a better texture.
Do not make the cream layer excessively thick. A thinner layer allows the chocolate and biscuit flavors to remain balanced.
Allow plenty of chilling time. The dessert becomes noticeably softer and more cohesive after several hours in the refrigerator.
For the neatest presentation, assemble the cake directly on the plate or serving board you plan to use.
Best Ingredient Options
Digestive biscuits provide a slightly buttery, crumbly texture, while Marie biscuits create a lighter and more delicate cake-like result.
Butter cookies can give the dessert a richer flavor, although they may soften more quickly.
Milk creates a mild, creamy soak. Brewed coffee can be used instead for a deeper chocolate flavor.
Dark chocolate ganache creates a less sweet, more sophisticated topping, while milk chocolate produces a sweeter and creamier finish.
White chocolate provides a beautiful contrast and makes the decorative pattern stand out.
Recipe Variations
Coffee Chocolate Icebox Cake
Replace the milk with cooled brewed coffee and add a small splash of vanilla. Coffee enhances the chocolate hazelnut flavor beautifully.
Strawberry Nutella Icebox Cake
Add thinly sliced fresh strawberries between some of the biscuit layers for a fruity contrast.
Banana Chocolate Version
Add thin banana slices between the Nutella and whipped cream layers for a rich banana-chocolate combination.
Extra Hazelnut Cake
Sprinkle finely chopped toasted hazelnuts between the layers and over the finished cake for additional crunch.
White Chocolate Version
Use melted white chocolate mixed into part of the filling and finish the cake with a white chocolate topping.
Mini Icebox Cakes
Instead of creating one large tower, use smaller biscuits to make individual mini cakes. This is a great option for parties and entertaining.
What to Serve With This Dessert
Serve small slices alongside fresh strawberries, raspberries, or banana slices to add a refreshing contrast to the rich chocolate.
A cup of coffee or espresso pairs beautifully with the hazelnut and chocolate flavors.
For a special occasion, serve each slice with a small spoonful of whipped cream and a few chocolate shavings.
Make-Ahead Instructions
This dessert is ideal for making ahead.
Assemble the entire cake several hours before serving and keep it refrigerated.
For the best texture, prepare it the evening before and allow it to chill overnight.
Add delicate toppings or fresh fruit shortly before serving if desired.
Storage
Keep the cake covered and refrigerated.
It is best enjoyed within 2–3 days.
The biscuits will continue to soften over time, so the texture will become progressively more tender.
Can You Freeze It?
Freezing is possible, but the whipped cream and softened biscuit texture may change after thawing.
For the best results, prepare the cake fresh and refrigerate it overnight rather than freezing it.
Common Mistakes to Avoid
Soaking the Biscuits Too Long
A biscuit that becomes completely saturated during assembly can break before the cake is finished.
A quick dip is all you need.
Using Hot Ganache
Very hot ganache can soften the top layer excessively and may melt the whipped cream underneath.
Let the ganache cool slightly before spreading it.
Overwhipping the Cream
Stop whipping as soon as soft or medium peaks form. Overwhipped cream can become grainy and difficult to spread.
Skipping the Chill Time
The refrigerator is an important part of this recipe. Without enough chilling time, the biscuits will not develop their desired cake-like texture.
Making the Cake Too Tall
If your biscuits are very thin, you can create additional layers. However, an extremely tall cake may become difficult to stabilize and slice.
Keep the layers compact and centered.
Nutrition Estimate
Approximate values per serving:
| Nutrient | Estimated Amount |
| Calories | 550–650 kcal |
| Protein | 7–9 g |
| Carbohydrates | 55–65 g |
| Fat | 32–38 g |
| Saturated Fat | 16–20 g |
| Fiber | 3–5 g |
| Sugar | 35–45 g |
| Sodium | 250–400 mg |
Nutrition information is an estimate and will vary depending on the biscuits, chocolate spread, cream, and portion size used.
Frequently Asked Questions
Can I make this dessert the day before?
Yes. In fact, overnight refrigeration is highly recommended because it gives the biscuits more time to soften and develop a cake-like texture.
Can I use regular cookies instead of large biscuits?
Yes. Smaller cookies can be arranged closely together to create each round layer.
Can I skip the whipped cream?
Yes. You can make the cake with biscuits and Nutella alone, although the result will be considerably richer and denser.
Can I use coffee instead of milk?
Absolutely. Cooled brewed coffee gives the dessert a deeper, more intense chocolate flavor.
How do I make Nutella easier to spread?
Let it sit at room temperature for a short time. If necessary, warm it very gently, stirring frequently.
Why did my biscuits break?
They were likely soaked for too long. The biscuits should only be briefly dipped because they continue absorbing moisture while the cake chills.
Can I add fruit?
Yes. Strawberries and bananas are particularly delicious with chocolate hazelnut spread. Add fruit in thin layers so the cake remains stable.
How long should the cake chill?
At least 3–4 hours is recommended, but overnight refrigeration generally gives the best texture.
Final Thoughts
This No-Bake Giant Biscuit & Nutella Icebox Cake is proof that an impressive dessert does not require an oven or complicated baking techniques.
With just a handful of ingredients, you can create beautiful layers of softened biscuits, creamy chocolate hazelnut spread, fluffy whipped cream, and glossy chocolate topping.
The key is patience: give the assembled cake enough time in the refrigerator to soften and set. Once chilled, slice it into wedges and enjoy a rich, creamy dessert that looks spectacular on any table.