
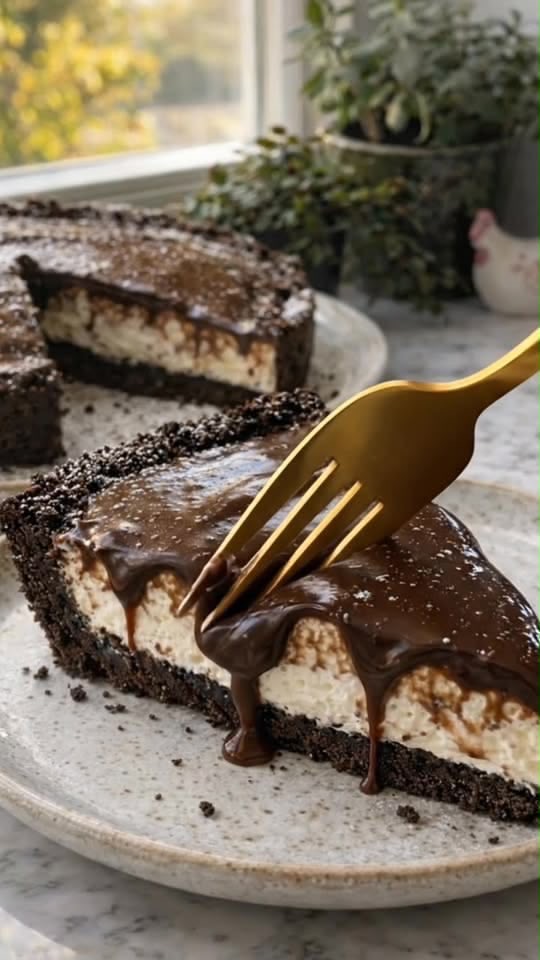
This No-Bake Oreo Chocolate Tart is an indulgent dessert made with a crunchy Oreo cookie crust, a light and creamy vanilla filling, and a silky chocolate ganache topping.
There is no oven required, making this an easy dessert for birthdays, holidays, dinner parties, or whenever you are craving something rich and chocolatey. The combination of crunchy chocolate cookies, smooth cream cheese, whipped cream, and glossy chocolate ganache creates an irresistible texture in every bite.
Recipe Overview
| Category | Details |
| Prep Time | 25 minutes |
| Chilling Time | 2–3 hours |
| Total Time | About 3 hours |
| Servings | 8–10 |
| Cooking Method | No-Bake |
| Difficulty | Easy |
| Dessert Type | Chocolate Tart |
Why You’ll Love This Recipe
This Oreo chocolate tart requires no baking, making it especially convenient when you want an impressive dessert without turning on the oven.
The Oreo crust is crunchy, buttery, and intensely chocolatey.
The cream cheese and whipped cream filling is smooth, airy, and lightly sweetened with vanilla.
The chocolate ganache creates a luxurious glossy topping that complements the creamy center perfectly.
A tiny pinch of flaky sea salt balances the sweetness and makes the chocolate flavor even more pronounced.
Ingredients
For the Oreo Crust
| Ingredient | Amount |
| Oreo cookies, filling included | 300 g / about 26–28 cookies |
| Unsalted butter, melted | 80 g / ⅓ cup + 1 tablespoon |
For the Creamy Filling
| Ingredient | Amount |
| Cream cheese or mascarpone, softened | 250 g / 8.8 oz |
| Heavy whipping cream, very cold | 200 ml / about ¾ cup + 1 tablespoon |
| Powdered sugar | 60 g / about ½ cup |
| Vanilla extract | 1 teaspoon |
For the Chocolate Ganache
| Ingredient | Amount |
| Dark or milk chocolate, finely chopped | 150 g / 5.3 oz |
| Heavy cream | 120 ml / ½ cup |
| Flaky sea salt | A small pinch |
Step-by-Step Instructions
1. Prepare the Oreo Crust
Place the whole Oreo cookies, including the cream filling, in a food processor.
Pulse until the cookies become a fine, even crumb.
Pour in the melted butter and process briefly until the mixture resembles wet sand and holds together when pressed.
Transfer the mixture to a 9-inch / 23-cm tart pan, preferably one with a removable bottom.
Firmly press the Oreo mixture over the bottom and up the sides of the pan.
Use the bottom of a glass or measuring cup to compact the crust evenly.
Refrigerate for at least 20 minutes to allow the crust to firm up.
2. Prepare the Creamy Filling
Place the softened cream cheese or mascarpone in a large mixing bowl.
Add the powdered sugar and vanilla extract.
Beat with an electric mixer until the mixture is completely smooth and creamy.
In a separate chilled bowl, whip the cold heavy cream until it forms firm peaks.
Gently fold the whipped cream into the cream cheese mixture using a spatula.
Fold gradually and carefully to preserve as much air as possible and create a light, fluffy filling.
3. Fill the Oreo Crust
Remove the chilled Oreo crust from the refrigerator.
Spoon the creamy filling over the crust.
Spread it evenly with an offset spatula or the back of a spoon.
Smooth the surface as evenly as possible.
Refrigerate for 1–2 hours to allow the filling to firm up.
4. Make the Chocolate Ganache
Finely chop the chocolate and place it in a heatproof bowl.
Heat the heavy cream in a small saucepan over medium-low heat until it reaches the first gentle simmer.
Do not bring the cream to a vigorous boil.
Pour the hot cream over the chopped chocolate.
Let it sit undisturbed for approximately 1 minute.
Slowly whisk from the center outward until the chocolate has completely melted and the ganache becomes smooth, glossy, and uniform.
Allow the ganache to cool slightly until it is warm but no longer hot.
5. Add the Chocolate Topping
Remove the tart from the refrigerator.
Pour the warm ganache over the creamy filling.
Gently spread it toward the edges with a spatula, allowing the chocolate topping to create an even layer.
Finish with a very small pinch of flaky sea salt.
6. Chill and Serve
Return the tart to the refrigerator for approximately 30 minutes to allow the ganache to set.
For cleaner slices, you can chill the tart for a little longer before serving.
Carefully remove the tart from the pan.
Slice with a sharp knife and serve cold.
For especially clean cuts, wipe the knife with a warm, damp towel between slices.
Best Tips
Use the entire Oreo cookie, including the cream filling, when making the crust. The filling helps bind the crumbs together.
Press the crust firmly into the tart pan. A well-compacted crust will hold together much better when sliced.
Make sure the heavy cream is very cold before whipping. Cold cream generally whips more easily and creates a more stable filling.
Do not overmix the whipped cream when folding it into the cream cheese mixture. Gentle folding helps maintain the airy texture.
Let the ganache cool slightly before pouring it over the filling. If it is too hot, it can soften the creamy layer.
Use a tart pan with a removable bottom for easier serving and a more attractive presentation.
Best Ingredient Options
Regular Oreo cookies work perfectly for the crust, but chocolate-flavored or other Oreo varieties can be used to create different flavor combinations.
Mascarpone creates an especially smooth and rich filling, while cream cheese provides a slightly tangier flavor.
Dark chocolate creates a more intense chocolate flavor and balances the sweetness of the Oreo crust.
Milk chocolate creates a sweeter and creamier ganache.
For the best whipped filling, use heavy cream containing at least 30% fat, preferably higher.
Recipe Variations
For an extra chocolatey version, add 1–2 tablespoons of unsweetened cocoa powder to the creamy filling.
For a peanut butter variation, swirl a few tablespoons of smooth peanut butter into the filling before chilling.
For a mocha version, add 1 teaspoon of instant espresso powder to the chocolate ganache.
For a mint-chocolate version, add a small amount of peppermint extract to the creamy filling.
You can also decorate the finished tart with crushed Oreo cookies, chocolate shavings, mini chocolate chips, or additional whipped cream.
What to Serve With
Serve this Oreo tart on its own for a rich and indulgent dessert.
Fresh strawberries or raspberries provide a bright contrast to the creamy chocolate filling.
A small spoonful of whipped cream can make the dessert even more luxurious.
For a dinner-party presentation, serve each slice with a few fresh berries and a light dusting of cocoa powder.
Make-Ahead Instructions
This tart is an excellent make-ahead dessert.
You can prepare the entire tart 1 day in advance and keep it covered in the refrigerator until serving.
Preparing it several hours ahead also gives the creamy filling plenty of time to firm up.
For the cleanest slices, keep the tart chilled until shortly before serving.
Storage
Store the finished tart covered in the refrigerator.
It is best enjoyed within 3–4 days.
Keep the tart refrigerated because the filling contains dairy ingredients and whipped cream.
Reheating
This is a no-bake chilled dessert and does not need to be reheated.
If the ganache becomes very firm after refrigeration, simply allow the tart to sit at room temperature for approximately 10–15 minutes before serving.
Freezing
The finished tart can be frozen, although the texture of the whipped cream filling may change slightly after thawing.
For best results, freeze the tart uncovered until firm, then wrap it tightly and place it in a freezer-safe container.
Freeze for up to 1 month for best quality.
Thaw overnight in the refrigerator before serving.
Common Mistakes to Avoid
Do not add too much butter to the Oreo crust because an overly greasy crust may not set properly.
Avoid using warm cream when making the whipped filling. Cold cream is important for achieving a firm, stable texture.
Do not pour boiling-hot ganache directly onto the filling because it can melt or soften the cream layer.
Avoid overwhipping the cream because it can become grainy and eventually turn into butter.
Do not remove the tart from the pan before the crust and filling have had enough time to chill and firm up.
Nutrition Estimate
Nutrition values are approximate and depend on the specific Oreo cookies, chocolate, dairy products, and serving size used.
| Nutrient | Estimated Amount Per Serving |
| Calories | 500–600 kcal |
| Protein | 6–8 g |
| Fat | 32–40 g |
| Carbohydrates | 50–60 g |
| Sugar | 32–40 g |
| Fiber | 3–5 g |
| Sodium | 250–400 mg |
Frequently Asked Questions
Do I need to remove the cream from the Oreo cookies?
No. Use the whole Oreo cookie, including the filling. The cream helps bind the crust together.
Can I use mascarpone instead of cream cheese?
Yes. Mascarpone creates an exceptionally smooth and rich filling and works beautifully in this recipe.
How long does the tart need to chill?
The crust needs at least 20 minutes initially. After adding the filling, chill for 1–2 hours, then chill for another 30 minutes after adding the ganache.
For the firmest texture, you can chill the finished tart for several hours or overnight.
Can I use milk chocolate for the ganache?
Yes. Milk chocolate creates a sweeter, creamier topping. Dark chocolate provides a stronger contrast with the sweet Oreo crust.
Why is my Oreo crust falling apart?
The crumbs may not have been compressed firmly enough, or the crust may not have been chilled long enough. Press the mixture firmly into the pan and refrigerate it until completely firm.
Can I make this dessert without a tart pan?
Yes. A springform pan can work as an alternative. You can also make individual Oreo chocolate dessert cups instead of one large tart.
Can I decorate the tart?
Absolutely. Crushed Oreo cookies, chocolate curls, whipped cream, fresh berries, or a light drizzle of melted chocolate all make beautiful decorations.
Final Thoughts
This No-Bake Oreo Chocolate Tart with Creamy Filling is an easy yet impressive dessert that brings together three irresistible layers: a crunchy Oreo cookie crust, a soft vanilla cream filling, and a silky chocolate ganache.
Because it can be prepared ahead of time and requires no oven, it is an excellent dessert for entertaining, celebrations, or a simple chocolate treat at home.
Keep it well chilled, add a tiny touch of flaky sea salt, and slice it just before serving for the best texture and presentation.