
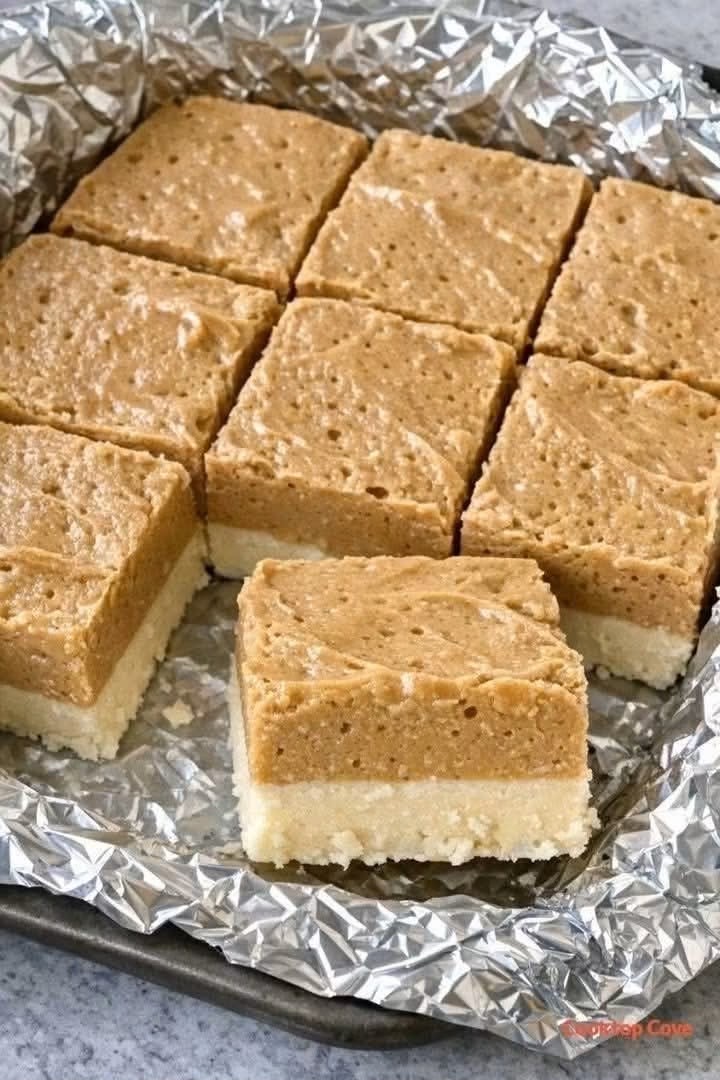
These delicious Peanut Butter Cookie Bars feature two irresistible layers: a tender, buttery shortbread crust topped with a rich, creamy peanut butter filling. Each square delivers the perfect balance of sweet, nutty flavor and a melt-in-your-mouth texture.
They are easy to prepare with simple pantry ingredients and require very little hands-on time. Whether you’re looking for an easy homemade dessert, a sweet afternoon snack, or a crowd-pleasing treat for parties and holidays, these peanut butter bars are sure to become a favorite.
Recipe Overview
| Detail | Information |
| Preparation Time | 20 minutes |
| Baking Time | 15–20 minutes |
| Chilling Time | 1–2 hours |
| Total Time | Approximately 2 hours 40 minutes |
| Servings | 16–20 squares |
| Course | Dessert |
| Cuisine | American-inspired |
| Difficulty | Easy |
Why You’ll Love This Recipe
These peanut butter bars combine two wonderful textures in every bite. The bottom layer is buttery and slightly crumbly, while the peanut butter topping is smooth, rich, and wonderfully sweet.
The recipe uses everyday ingredients such as butter, flour, powdered sugar, vanilla, and creamy peanut butter, making it an affordable homemade dessert.
You can also prepare the bars ahead of time and keep them chilled until you’re ready to serve. They are perfect for dessert platters, family gatherings, lunchbox treats, and holiday celebrations.
Ingredients
For the Buttery Shortbread Base
| Ingredient | Quantity |
| Unsalted butter, softened | 1 cup (227 g) |
| Powdered sugar | ½ cup (60 g) |
| All-purpose flour | 2 cups (250 g) |
| Vanilla extract | 1 teaspoon |
For the Creamy Peanut Butter Layer
| Ingredient | Quantity |
| Creamy peanut butter | 1 cup (250–260 g) |
| Unsalted butter, melted | ¼ cup (57 g) |
| Powdered sugar | 2 cups (240 g) |
| Milk | 2–3 tablespoons, as needed |
Step-by-Step Instructions
Step 1: Prepare the Baking Pan
Preheat your oven to 350°F (180°C).
Line an 8-by-8-inch square baking pan with parchment paper, leaving some overhang on the sides. This will make it easier to lift the finished bars out of the pan.
Lightly grease the parchment paper if necessary.
Step 2: Make the Shortbread Base
In a large mixing bowl, beat the softened butter and powdered sugar together until creamy and smooth.
Add the vanilla extract and mix until incorporated.
Gradually add the all-purpose flour, mixing on low speed until a soft, uniform dough forms. Avoid overmixing, as this can make the crust less tender.
Step 3: Press and Bake the Crust
Transfer the shortbread dough into the prepared baking pan.
Press it evenly across the bottom using your hands or the back of a spoon. Make sure the dough reaches the corners and has a consistent thickness.
Bake for 15–20 minutes, or until the edges are lightly golden and the center looks set.
Remove the pan from the oven and allow the shortbread crust to cool completely before adding the peanut butter layer.
Step 4: Prepare the Peanut Butter Filling
In a separate mixing bowl, combine the creamy peanut butter and melted butter.
Stir until smooth and fully blended.
Gradually add the powdered sugar, mixing until the filling becomes thick and creamy.
If the mixture is too firm to spread, add milk one tablespoon at a time until it reaches a smooth, spreadable consistency.
Step 5: Assemble the Two Layers
Once the shortbread base has cooled completely, spoon the peanut butter filling over it.
Spread the mixture evenly using an offset spatula or the back of a spoon.
Smooth the surface so every square will have a consistent layer of peanut butter filling.
Step 6: Refrigerate Until Firm
Place the pan in the refrigerator for at least 1–2 hours, or until the peanut butter layer is firm enough to cut cleanly.
For even neater squares, refrigerate the bars for a little longer.
Step 7: Slice and Serve
Use the parchment paper overhang to carefully lift the chilled dessert out of the pan.
Place it on a cutting board and cut into 16–20 squares using a sharp knife.
For clean edges, wipe the knife with a warm, damp cloth between cuts.
Serve chilled or let the bars sit at room temperature for a few minutes before enjoying.
Best Tips
Always allow the shortbread crust to cool completely before adding the peanut butter filling. A warm crust can soften the topping and make the layers difficult to keep separate.
Use softened butter for the shortbread base so it blends smoothly with the powdered sugar. For the peanut butter layer, choose creamy peanut butter for the smoothest consistency.
Add the milk gradually. Too much liquid can make the filling too soft, so stop as soon as it becomes easy to spread.
For perfectly shaped dessert squares, chill the assembled bars thoroughly before slicing.
Best Ingredient Options
Creamy peanut butter gives the filling a smooth, classic texture. Natural peanut butter can also work, but it should be thoroughly stirred before measuring because separated oil may affect the consistency.
Unsalted butter allows you to control the flavor and sweetness of the dessert. If using salted butter, you may want to omit any additional salt.
Powdered sugar is essential for a smooth filling and tender shortbread texture. Granulated sugar is not a direct substitute because it can create a grainier result.
Pure vanilla extract adds a warm aroma that complements the buttery crust and peanut butter topping.
Recipe Variations
For a chocolate peanut butter version, melt ½–1 cup of semi-sweet chocolate chips and spread a thin layer over the peanut butter filling before refrigerating.
For a crunchy texture, replace part of the creamy peanut butter with crunchy peanut butter or sprinkle chopped roasted peanuts over the topping.
You can add a pinch of sea salt to the peanut butter layer to balance the sweetness.
For a chocolate-drizzled finish, drizzle melted chocolate over the chilled bars before cutting them into squares.
What to Serve With These Peanut Butter Bars
These rich dessert bars pair beautifully with a cup of freshly brewed coffee, hot tea, or cold milk.
For a dessert platter, serve them alongside chocolate brownies, vanilla cookies, or fresh strawberries.
They also make a delicious addition to holiday dessert tables, birthday celebrations, bake sales, and afternoon coffee gatherings.
Make-Ahead Instructions
These peanut butter bars are an excellent make-ahead dessert.
Prepare the shortbread base and peanut butter topping, assemble the layers, and refrigerate the pan until firm.
You can make them up to 2 days before serving. Keep the bars covered in the refrigerator and slice them shortly before serving for the neatest presentation.
Storage
Store the bars in an airtight container in the refrigerator for up to 5–7 days.
Place parchment paper between layers if stacking the squares to prevent them from sticking together.
For the best texture, allow refrigerated bars to sit at room temperature for approximately 5–10 minutes before serving.
Reheating
These bars do not need reheating. They are designed to be enjoyed chilled or slightly softened at room temperature.
If the shortbread base feels too firm straight from the refrigerator, simply leave the bars on the counter for a few minutes before serving.
Freezing
These peanut butter cookie bars freeze well.
Cut them into individual squares and arrange them in a freezer-safe container with parchment paper between the layers.
Freeze for up to 2–3 months for the best quality.
To enjoy, transfer the desired number of squares to the refrigerator and allow them to thaw overnight, or let them soften at room temperature for approximately 20–30 minutes.
Common Mistakes to Avoid
Adding the peanut butter filling while the crust is still warm can cause the layers to blend together. Always let the base cool completely first.
Overbaking the shortbread can make it dry and crumbly. Remove it when the edges are lightly golden rather than waiting for the entire surface to become dark.
Adding too much milk to the peanut butter filling can make it difficult to set. Add only enough to achieve a thick, spreadable consistency.
Cutting the bars before they are fully chilled can cause the topping to stick to the knife and lose its shape. Give the dessert enough time in the refrigerator before slicing.
Nutrition Estimate
| Nutrient | Estimated Amount per Serving |
| Calories | 290–340 kcal |
| Protein | 5–7 g |
| Carbohydrates | 30–36 g |
| Fat | 17–21 g |
| Saturated Fat | 7–9 g |
| Sugar | 19–24 g |
| Fiber | 1–2 g |
Nutrition information is approximate and will vary depending on the peanut butter, butter, serving size, and exact ingredients used.
Frequently Asked Questions
Can I make these peanut butter bars without baking the crust?
The shortbread base in this recipe is designed to be baked. For a completely no-bake dessert, you can replace it with a prepared cookie crumb crust made from crushed biscuits and melted butter.
Why is my peanut butter filling too soft?
The filling may contain too much milk or the peanut butter may have a high oil content. Add a little more powdered sugar and refrigerate the bars until firm.
Can I use crunchy peanut butter?
Yes. Crunchy peanut butter works well and adds small pieces of peanuts for extra texture.
How long do these bars need to chill?
Allow at least 1–2 hours in the refrigerator. If your kitchen is warm or the filling is particularly soft, chill them longer.
Can I add a chocolate topping?
Absolutely. Melted chocolate chips make a delicious topping. Spread the chocolate over the peanut butter layer and refrigerate until completely set.
How do I get clean, even squares?
Chill the dessert thoroughly, lift it out of the pan using the parchment paper, and cut with a sharp knife. Wiping the blade between cuts helps create smooth edges.
Final Thoughts
These Peanut Butter Cookie Bars with Buttery Shortbread Crust are an easy homemade dessert with two irresistible layers. The delicate, buttery base pairs perfectly with the rich and creamy peanut butter topping, creating a sweet treat that is simple yet satisfying.
Whether you’re preparing a dessert for your family, a holiday gathering, or a weekend baking project, these easy peanut butter bars are a wonderful choice.
Make a batch ahead of time, keep them chilled, and enjoy a delicious homemade treat whenever a sweet craving strikes!