
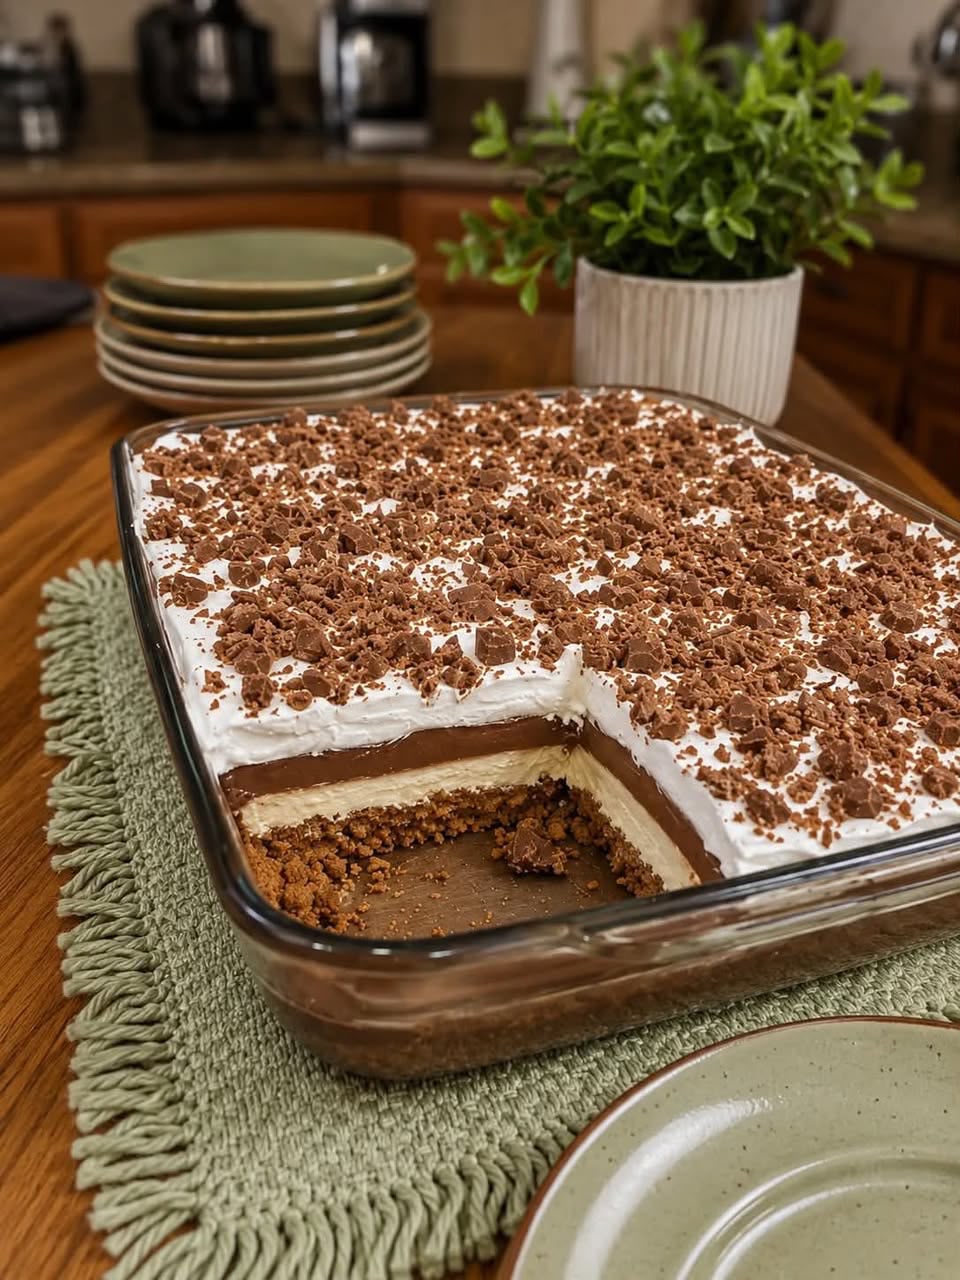
If you love rich, creamy, chocolatey desserts but don’t want to turn on the oven, this Ultimate No-Bake Chocolate Layer Dessert is the perfect treat. Also known as Chocolate Lasagna or Chocolate Delight, this easy layered dessert combines a buttery graham cracker crust, sweetened cream cheese, silky chocolate pudding, and a generous layer of fluffy whipped topping.
Every bite delivers a delicious combination of creamy, crunchy, chocolatey, and sweet textures. Best of all, the entire dessert can be prepared ahead of time and chilled until you’re ready to serve it.
This no-bake chocolate dessert is ideal for family gatherings, potlucks, holidays, birthdays, Sunday dinners, or anytime you need an easy dessert that feeds a crowd.
Recipe Overview
| Category | Details |
| Prep Time | 25 minutes |
| Chill Time | 4 hours |
| Total Time | About 4 hours 25 minutes |
| Servings | 12–16 |
| Recipe Type | No-Bake Dessert |
| Main Flavor | Chocolate |
| Difficulty | Easy |
| Baking Required | No |
| Dish | 9 × 13-inch baking dish |
Why You’ll Love This No-Bake Chocolate Dessert
This dessert requires absolutely no baking, making it especially convenient when you want something impressive without spending hours in the kitchen.
The buttery graham cracker crust provides a slightly crisp foundation for the creamy layers above it.
The sweet cream cheese layer adds a smooth, tangy contrast to the rich chocolate pudding.
The chocolate pudding layer gives the dessert its deep chocolate flavor while keeping every bite soft and creamy.
A final layer of fluffy whipped topping makes the dessert light and luxurious, while crushed chocolate pieces or toffee bits add a delicious finishing crunch.
Because it needs several hours to chill, it’s also an excellent make-ahead dessert for parties and gatherings.
Ingredients
For the Graham Cracker Crust
| Ingredient | Quantity |
| Graham cracker crumbs | 2 cups |
| Unsalted butter, melted | ½ cup (1 stick) |
| Granulated sugar | 2 tablespoons |
Finely crushed graham crackers create the classic buttery crust. For an even richer chocolate version, chocolate cookie crumbs can be used instead.
For the Cream Cheese Layer
| Ingredient | Quantity |
| Cream cheese, softened | 8 oz (225 g) |
| Powdered sugar | 1 cup |
| Whipped topping, thawed | 1 cup |
Make sure the cream cheese is properly softened before mixing. This helps create a smooth filling without lumps.
For the Chocolate Pudding Layer
| Ingredient | Quantity |
| Instant chocolate pudding mix | Two 3.9-oz boxes |
| Cold whole milk | 3 cups |
Use instant chocolate pudding rather than cook-and-serve pudding. Cold whole milk creates a rich and creamy pudding layer.
For the Topping
| Ingredient | Quantity |
| Whipped topping, thawed | 8 oz (225 g) |
| Chocolate chunks or toffee bits | 1 cup |
Chocolate shavings, mini chocolate chips, crushed chocolate cookies, or chopped nuts can also be used as toppings.
Step-by-Step Instructions
1. Prepare the Crust
Place the graham cracker crumbs in a medium mixing bowl.
Add the melted butter and granulated sugar. Stir thoroughly until all the crumbs are evenly coated and the mixture resembles wet sand.
The mixture should hold together when pressed between your fingers.
2. Form the Base
Transfer the crumb mixture to a 9 × 13-inch glass baking dish.
Using the bottom of a measuring cup, glass, or flat spatula, firmly press the crumbs into an even layer.
Pay particular attention to the corners so the crust remains compact when the dessert is sliced.
Place the dish in the refrigerator while preparing the cream cheese layer.
3. Prepare the Cream Cheese Layer
Add the softened cream cheese and powdered sugar to a large mixing bowl.
Beat until completely smooth and creamy.
Add 1 cup of thawed whipped topping and gently fold it into the cream cheese mixture until evenly combined.
Avoid overmixing once the whipped topping has been incorporated.
4. Add the Cream Cheese Layer
Remove the chilled crust from the refrigerator.
Carefully spoon the cream cheese mixture over the crust.
Spread it gently into an even layer using a spatula.
Try not to press too aggressively, as this can disturb the crust underneath.
Return the dish to the refrigerator while preparing the chocolate pudding.
5. Prepare the Chocolate Pudding
Pour the cold whole milk into a large bowl.
Add both packages of instant chocolate pudding mix.
Whisk continuously for approximately 2 minutes, or until the mixture becomes noticeably thick and creamy.
Allow the pudding to sit for another minute or two if necessary. It should be thick enough to spread without running.
6. Add the Chocolate Layer
Carefully spoon the chocolate pudding over the cream cheese layer.
Use a spatula to spread the pudding evenly from edge to edge.
Chill the dessert for approximately 10 minutes to allow this layer to firm slightly.
7. Add the Whipped Topping
Spread the remaining 8 oz of thawed whipped topping over the chocolate pudding.
Use a clean spatula to create a smooth, even surface.
For a decorative finish, you can create gentle swirls in the whipped topping.
8. Add the Chocolate Garnish
Sprinkle the crushed chocolate chunks or toffee bits evenly over the top.
You can use a combination of chocolate pieces and toffee for additional texture and flavor.
9. Chill Completely
Cover the baking dish and refrigerate the dessert for at least 4 hours.
For the best results, refrigerate it overnight.
This extended chilling time allows every layer to firm up, making the dessert much easier to slice cleanly.
10. Slice and Serve
For neat slices, use a sharp knife and wipe the blade clean between cuts.
For an especially clean presentation, chill the dessert overnight before slicing.
Serve cold and enjoy.
Best Tips for Perfect Chocolate Layer Dessert
Soften the cream cheese properly. Room-temperature cream cheese blends much more easily with powdered sugar and helps prevent small lumps from forming.
Use cold milk for the pudding. Cold milk helps instant pudding thicken properly and gives the chocolate layer a smooth consistency.
Don’t rush the chilling process. Although the dessert can technically be served after several hours, overnight chilling produces firmer, cleaner layers.
Press the crust firmly. A compact crust provides a sturdy base and helps prevent crumbs from scattering when you serve each slice.
Spread each layer gently. Use a light touch when spreading the cream cheese and pudding layers to keep the layers distinct.
Keep the dessert refrigerated. Because this dessert contains cream cheese, milk, and whipped topping, it should remain chilled until serving.
Best Ingredient Options
Graham Crackers
Traditional graham cracker crumbs provide a lightly sweet, buttery flavor. For a more intense chocolate dessert, substitute chocolate sandwich cookie crumbs.
Cream Cheese
Full-fat cream cheese gives the filling its richest texture. Reduced-fat cream cheese can work, but the finished layer may be slightly lighter and softer.
Whipped Topping
Prepared whipped topping makes this recipe quick and convenient. If preferred, stabilized homemade whipped cream can also be used.
Chocolate Pudding
Instant chocolate pudding is the easiest choice because it requires no cooking. For an especially rich flavor, use a chocolate fudge variety if available.
Toppings
Toffee pieces provide a caramel-like crunch, while chocolate shavings create a more elegant finish. Mini chocolate chips, chopped chocolate cookies, or finely chopped nuts can also work beautifully.
Recipe Variations
Chocolate Cookie Crust
Replace the graham cracker crumbs with finely crushed chocolate sandwich cookies for an extra chocolatey base.
Chocolate Peanut Butter Version
Add a thin layer of creamy peanut butter between the crust and cream cheese layer for a chocolate-peanut-butter combination.
Chocolate Mint Version
Add a small amount of mint flavoring to the cream cheese layer and finish the dessert with chocolate shavings.
Triple Chocolate Version
Use chocolate cookie crumbs for the crust, chocolate pudding in the center, and chocolate curls or mini chocolate chips on top.
Chocolate Caramel Version
Drizzle a small amount of caramel sauce over the chocolate pudding before adding the whipped topping, then finish with toffee pieces.
What to Serve With This Dessert
This rich chocolate dessert pairs beautifully with a cup of freshly brewed coffee.
For an extra indulgent serving, add a small scoop of vanilla ice cream alongside each slice.
Fresh strawberries or raspberries can also provide a bright, fruity contrast to the rich chocolate layers.
For special occasions, serve each slice with a light drizzle of chocolate or caramel sauce.
Make-Ahead Instructions
This is an excellent make-ahead dessert.
Prepare the entire dessert the day before serving, cover it tightly, and refrigerate overnight.
In fact, making it ahead of time often improves the texture because the layers have additional time to firm up.
If you’re preparing it for a party, add delicate garnishes shortly before serving for the freshest appearance.
Storage
Store leftover dessert covered in the refrigerator.
It is best enjoyed within approximately 3–4 days for the best texture and freshness.
Always keep the dessert refrigerated when it is not being served.
Can You Freeze No-Bake Chocolate Layer Dessert?
Yes, this dessert can be frozen, although the texture may change slightly after thawing.
For best results, freeze the dessert tightly covered and consume it within about 1 month.
Thaw it gradually in the refrigerator before serving.
The whipped topping may become slightly softer after freezing and thawing, so freezing is best reserved for leftovers or advance preparation rather than when the dessert’s presentation needs to be perfect.
How to Slice Chocolate Layer Dessert Neatly
For clean, attractive slices, make sure the dessert has been thoroughly chilled.
Use a sharp knife and dip the blade briefly in warm water. Wipe it completely dry before making each cut.
Make one firm downward cut rather than repeatedly sawing through the layers.
Wipe the knife clean between slices and repeat the process.
If the dessert seems too soft to slice cleanly, return it to the refrigerator for another 30–60 minutes before serving.
Common Mistakes to Avoid
Using softened rather than melted butter for the crust can leave the crumbs unevenly coated. Melted butter helps bind the crust together.
Using warm milk for the pudding can interfere with the desired thick consistency. Always use cold milk.
Using cook-and-serve pudding instead of instant pudding can change the consistency and preparation method significantly.
Skipping the chilling time can result in soft, messy layers that are difficult to slice.
Overmixing the whipped topping can reduce its light texture.
Pressing too hard while spreading the upper layers can disturb the cream cheese layer or crust.
Cutting the dessert immediately after preparation is one of the easiest ways to end up with messy slices. Give the dessert enough time to fully set.
Nutrition Estimate
Nutrition will vary depending on the specific brands and toppings used.
| Nutrient | Estimated Amount Per Serving |
| Calories | 400–450 |
| Carbohydrates | 50–55 g |
| Protein | 5–7 g |
| Fat | 20–24 g |
| Saturated Fat | 10–13 g |
| Sugar | 32–38 g |
| Fiber | 1–2 g |
| Sodium | 300–400 mg |
These values are estimates and should be used only as a general guide.
Frequently Asked Questions
Why is my chocolate layer dessert too soft?
The most common reason is insufficient chilling time. Refrigerate the dessert for at least 4 hours, preferably overnight, to allow the layers to firm properly.
Can I make chocolate layer dessert the night before?
Yes. Making it the night before is actually recommended. Overnight refrigeration gives the layers plenty of time to set and makes slicing easier.
How do I get clean slices?
Chill the dessert thoroughly, use a sharp knife, and wipe the blade between cuts. A slightly warmed and dried knife can also help produce cleaner layers.
Can I use chocolate cookies instead of graham crackers?
Absolutely. Finely crushed chocolate sandwich cookies make an excellent alternative and create a richer chocolate crust.
Can I use homemade whipped cream?
Yes, provided it is stabilized enough to maintain its structure. Regular unstabilized whipped cream may become softer during refrigeration.
Can I use low-fat milk?
Whole milk provides the richest texture, but other milk varieties can work with instant pudding. The final consistency and richness may vary.
How long does chocolate layer dessert last in the refrigerator?
For the best quality, enjoy it within approximately 3–4 days while keeping it covered and refrigerated.
Can I freeze this dessert?
Yes. Wrap it tightly and freeze for up to about 1 month. Thaw it slowly in the refrigerator before serving.
What is Chocolate Lasagna?
Chocolate Lasagna is a no-bake layered dessert traditionally made with a cookie or graham cracker crust, a sweet cream cheese layer, chocolate pudding, whipped topping, and chocolate or other crunchy garnishes.
Final Thoughts
This Ultimate No-Bake Chocolate Layer Dessert is proof that an impressive dessert doesn’t have to be complicated.
With a buttery crust, creamy sweet cheese layer, rich chocolate pudding, and fluffy whipped topping, every layer brings something delicious to the finished dessert.
The best part is that there’s no oven required. Simply assemble the layers, refrigerate until firm, add your favorite garnish, and slice.
Whether you’re preparing dessert for a holiday gathering, family dinner, potluck, birthday celebration, or weekend treat, this easy chocolate dessert is sure to be a crowd-pleaser.
⚠️ This recipe may not be suitable for everyone. If you have specific dietary concerns or allergies, check the ingredients carefully and consult a qualified healthcare professional when appropriate.