
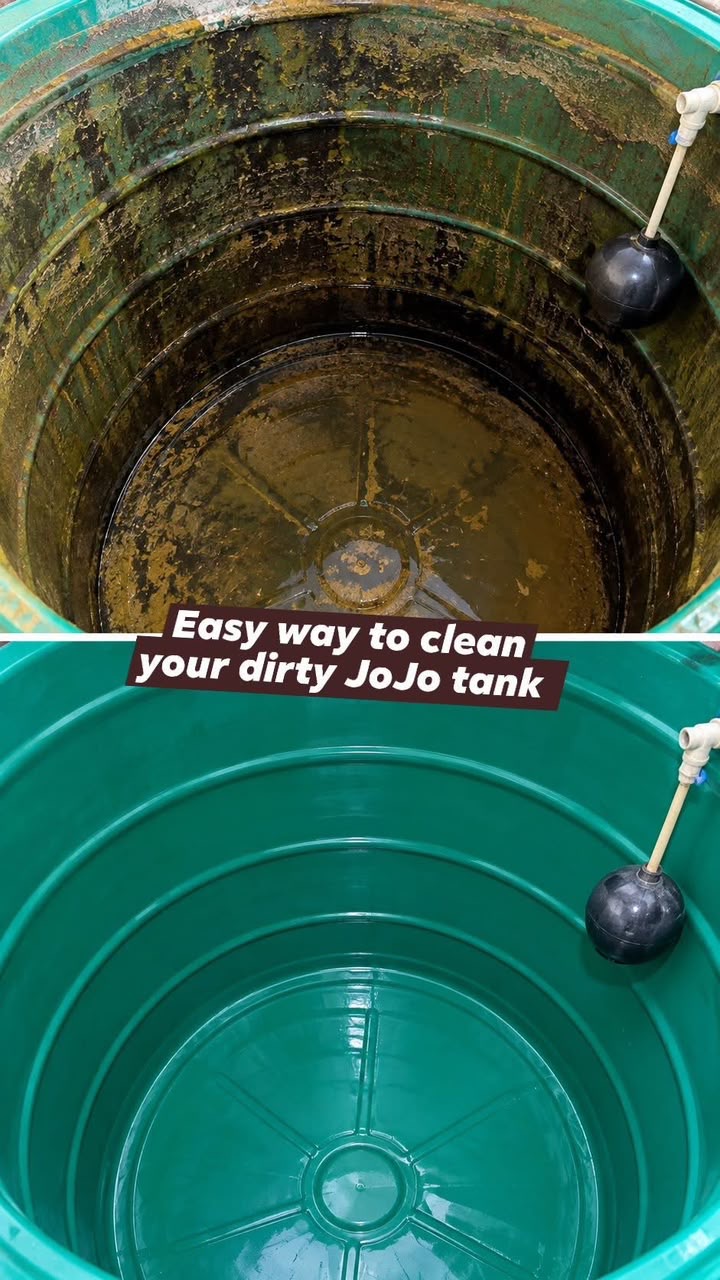
Keeping your water storage tank clean is essential for maintaining good water quality and preventing dirt, sediment, algae, and other unwanted buildup. Over time, water tanks can accumulate deposits on their interior walls, especially when they are exposed to sunlight or are not cleaned regularly.
This simple water tank cleaning method uses basic cleaning equipment, a suitable cleaning solution, and clean water to help remove accumulated dirt and residue.
Whether you have a JoJo-style plastic water tank or another compatible storage tank, regular maintenance can help keep your water storage system cleaner and in better condition.
Cleaning Overview
| Details | Information |
| Preparation Time | 10–15 minutes |
| Cleaning Time | 30–60 minutes |
| Rinsing Time | 10–20 minutes |
| Total Time | Approximately 50–95 minutes |
| Difficulty | Moderate |
| Cleaning Method | Manual scrubbing and rinsing |
| Suitable For | Compatible plastic water tanks |
Why You’ll Love This Cleaning Method
This cleaning method is straightforward and does not require complicated equipment. A long-handled brush, clean water, and an appropriate tank-cleaning product are enough to remove many types of accumulated dirt.
Regular cleaning also helps prevent excessive sediment buildup and makes it easier to inspect the condition of your water storage tank.
Materials Needed
| Material | Quantity | Purpose |
| Clean water | As needed | Rinsing the tank |
| Long-handled soft brush | 1 | Scrubbing interior walls |
| Non-abrasive sponge | 1 | Cleaning accessible surfaces |
| Potable-water-safe cleaning solution | According to label | Removing dirt and deposits |
| Clean bucket | 1 | Preparing and collecting cleaning water |
| Protective gloves | 1 pair | Protecting your hands |
Important: If the tank stores drinking water, use only products specifically approved for cleaning potable-water storage tanks. Never use ordinary household detergents or scented cleaning products unless their use is explicitly approved for this purpose.
Step-by-Step Instructions
Step 1: Empty the Water Tank
Turn off the water supply connected to the tank.
Drain the remaining water through the designated outlet or drain valve. Remove as much residual water as possible before beginning the cleaning process.
Never enter a water storage tank yourself. Confined spaces can present serious risks, including oxygen deficiency and difficulty escaping.
Step 2: Inspect the Interior
Once the tank is empty, inspect the accessible interior surfaces for sediment, algae, discoloration, and accumulated dirt.
Check the walls, bottom, corners, and outlet area for visible deposits.
Step 3: Scrub the Interior Walls
Use a long-handled, soft-bristled brush or a suitable non-abrasive sponge.
Gently scrub the interior surfaces to loosen sediment, algae, and dirt.
Pay particular attention to corners and the bottom of the tank, where deposits often accumulate.
Avoid metal brushes and harsh abrasive tools that could scratch or damage the plastic lining.
Step 4: Apply an Appropriate Cleaning Solution
If additional cleaning is necessary, use a product specifically approved for the tank material and intended water use.
Follow the manufacturer’s dilution instructions and recommended contact time.
Do not combine different cleaning chemicals, especially bleach, acids, ammonia, or household detergents.
Step 5: Rinse Thoroughly
Rinse all interior surfaces with clean water.
Remove loosened dirt and cleaning-product residue completely. Continue rinsing until the water draining from the tank is clear and no cleaning residue remains.
Step 6: Drain the Dirty Water
Allow the rinse water to flow out through the designated bottom outlet or drain valve.
Remove any remaining water and loose sediment without entering the tank.
Step 7: Disinfect When Necessary
If the tank is used for drinking water, cleaning alone may not be sufficient.
Disinfect the tank using a product specifically approved for potable-water storage, following the manufacturer’s instructions or local public-health guidance.
Respect the required concentration and contact time, then rinse if the product instructions require it.
Step 8: Refill the Tank
Close the drain valve, inspect the connections, and refill the tank with water from a safe source.
If the tank supplies drinking water, follow local water-safety recommendations before using the water for consumption.
Best Tips for Effective Water Tank Cleaning
Clean your tank regularly according to the manufacturer’s recommendations and local water-quality requirements.
Use soft cleaning equipment to protect the plastic surface, and pay special attention to the bottom of the tank, where sediment tends to collect.
Keep the tank securely covered to reduce contamination from dust, insects, leaves, and sunlight.
Best Cleaning Product Options
Choose a cleaning product specifically designed for water storage tanks and approved for the intended use.
For tanks storing drinking water, the product must be suitable for potable-water systems.
Avoid scented detergents, general-purpose household cleaners, and unapproved chemicals that may leave residues or contaminate the water.
Water Tank Cleaning Variations
For light sediment buildup, mechanical cleaning with a suitable brush and clean water may be sufficient.
For algae or persistent contamination, use an approved cleaning and disinfection procedure based on the tank manufacturer’s instructions and local public-health recommendations.
Different tanks may require different cleaning procedures depending on their material, size, and intended use.
What to Clean During Tank Maintenance
During routine maintenance, inspect and clean accessible areas such as the interior walls, tank floor, outlet area, lid, and external connections.
Also check the inlet screen, overflow pipe, and drainage system for blockages or damage.
Make sure the tank cover fits securely to help prevent future contamination.
Make-Ahead Instructions
Prepare all cleaning equipment and the approved cleaning product before draining the tank.
Check that you have enough clean rinse water available to complete the process properly.
For larger tanks, plan the cleaning when water demand is low so the household or building has enough alternative water available.
Storage and Maintenance
Once cleaned and refilled, keep the tank closed and protected from external contamination.
Inspect it periodically for leaks, damaged covers, unusual odors, discoloration, or visible sediment.
Follow the cleaning frequency recommended by your tank manufacturer and local water authority.
Recleaning and Rinsing
If dirt remains after the first scrubbing, repeat the mechanical cleaning process.
Always rinse thoroughly after using an approved cleaning product, following its specific instructions.
Do not refill the tank for drinking-water use until the cleaning and disinfection procedure has been completed correctly.
Common Mistakes to Avoid
Never enter a water storage tank to clean it. Avoid using metal brushes or sharp tools that can damage plastic surfaces.
Do not use ordinary household cleaning products inside a drinking-water tank unless they are specifically approved for potable-water applications.
Never mix bleach with vinegar, acids, ammonia, or other cleaning chemicals because dangerous gases or reactions may occur.
Finally, do not neglect disinfection when the tank has been contaminated or when public-health guidance requires it.
Frequently Asked Questions
How often should a water storage tank be cleaned?
Cleaning frequency depends on the tank’s use, water quality, and local recommendations. Inspect it regularly and follow the manufacturer’s maintenance guidance.
Can I clean a JoJo tank myself?
Basic maintenance may be possible using suitable external equipment, but large tanks and tanks requiring entry or specialized disinfection should be handled by trained professionals.
Can I use dish soap to clean a drinking-water tank?
Ordinary dish soap is not recommended unless the product is specifically approved for potable-water storage systems. Residues may affect water quality.
How do I remove algae from a plastic water tank?
Start by emptying the tank and mechanically removing the deposits with an appropriate soft brush. Follow with an approved cleaning and disinfection procedure.
Is rinsing enough to make the water safe to drink?
No. Rinsing removes cleaning residues and loosened dirt, but it does not necessarily disinfect the tank. Use an approved disinfection procedure when necessary.
Can I use bleach inside a water tank?
Only use a suitable product specifically labeled for potable-water tank disinfection, and follow the exact dosage, contact time, and rinsing instructions. Never mix bleach with other cleaning products.
How can I prevent algae from growing inside my tank?
Keep the tank properly covered, prevent sunlight from entering, maintain clean inlet screens, and inspect the tank regularly.
Final Thoughts
Cleaning your water storage tank is an important part of maintaining a clean and reliable water supply.
With the right brush, suitable cleaning products, thorough rinsing, and proper disinfection when required, you can help reduce sediment buildup and maintain better tank hygiene.
Always follow the manufacturer’s instructions and local drinking-water safety recommendations to ensure that your water storage system remains suitable for its intended use.